
Creating Excel drop down lists, or Data Validation Lists as they're formally known, enables you to control the value entered into a specific cell by limiting the choices to those on a pre-defined list.
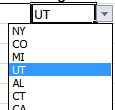
Excel validates that the entry in the cell matches an item from your pre-defined list, or you can simply click on the down arrow to select from an item in the list.
Watch the Video

Download the Excel File
Enter your email address below to download the sample workbook.
How to create an Excel drop down list
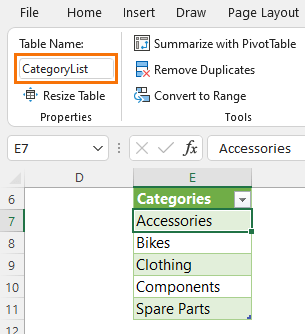
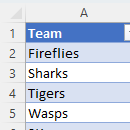
1) You first need to store the items that will appear in your list somewhere in your worksheet. Ideally in an Excel Table so that if you add new items, they will automatically be included in the drop down list (more on that in a moment).
2) Select the cell or range of cells you want validated.
3) Go to the Data tab of the ribbon in the Data Tools section click on ‘Data Validation’. You’ll get a dialog box like this:
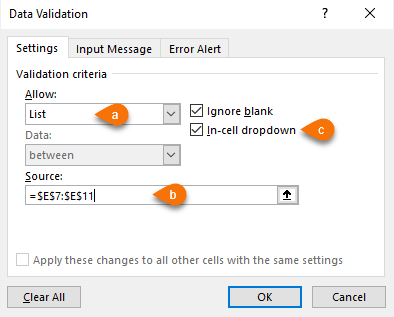
a) From ‘Allow:’ choose ‘List’.
b) In the source box enter the cell range that your list is in by selecting them with your mouse.
c) Make sure ‘In-cell dropdown’ is checked.
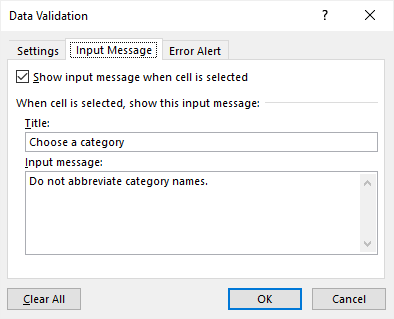
4) On the ‘Input Message’ tab you can enter a message that will appear when the user selects the cell. This is to give the user guidance as to what you want them to do. For example, mine simply says, ‘Choose a category’ in the title and 'Do not abbreviate category names' in the Input Message.
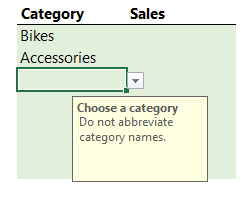
When the user select a cell containing a drop down list, the input message automatically appears:
5) The last tab is ‘Error Alert’. Here you can define the message you want displayed if the user tries to enter something that isn’t on the list.
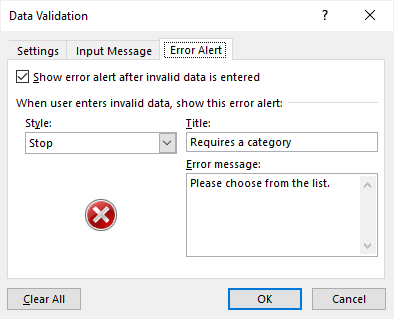
There are three styles of Error Alert you can choose from. Stop, as you see above, Warning, or Information. Simply pick the one you want from the ‘Style’ list.
That's it. You're good to go.
Automatically Update Drop Down Lists
If your data validation drop down list source data is in an Excel Table in the same sheet as your drop down lists, then your lists will automatically pick up any new items added to the source data table. Job done!
However, if your source data is in a different worksheet to your drop down lists, you will need to define a name for the items in the table. See video.
Note: an update was released to Excel 365 that allowed source tables on other sheets to automatically update as though it was on the same sheet as the drop down lists, however this update was rolled back. It may come back in the future, but there's no guarantee.
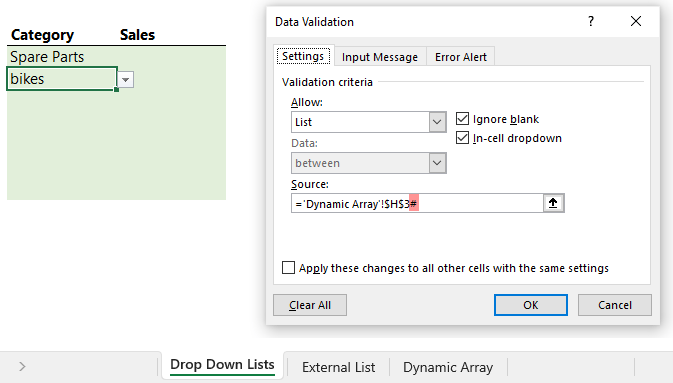
If you have Excel 2021 or Microsoft 365, you can use dynamic array formulas to extract a list of unique items for your list, and then reference the spilled range using the spilled array operator like so:
See video for step by step instructions.
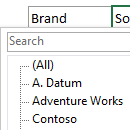
Searchable Drop Down Lists
Searchable drop down lists are coming to Excel for the desktop, but in the meantime you can save your file to OneDrive or SharePoint and open it in Excel Online to get searchable drop down lists (see video for demo):
Tip: Get a free OneDrive account here.
There are a load of other benefits to working in Excel Online, like tracking changes, real-time file sharing and co-authoring to name two. Check them out here:
Related Data Validation Drop Down List Lessons
Data validation lists are super useful. Below are just some of the tutorials I've used them in:
Excel Tables as Source for Data Validation Lists
Excel Data Validation With Dependent Lists
Custom Data Validation to Limit Entries
Automatically Add Items to Data Validation List
Dynamic Dependent Data Validation
Excel Combo Box KO’s Data Validation
Ignore Blanks in Data Validation List
Selecting Multiple Items in Data Validation List


BJ Anderson
hello,
General list question: I have a long list of items (400) sorted a-z and would like to hit “S” on keyboard and jump to the words that begin with s instead of using the mouse and scrolling down through the entire list. This exists in other programs we use but can it be done in excel?
Thank you so much. I know if anyone can answer this, YOU can.
Mynda Treacy
Hi BJ,
Searchable drop down lists are only available in Excel Online or with a Microsoft 365 license, sorry.
Mynda
Michael Saul
I can create dropdowns in Excel, no problem… However, I have a need to create the following scenario:
I have two lists (an ID, and a Value). I need to have those two lists “linked” so that if I select ID number “10”, the other column will automatically select the matching value (“Test10” for example). Likewise, if I select “Test20” from the values list, the ID column automatically selects “20”.
Is thatpossible?
Philip Treacy
Hi Michael,
Have you seen these blog posts:
https://www.myonlinetraininghub.com/dynamic-dependent-data-validation
https://www.myonlinetraininghub.com/excel-data-validation-with-dependent-lists
https://www.myonlinetraininghub.com/excel-dependent-data-validation
Regards
Phil
Colin Williams
I think your website needs an update as some of the info is not correct
For example, instead of my reference being =$C$1:$C$7 it would be =’Legends’!$C$1:$C$7. Unfortunately you have to type this into the Source box, you can’t use your mouse to select the sheet with the cells containing your list as described in step 5 above.
Actually you can use the mouse !
Mynda Treacy
Thanks, Colin! Updated 🙂
Nikhil Narwade
Hi,
I am using 3 combobox and each CB are dependent on each other. So, if I select data in any one of then then the data in other two CB should get updated.
In my code when I select CB1 then CB 2 is getting updated. But going ahead when I select CB 2 then on the basis of CB 1 and CB 2 the data in CB 3 should get updated.
Below is the code –
******************************************************
Private Sub ComboBox1_Change()
Dim rng As Range
Dim r As Range
Dim Dic As Object
Dim sh As Worksheet
Dim ws As Worksheet
Dim i As Integer
Dim cb As ComboBox
Dim ar As Variant
Set sh = Sheet2 ‘Calc Sheet
Set ws = Sheet3 ‘List Sheet
ar = Array(“All Sub Categories”, “All Grades”)
Application.EnableEvents = False
Set rng = ws.Range(“A2”, ws.Range(“A” & Rows.Count).End(xlUp))
Set Dic = CreateObject(“scripting.dictionary”)
Dic.CompareMode = vbTextCompare
Set sh = Sheet2
For Each r In rng
If r = ComboBox1 Then
Dic(r.Offset(, 1).Value) = Empty
End If
Next
With ComboBox2 ‘Add data to the comboboxes
.List = Application.Transpose(Dic.keys)
.AddItem “All Categories”, 0
.ListIndex = 0
End With
‘Add to cb 3 & 4
For i = 3 To 4
Dic.RemoveAll
For Each r In rng
If r = ComboBox1 Then
Dic(r.Offset(, i – 1).Value) = Empty
End If
Next
Set cb = Sheet1.Shapes(“ComboBox” & i).OLEFormat.Object.Object
With cb ‘Add data to the comboboxes
.List = Application.Transpose(Dic.keys)
.AddItem ar(i – 2), 0
.ListIndex = 0
End With
Next i
For i = 1 To 4 ‘Loop through the comboboxes
Set cb = Sheet1.Shapes(“ComboBox” & i).OLEFormat.Object.Object
‘sh.Activate
‘sh.Cells(2, i + 1).Select
sh.Cells(2, i + 1) = cb.Value
Next i
Application.EnableEvents = True
End Sub
Private Sub ComboBox2_Change()
Dim rng As Range
Dim r As Range
Dim Dic As Object
Dim i As Integer
Dim cb As ComboBox
Dim sh As Worksheet
Dim ws As Worksheet
Set sh = Sheet2 ‘Calc Sheet
Set ws = Sheet3 ‘List Sheet
Application.EnableEvents = False
Set rng = ws.Range(“B2”, ws.Range(“B” & Rows.Count).End(xlUp))
Set Dic = CreateObject(“scripting.dictionary”)
Dic.CompareMode = vbTextCompare
If ComboBox2 = “All Categories” Then
For Each r In rng
Dic(r.Offset(, 1).Value) = Empty
Next
Else
‘Only items that relate to Combo 2
For Each r In rng
If r = ComboBox2 Then
Dic(r.Offset(, 1).Value) = Empty
End If
Next
End If
With ComboBox3 ‘Add data to the comboboxes
.List = Application.Transpose(Dic.keys)
.AddItem “All Sub Categories”, 0
.ListIndex = 0
End With
Dic.RemoveAll
‘Only items that relate to Combo 2
For Each r In rng
If r = ComboBox2 Then
Dic(r.Offset(, 2).Value) = Empty
End If
Next
With ComboBox4 ‘Add data to the comboboxes
.List = Application.Transpose(Dic.keys)
.AddItem “All Grades”, 0
.ListIndex = 0
End With
sh.[c2] = ComboBox2.Value
Application.EnableEvents = True
End Sub
Private Sub ComboBox3_Change()
Dim rng As Range
Dim r As Range
Dim Dic As Object
Dim sh As Worksheet
Dim ws As Worksheet
Set sh = Sheet2 ‘Calc Sheet
Set ws = Sheet3 ‘List Sheet
Application.EnableEvents = False
Set rng = ws.Range(“C2”, ws.Range(“C” & Rows.Count).End(xlUp))
Set Dic = CreateObject(“scripting.dictionary”)
Dic.CompareMode = vbTextCompare
If ComboBox3 = “All Sub Categories” Then
For Each r In rng
Dic(r.Offset(, 1).Value) = Empty
Next
Else
‘Only items that relate to Combo 3
For Each r In rng
If r = ComboBox3 Then
Dic(r.Offset(, 1).Value) = Empty
End If
Next
End If
With ComboBox4
.List = Application.Transpose(Dic.keys)
.AddItem “All Grades”, 0
.ListIndex = 0
End With
sh.[D2] = ComboBox3.Value
Application.EnableEvents = True
End Sub
Private Sub ComboBox4_Change()
Dim sh As Worksheet
Set sh = Sheet2 ‘Calc Sheet
Application.EnableEvents = False
sh.[E2] = ComboBox4.Value
Application.EnableEvents = True
End Sub
*********************************************************************
Philip Treacy
Hi Nikhil,
I cant’t use this code without your workbook. Please start a topic n the forum and attach it.
Regards
Phil
Uche Uche
This is the best explanation I really understand in the creating of dropdown list. It can be on the same worksheet also.
Thanks.
Mynda Treacy
Glad we could help!
suresh karnani
hello .. i want to create a custom validation where i need to input 15 Alphanumeric digits only ( indian GST no ) – can u guide how can i do this please …. me struggling on this
Philip Treacy
Hi Suresh,
I’m not sure what else I can add to what is already in this blog post. A full explanation of what you need to do is here.
Have you tried following these steps? Have you received some sort of error?
Regards
Phil
Peter Buyze
Mynda, good tutorial, as usual with your tutorials 🙂
I have a table as well as a list for the drop-down on the same sheet, though separated by an empty column.
Both are Excel Tables. I followed you
I gave the drop-down list a Name, but when I then click on the arrow in a cell to choose from the list, I get presented with the Name only. Clicking on that just adds the Name to the cell.
So what am I doing wrong?
Catalin Bombea
Hi Peter,
Put an = sign before the name, in the Source field. For a static list, you can manually type any comma separated text, like: Yes,No,Other to create a dropdown with those 3 values.
Cheers,
Peter Buyze
Hi Catalin, thanks for your reply, and apologies for not answering yesterday but I was a bit tied up.
I tried what you suggested with the = sign, but Excel does not accept that, and displays a message:
We found a problem with this formula.
So I looked at this again & tried to use the drop-down list, converted to a table, but without naming it. That works.
Catalin Bombea
Hi Peter,
Looks like the formula used in that name was wrong. You can always upload a sample file on our forum, without a file it’s hard to see what is wrong.
Catalin
Steve
Hi Mynda,
Great lesson. I think I found another way to do dynamic drop down lists:
A. make the list
B. make the list a table
C. in the validation source, type =Tablename[fieldname]
Now whenever a row is added, the new entry automatically shows up in the list.
Mynda Treacy
Hi Steve,
Almost, you can’t use Structured References in the data validation list source, but if you simply reference the table (with your mouse) it will behave dynmically. Alternatively you can create a named range which uses your Table’s Structured References and use that named range in your data validation list source.
Mynda
sara
Hi. Great lesson. I have created a number of tables for my drop down lists and used named ranges. Initially this was great as every time I added a new row, the lists were there. However, now when I add a new row, when I get to my first 2 lists, they are not there, but all the other further down the row are??!!! I cant work out why as I have used the same structure for all the lists. Any suggestions?
cheers Sara
Mynda Treacy
Hi Sara,
Glad you liked the lesson on Drop Down Lists.
As for your question; I’d have to see the file to know what the problem is. You can send it to my via our Help Desk.
Cheers,
Mynda
Tim Stacy
Hi,
I have a list of vendors and products in tabular format (duplicate vendor name and duplicate products). I want the user to select the vendor from a data validation list and then the corresponding products associated with the vendor. The vendor list and product list are in column A and B respectively (side by side).
I don’t want to create a named range for every vendor/product combination. Is there a method to only show distinct vendors and their corresponding products (without VBA and without me going crazy?)
Many thanks,
Tim
Catalin Bombea
Hi Tim,
You can create dependent data validation lists, you have examples here: excel-data-validation-with-dependent-lists
and here: excel-factor-19-dynamic-dependent-data-validation
Catalin
Anna
Hey, I’ve downloaded the Workbook for this, and I noticed that this List data validation is NOT case-sensitive. In other words, using the Workbook’s example, a person can of course (not only) choose from drop down list the option of Bat Man, (but also) type in the cell Bat Man, (and also) type in the cell bat man (notice lower case) but that last one IS accepted, although bat man in lowercase form is NOT in the defined list.
How do we specify that so it IS case sensitive?
Or how do we use List and UPPER (or simply, more than one “checkpoint”) together for one cell as data validation?
Thanks,
Anna
Catalin Bombea
Hi Anna,
Excel dropdowns are quite rigid, there are many missing facilities, like changing the font size, autocomplete functionality (this works only if upper cells contains the word you are typing, so it’s not a drop down functionality, it’s the normal excel behaviour). This is the built-in functionality of drop down lists, and cannot be changed.
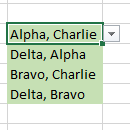
The only way i know to make a drop down list case sensitive, is to type your list directly into the Source field in the data validation menu, comma separated: From Data Validation Menu, Allow: List, Source: YeS,No
You will be able to select YeS, and to type YeS, but if you type “yes” or “Yes”, this will not be accepted, so it’s case sensitive…
Catalin
Anna
it worked! thanks Catalin. This is the best website ever.
Catalin Bombea
You’re wellcome 🙂
Anna
Hey Catalin,
This may be a stupid question but is there a way to have excel take an input such as “Kg” or “kg” or “kG” and auto-convert it to “KG”? It may not be a data validation function anymore?
Thanks!
Anna
Catalin Bombea
There is no way that i know to autoconvert to uppercase, only VBA can do that…
Spencer Lui
Is there a way I can just type the first or few characters in the validation cell and the drop down list will point to the data that I want?
Thank you and regards.
Mynda Treacy
Hi Spencer,
No, unfortunately data validation lists don’t auto-complete.
Kind regards,
Mynda
Kevin Pombriant
Using Debra Dalgleish’s Data Validation with Combo box you can have auto complete.
K.
Mynda Treacy
Thanks Kevin. Do you have a link for that?
Ashraf
Dear Mynda,
Hope you are having a pleasant day….
this lesson was very awesome, i like your way and i got all the point, but also we can can create Dynamic Drop list as the following:
– In the source box enter the criteria that your want like (Ashraf,Mynda,…..
Thank you
Ashraf
Catalin Bombea
Hi Ashraf,
I’m glad you liked this lesson!
You are right, values can be entered directly in source field, separated by commas, your observation is very useful, thank you for this.
The only thing i must add to your method, is that the values must be typed without parenthesis.
Best Regards,
Catalin
jayaseelan
one of the best tutorial, easy to understand i really like the way u explained each example.
Mynda Treacy
Thanks, Jayaseelan 🙂
Purnima
Hi Mynda,
Thanks for such great tips, this page is really helpful! I am stuck with a drop down list that has a lot of values just listed as REF!(maybe because I deleted values from a sheet the list was referenced from? I did not create the sheet and am pretty new at this). Is there a way I can get the REF! to go away so I have a cleaner drop down menu?
Regards,
Purnima.
Mynda Treacy
Hi Purnima,
Thanks for your kind words. To remove the REF erros go to the data validation list source and remove them. To find the source select the cell containing the drop down list > Data tab of ribbon > Data Validation.
I hope that helps.
Kind regards,
Mynda.
Kellie
I am trying to create a drop down that has pictures to select and then after that selection has been made, the next 2 columns automatically fill-in with text corresponding. I need to be able to repeat in multiple rows. Any ideas?
Mynda Treacy
Hi Kellie,
Sorry, I’m not aware of being able to set up a data validation list that displays pictures instead of text.
Kind regards,
Mynda.
Eduard Hetzel
Hi Mynda
I’m still enjoying you’re tips and tricks, so Keep on!
Now I have a small problem with my drop down lists:
On one of my tables the drop down arrows (the arrows to open the list next to the cell) do not show anymore??
It must be something stupid, but I can’t find out what it is.
You have any idea?
regards
Eduard
Mynda Treacy
Hi Eduard,
Thanks for your kind words 🙂
If your drop down lists no longer display the down arrows then they’re no longer drop down lists. I would select the cell you’re expecting to contain a drop down list and open the Data Validation dialog box (Data tab of ribbon > Data Validation) and see if the validation criteria is set to your list. I suspect it’s no longer set to your list.
If that’s not the problem it’s probably best if you send me your file so I can take a look.
Kind regards,
Mynda.
Eduard Hetzel
Hi Mynda
This is just to give details on the solution.
Since the file was an Excel 2003 template, an somehow had a bug in it. Mynda mentioned, that I try to save the file as an “Excel-Macro-Enabled-Template (*.xltm)”, and the working files as “Excel-Macro-Enabled-Workbooks (*.xlsm)”. The result was, that my drop downs work again, and I just hope that all my users of the file have upgraded to at least 2007 Excel level by now.
It is just great how we can work – I ask a question here in Switzerland during my lunch break, and before the break is finished Mynda sent me the possible solutions from the other side of the world.
Thank you and kind regards
Eduard
Mynda Treacy
Hi Eduard,
Thanks for taking the time to give your update.
Cheers,
Mynda.
Kaveh
Does anyone know how to create a drop down list on excel with “all that applly” functionality? Essentailly when more than one option could be chosen from the list.
Mynda Treacy
Hi Kaveh,
You can do it with VBA. Select multiple items from a data validation list
Kind regards,
Mynda.
Deb Morrissey
I have a spreadsheet where the first column dropdown determines the second column dropdown but when the first column choice is changed the second column choice remains the same until the column is selected and changed. Is there a way to highlight and alert the user that the choice is no longer valid?
Ex –
A2 is vegetable B2 is carrot
you change A2 to fruit but B2 remains at carrot until you select it and change the selection.
Let’s say you are distracted and don’t change it, I would like it to be highlighted to show that it is invalid. Is there a way to do that?
Carlo Estopia
Hi Deb,
You can use formula formatting here.
1 Go to Home Ribbon
2 Click Conditional Formatting
3 Click New Rules
4 “Use a formula to determine which cells to format”
5 Enter this Formula
=A2<>B2
6 Format your fill to a color you like
7 Click OK
8 In the Applies to box select the range where you want
your rules to apply
Read More: Conditional Formatting
Cheers,
CarloE
Ajay Jangral
Hi.
I have created a list containing few name, it works well, but when I am trying to use that list as reference in another cell, only the name selected in first cell is displayed and the second cell will not show the complete dropdown list, it show a single name selected in the first cell. Please assist me how I can use that list it without copy & Past option.
Mynda Treacy
Hi Ajay,
Are you saying you want to use the same list in another location? If so, just insert another data validation list, or copy and paste the original one to the new location.
If I’ve misunderstood please send me the file with specific information on what you’re tyring to do and where.
Kind regards,
Mynda.
Ajay Jangral
Hi.
I have created a list, by the option cut and paste, it works fine. But I don’t want to do it in this way. I Want to use the reference of the list created for creating another list so that it will provide the same option, as with the case of cut and copy.
thanks.
Ajay.
Mynda Treacy
Hi Ajay,
I’m not sure I fully understand, but perhaps Copy and Paste Special > Links is what you’re looking for?
Kind regards,
Mynda.
Brett
I have a spreadsheet where the first column dropdown determines the second column dropdown but when the first column choice is changed the second column choice remains the same until the column is selected and changed. Is there a way to highlight and alert the user that the choice is no longer valid?
Ex –
A2 is vegetable B2 is carrot
you change A2 to fruit but B2 remains at carrot until you select it and change the selection.
This example was previously posted but Is there a way to blank out all selections in the dependent drop down list when opening the spreadsheet so there is no legacy selections?
Mynda Treacy
Hi Brett,
You would have to use VBA to clear invalid selections upon opening the file.
You could use Conditional Formatting to highlight, or make the font white (so it’s not visible), if the second column is of the wrong category.
I hope that gives you some ideas. Let us know if you get stuck.
Kind regards,
Mynda
richard
How can I set the number of lines in the drop-down list?
Carlo Estopia
Hi Richard,
I didn’t quite get what you mean by ‘number of lines’.
So I’m guessing you want to ignore blanks or some kind of dynamic
data validations.
Dynamic Range/Dynamic Data Validations
Cheers,
CarloE
PS: Please clarify further about what you mean by ‘number of lines’. I have a hunch however that It can’t be
done. Please send your file , if any, to help desk.
paul
Thanks a lot. you relly help
Carlo Estopia
Hi Paul,
On behalf of Mynda and Philip,
You’re Welcome!
CHeers.
CarloE
PAUL
Have you ever heard of the ability to have a Search Assist in an Excel dropdown list? Is there a formula that you know of?
Best regards,
Paul
RAVI XAVIER
THANK YOU VERY MUCH SIR THIS USEFUL SHARING.
Mynda Treacy
You’re welcome, Ravi 🙂
NeMarr
Really helpful, but despite making pick list values absolute, the list of options diminishes by one as you travel down each row in the sheet- any idea how this can be rectified?
Mynda Treacy
Hi Neil,
I don’t know why you’re having that problem. It doesn’t diminish by one for me. If you would like to send me your example file I’d be happy to take a look.
Kind regards,
Mynda.
Fredy
Thanks so much! May I ask “What is the Keyboard short cut for activating a chart in Excel?”
Mynda Treacy
Hi Fredy,
Sorry, I don’t know a shortcut for that. I know that to insert a chart you can use F11. Please let me know if you find it.
Cheers,
Mynda.
turab
Good it was well written and explained. – Have already joined you member group to remain active and informative.
Mynda Treacy
Thanks Turab 🙂