If your work involves capturing and organizing information but you don’t have the budget (or the need) for a full-blown SQL database, Excel can do the job for you. With a bit of setup, you can create an automated, searchable database that saves you time, reduces errors, and simplifies your workflow.
In this guide, I’ll walk you through building a professional Excel system step by step. You’ll also get the full working template free so you can use it straight away or customize it to suit your exact needs.
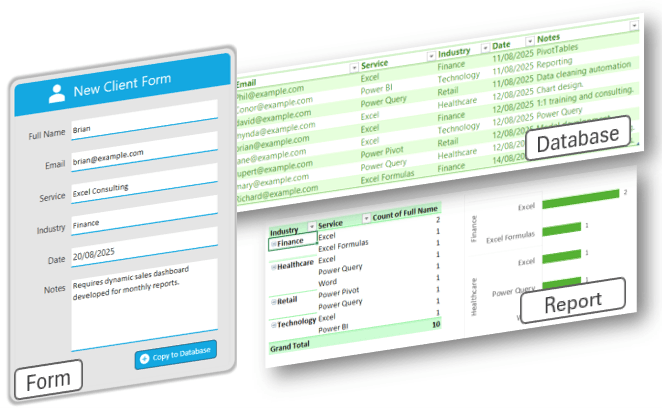
Table of Contents
- Watch the Video
- Get the Free Excel Database Template
- Why Build a Database in Excel?
- Step 1: Create the Client Form
- Step 2: Build the Database
- Step 3: Automate Data Entry with Office Scripts
- Step 4: Add Duplicate Checks in the Form
- Step 5: Protect the Form
- Step 6: Analyze Your Data
- Recap: What We Built
- Take Your Skills Further
Watch the Video

Get the Free Excel Database Template
You don’t have to build it from scratch. Grab the free working template I used in this tutorial:
Enter your email address below to download the free file.
Why Build a Database in Excel?
Most of us already use Excel for lists, reports, and analysis. But with a few smart tricks, Excel becomes more than just a spreadsheet: it turns into a structured database.
This setup works for all kinds of tasks:
- Client management
- Inventory tracking
- Expense tracking
- Employee information
- Project management
- …and more
The key is to build three components:
- A data entry form
- A structured database
- A little automation to tie them together
Step 1: Create the Client Form
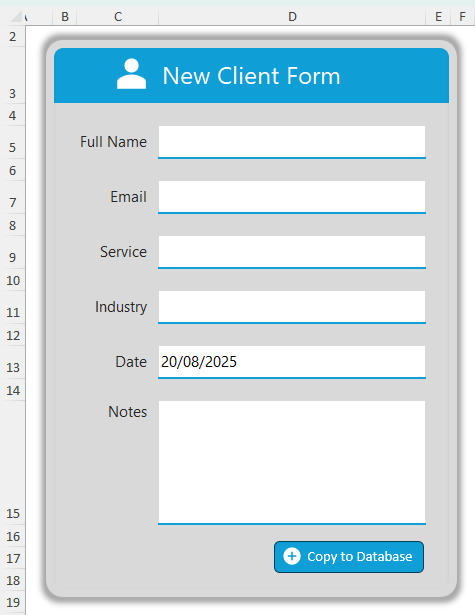
We’ll start with a clean workbook and add a sheet called Client Form. This is where users will enter information.
Add the following fields:
- Full Name
- Service
- Industry
- Date
- Notes
Some key touches to make the form easy to use (see the video for step by step instructions):
- Data validation: add a dropdown list for Industry (e.g. Education, Finance, Healthcare, Retail, Technology).
- Date field: use the TODAY function: =TODAY() so today’s date is automatically inserted.
- Formatting: use shapes like rounded rectangles, icons, and turn off gridlines to make it look like a real form.
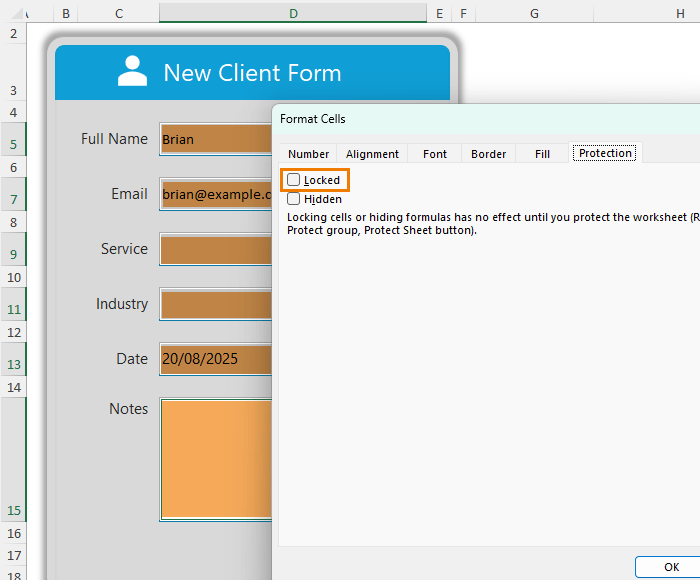
- Unlocked cells: use worksheet protection to unprotect only the input cells so users can tab smoothly between fields.
Step 2: Build the Database
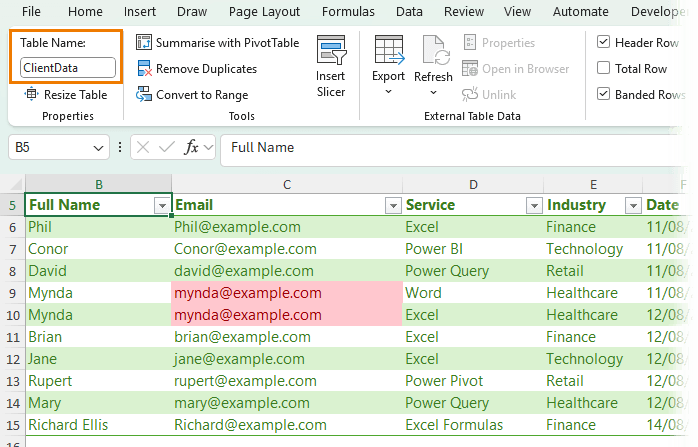
Next, create another sheet called Database. This will store all client records.
- Add column headers: Full Name, Email, Service, Industry, Date, Notes.
- Convert the range into an Excel Table (Insert > Table) and name it ClientData.
- Format the Date column as Short Date (Home > Number Formats).
- Apply Conditional Formatting to highlight duplicate emails (since duplicates can creep in).
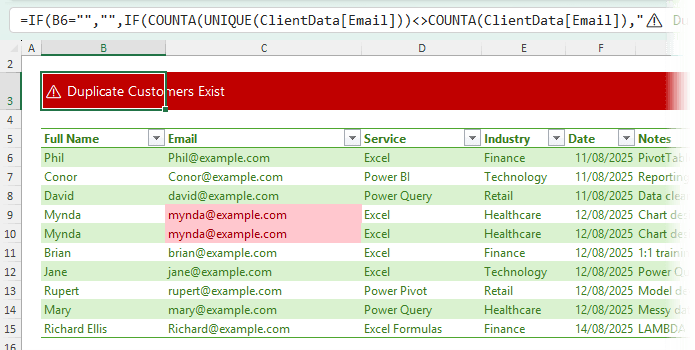
For extra protection, add a warning banner with this formula in cell B3:
=IF(B6="","",
IF(COUNTA(UNIQUE(ClientData[Email]))<>COUNTA(ClientData[Email]),
"⚠️ Duplicate Customers Exist",""))
Then apply red fill + white text using a formula with conditional formatting to make the warning stand out.
Step 3: Automate Data Entry with Office Scripts
Here’s the magic. Instead of manually copying form data into the database, we’ll automate it.
Note: I’ll be using Office Scripts so the file can be used in Excel Online or Excel for the Desktop, but you can also use VBA/Macros if you don’t need to use the file in Excel Online.
1. Go to Automate > Record Actions and record yourself copying the form fields to the database.

2. Stop the recording and edit the script (see video for step by step).
We need to adjust it so that:
- If the first row of the table is empty, it pastes data there.
- Otherwise, it adds a new row and pastes into the last row.
- After saving, it clears the form (except the Date field).
💡 Tip: I recorded part of the script, then used ChatGPT to rewrite and optimize it. This saved time because I didn’t have to write out all the sheet names and cell references manually.
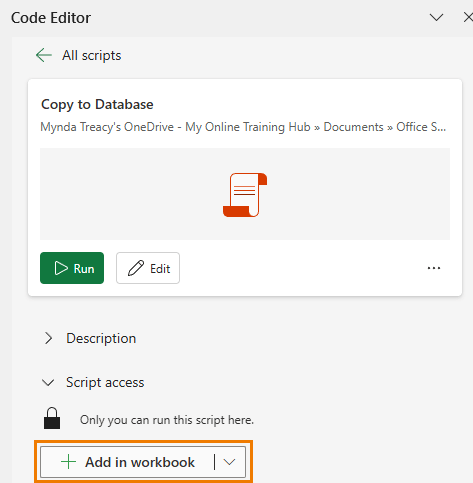
Finally, add a button to the form using the ‘+ Add in workbook’ button in the Code Editor to run the script with one click.
Step 4: Add Duplicate Checks in the Form
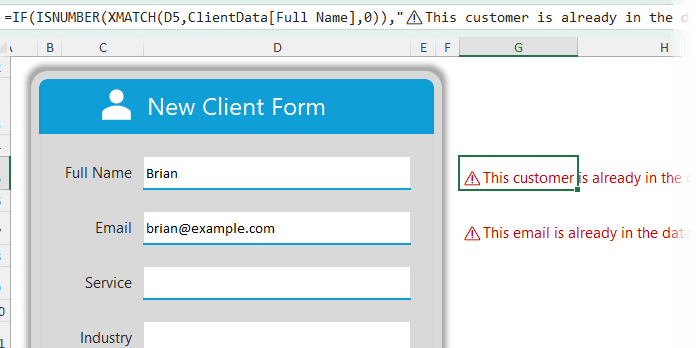
It’s great that the database warns us about duplicates - but even better if the form does too.
You can use XMATCH to check if a client already exists:
=IF(ISNUMBER(XMATCH(D5,ClientData[Full Name],0)),
"⚠️ This customer is already in the database.","")
Copy and adapt this formula for the Email field too.
Format the text in red so it’s impossible to miss.
Step 5: Protect the Form
Before sharing with users, protect the form so only the input fields can be edited.
- Select the input cells → Ctrl+1 → Protection tab → Uncheck Locked.
- Go to Review > Protect Sheet, tick Select unlocked cells, and apply protection.
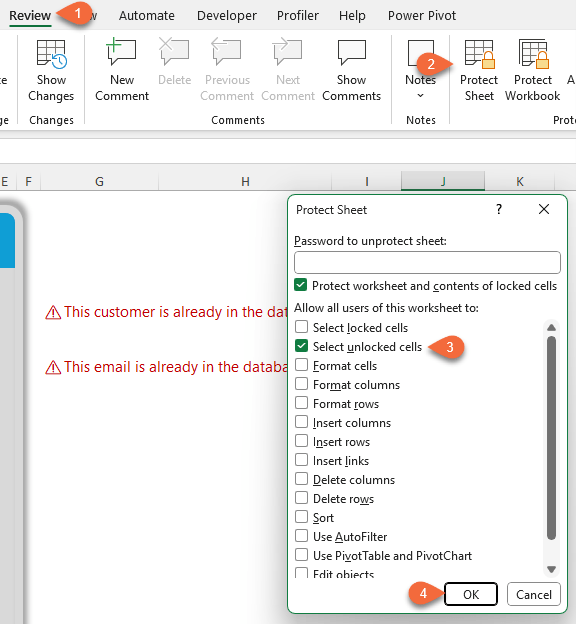
Now users can only enter data where intended - and pressing Enter or Tab (desktop only) jumps to the next input cell.
This works in both Excel Desktop and Excel Online (with a slightly different setup for Excel Online under Review > Manage Protection) – see video for detailed step by step instructions.
Step 6: Analyze Your Data
With your ClientData table, you can now:
- Filter and sort records instantly
- Build PivotTables and charts for insights
- Create automated reports linked to the database
This transforms a simple Excel file into a lightweight Excel CRM system.
Recap: What We Built
✅ A clean, user-friendly Client Form
✅ One-click automation to save and clear entries
✅ A structured, filterable Client Database
✅ Built-in duplicate detection
✅ Sheet protection for smooth data entry
✅ Ready for analysis with PivotTables and charts
This isn’t any old spreadsheet - it’s a scalable system you can adapt to manage clients, projects, inventory, or any other information you need to track.
Take Your Skills Further
If you’re excited about building smart, automated spreadsheets like this, you’ll love my Excel Expert course.
It’s designed to take you beyond the basics and into pro-level Excel. with step-by-step lessons, real-world examples, and downloadable workbooks so you can follow along.


Very interesting article, I would like to take advantage of this opportunity.
However, it seems that the options
– Add in Workbook
– or Add Button
– and others
are not included in personal and family-based Office versions.
My Excel 365 version 2508 includes “Automate” and I can also work with scripts, but some options are missing.
From 2023, the functionality should be available for desktop and online, but probably only for versions with so-called “business accounts.”
Yes, that’s probably the issue. Microsoft see this as a business tool and not required for Personal and Family licenses. You can use macros instead.
با درود و احترام
ضمن تشکر فراوان بابت انتخاب هدف والای شما، آموزش شما بسیار برایم مفید بود. و علاوه بر نحوۀ تدریس فوقالعادۀ شما، درسهای دیگری همچون انسانیت، بزرگواری و … از شما آموختم.
با آرزوی بهترینها برای شما
آرمان کیانی
از کشور ایران
Glad you found it helpful.
Thank you so much for this! It was very helpful and straightforward. The only issue I had was that new entries in my database do not appear with banded rows. Each new entry is created with no fill color. I’m guessing it’s something that was added to the script once I used AI to optimize it.
Sounds like you didn’t set the database up as a Table (the step after I inserted the headings). Select the headings and press Ctrl+T to format as a table.
Thank you for this database example! I am looking for ideas on how best to approach building a database for cataloging construction items and tracking the unit prices over time. Any tips would be greatly appreciated!
You can use these same techniques. The key will be to store your data in a tabular layout.
I have Excel 2010. Before I read all the content, can this database be generated on that version?
Thank you……..
Yes, but you’d have to use a Macro instead of Office Scripts. Just use the same steps, except record a macro for the copying and pasting and then use ChatGPT to complete the coding like I did for the script.
Great video and technique! Do you also have a video on how to modify / update or delete a record in a form like the one you showed ?
I don’t have a video on this, but you can use the same techniques to create a lookup form that populates the record from the database and then allows the user to update/delete the record with an Office Script or Macro.
I did something like this recently. I didn’t think of the duplicate warning banner; great idea. One thing you could add (or should I say”remove”?), is hiding the column and row headings (at least on the client form sheet) to give it a cleaner look.
Great idea thanks for sharing.
This is an amazing tutorial, I’ve been wanting to create an Excel database for a long time!
Awesome to hear you found it helpful!