In Excel 2007 the graphics features are vastly improved. Not only have you got some instant designer quality flow charts (see image below), with the new and improved Shapes you can now apply effects like you find in Photoshop.

Excel SmartArt
I’m not going to go into a lot of detail with SmartArt. Other than to say you’ll find SmartArt on the Insert tab of the ribbon.
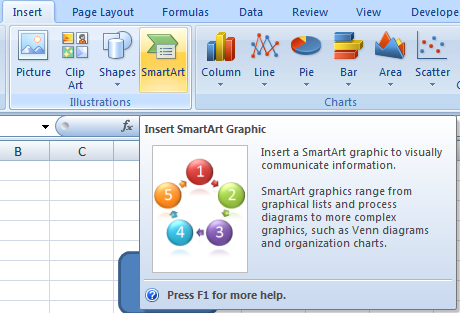
Once you have inserted your SmartArt graphic you’ll see new Design and Format tabs will appear on the ribbon when the SmartArt graphic is selected.
There’s a plethora of customisations you can make including colours, styles and layouts to name a few. It’s pretty self explanatory so I recommend you have a mess about with them and get familiar.
You’ll also find these SmartArt graphics in Microsoft Word.
Excel Shapes
Like SmartArt, Shapes are also found on the Insert tab of the ribbon.
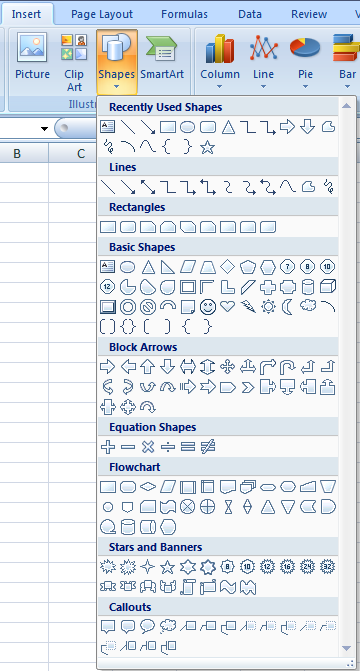
There is a vast array of shapes to choose from.
One handy feature is that Excel automatically puts any frequently used shapes at the top so you can easily find them again.
Inserting a Shape
To insert a shape simply click on the shape you want from the drop down menu.
Excel will automatically choose the default colour and style.
A new Format tab will appear in the ribbon when the shape is selected. This is where you can change the colour, style, fill, outline, effects….

Right-clicking on the shape opens up a list of options, which are also available on the format tab of the ribbon.
As with SmartArt, there’s a huge range of formatting options available and I’m not going to cover them all here, but I will show you a few tips and tricks.
How to Change the Size, Rotation and Curve
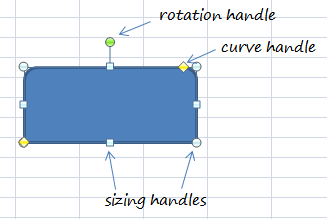
When you click on the shape handles will appear (see image below). Hover your mouse over the handles until it changes (note: it will change to a different style depending on the handle you choose). Once you’ve got your mouse in the right place simply left-click and drag to change it.
Getting Your Text to Fit the Way You Want
Sometimes I find the amount and layout of the text the shape allows me to insert is too restricted by the margins. I get around this by putting a Text Box on top of the shape, and then I format the text box to have no fill and no outline, so it’s invisible except for the text.
Below is a rough example of how this would appear with all the shapes selected. You can see there is one shape in the image on the left, and two shapes (well, one shape and one text box actually) in the image on the right.
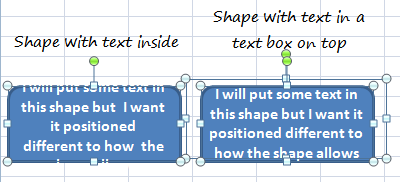
Notice there are 3 objects in the image above. You can see this because there are 3 green rotation handles.
Using Multiple Shapes Together
When you inset multiple shapes in your worksheet it’s important that they line up. And if you’re layering shapes, like I did above with the shape and the text box, then you’ll want to make sure the text box is at the front, and the shape is at the back.
Grouping Shapes
When you layer shapes or other objects on top of each other you can use the Group tool to keep them together.
This makes them easier to manage because you are reducing the number of objects you have to control.
When objects are grouped you can resize them, move them, change formatting, and apply effects all at the same time.
How to Group Shapes
First select each object you want to group together by clicking on one shape, and then holding down the CTRL key while you click on the others.
You’ll find Group on the format tab on the ribbon, or right-click your mouse with the objects selected.
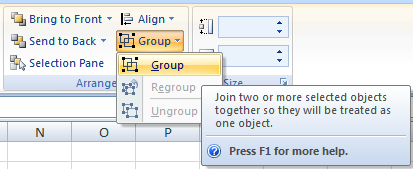
You can now change formatting etc. to all shapes that are grouped at once.
Note: you can also create this 'group' effect by selecting all shapes at once (per instructions above) but instead of grouping them just stop once they are all selected. Then go ahead and apply your formatting changes. Then to unselect all shapes simply click somewhere else in the worksheet.
Aligning Shapes
Once you’ve grouped your layered shapes or objects you can align them (note: you don't need to group all shapes to align them, only those that are layered shapes on top of one another).
The trick here is to select the shape you want everything to be aligned to first.
Then holding down the CTRL key select each subsequent shape by clicking on it.
On the Format tab of the ribbon select Align and then select the type of alignment you want from the list.
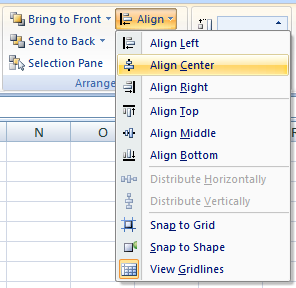
TIP: You can also move shapes by selecting them and then using your up and down arrow keys on your keyboard.
Order Your Shapes
If you find your text box has gone behind your shape you’ll want to bring it back to the front. You can do this by selecting the shape and then on the format tab of the ribbon select ‘Send to Back’.

The image above is a screen shot pasted into Paint (which comes free with Windows), I cropped the section I wanted and then pasted it into Excel where I put the orange border on (which is a shape with no fill) then I did another screen shot and pasted it back into Paint and saved it as a .png for this blog post. Sounds convoluted but it took me less than a minute!
Shape Tips & Tricks
TIP 1: Copying Multiple Shapes at a Time
- Select all the shapes you want to copy by clicking on one, then holding down the CTRL key click on the others. Tip: If you want to select all Shapes, select one then press CTRL+A to select all.
- While all shapes are selected hold down your CTRL key, hover your mouse over the outer edge of one of the shapes until your mouse pointer shows a very small + symbol beside it.
- Now left click and drag the shapes to a new location. You will see the original shapes are still in place.
- BONUS TIP: If you want the new shapes aligned to the original shapes hold down the SHIFT key at the same time. i.e.
- Select the shapes by holding down the CTRL key.
- Then hover your mouse over the edge of the shape while holding down the CTRL key until you get the small + sign beside your mouse pointer.
- While still holding down the CTRL key start to drag your new shapes into place.
- BEFORE letting go also hold down the SHIFT key and you will see your shapes snap into alignment with the original shapes.
- Once in place let go of your mouse button and then let go of your CTRL +SHIFT keys.
TIP 2: Link a Cell to a Shape
In the image below you can see that the text in the shape is the same as the text in cell A1. I have selected the shape and in the formula bar you can see that the cell reference is =A1.
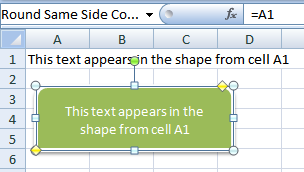
To link a shape to a cell so that the text that appears is dynamically updated when the cell updates is easy.
1. Select the shape
2. While the shape is selected type your cell reference in the formula bar and press enter.
I’ve tried to cover some of the less obvious ways you can manage shapes in this tutorial, but I’ve only really touched on the features available.
There is so much more for you to discover; like shadows, bevels, reflections, 3d, WordArt Styles and more. I recommend you have a play around with them and see how you can use them in your work.
Our Secret: We use a LOT of Excel Shapes as graphics on the My Online Training Hub website:
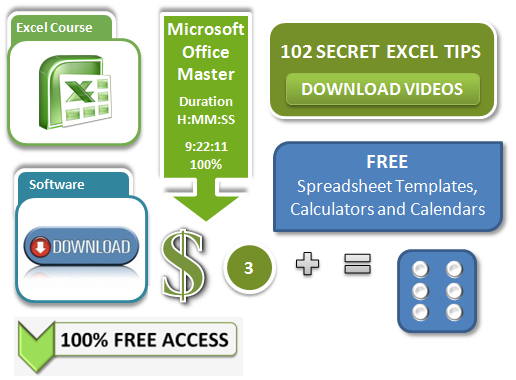
Who’d have thought Excel could be used for graphic design…isn’t it just a spreadsheet program?


I been using Excel for a long time and now I am glad to find your site.
Thank you very much for this valuable insight.
Great to know I could help, Armando.
I have a monthly schedule I create and use all Sundays, Thursdays, and just the 2nd Saturday. Is there any way to have Excel populate the dates automatically for the coming month (i.e. Dec 2015)?
Thanks,
Steele
Hi Steele,
You can use a range of cells to setup the dates for the shapes, and link each shape to it’s cell with date, (see tip 2 in above article), when you will change the dates from the cells, shapes will be also updated.
Catalin
I have Excel 2007. When I try to link a shape to a cell according to your instructions, no matter what I do with the alt; ctrl; shift keys on no keys, all I get is the cell reference is invalid.
Hi Ted,
You have to click on the shape to select it, then go to the formula bar and type the cell address that holds the text you want, like : =A5
; press Enter and the text should be shown on shape, you don’t have to use any of the keys you mentioned, this is how you link a shape to a cell; avoid the confusion usually made by setting a hyperlink to a shape, that’s a different problem.
If you still have problems, send me the file using our Help Desk, i will assist you.
Cheers,
Catalin
Thanks, I missed the equal sign. “=” A1
I note that you can put a formula in A1 and the answer will appear in the shape as well as the a1 cell. So it doesn’t just have to be text.
Glad you figured it out. Yes, the text from A1 can be static, or the result of a formula, your observation is correct. The shape can only hold a simple cell reference, not a formula.
Cheers,
Catalin
I have 12 columns, each column has a date, ie each month is one month. I have manually used your method to insert a shape (I used a straight line) that runs through several cells (a timeline so to speak).
I don’t want to do this this for every project so how can I get the shape to be automatically inserted and for the length of a certain number of cells.
I have a project that will last 3 months, so I inserted the line and then using the drag feature, I spread it across all three months. I would like for this to be done automatically.
Thanks,
Kent
Hi Kent,
The only way to do it is to use a macro.
Try something please:
-create a sample file, start the macro recorder (choose a name for the new macro) , then insert the line, spread it across cells; do that for 2-3 rows, then you can stop the macro recorder. Open a blank sheet , then press Alt+8 to run your new macro on this new sheet.
You’ll see that every action you made is repeated in the new sheet.
If you can send me the sample file, i’ll show you how to change the recorded macro to do exactly what you need.
You can use our Help Desk to upload the file.
Catalin
dear,mynda
Hi
Merry Christmas and thanks a world four your pretty perfect tips during the last year 😉
kind Regard-mano
Merry Christmas to you too, Mano 🙂
I like to have more and more excel tips.
Regards,
Thanks – very helpful
that’s fantastic!! I never knew excel could do this, is it just the latest version? I can see so many uses for this outside of excel itself to jazz up Word docs and even my website.
thanks
Gary
Hi Gary,
Earlier versions of Excel and Word have Shapes but not SmartArt. Office 2007 onwards are vastly improved for graphics. Enjoy!
Mynda.