Excel worksheet protection is a great way to prevent people accidentally messing up the reports you’ve spent hours creating.
However, it is not going to keep confidential data a secret. If someone really wants to get to your data, or see how your model was put together and all the amazing formulas you’ve used then there is nothing built into Excel security that’s going to stop them. The best you can do is make it difficult (for the majority or people) to get to your data/model.
Bottom line: Excel workbook protection is designed to keep honest people honest.
That’s not to say it isn’t worth using, so let’s look at how can set up our workbooks to leverage it.
Video Instructions
For best results view in full screen HD
Written Instructions:
Things you can Protect
First of all let’s talk about the different elements of the workbook that we can protect:
- Cells – including formulas, formatting and data inside the cells
- Structure – rows/columns/sheets
- Objects – pictures, charts, Slicers, form controls i.e. anything that floats above the cells of the worksheet.
Note: you can still interact with Form Controls (check boxes, buttons etc.) even when they are ‘locked’ and the sheet is protected. Makes sense, right?
By default all cells and objects in a worksheet are protected. However that protection only becomes effective when you actually protect the sheet. You’ll find the sheet and workbook protection on the Review tab of the ribbon:
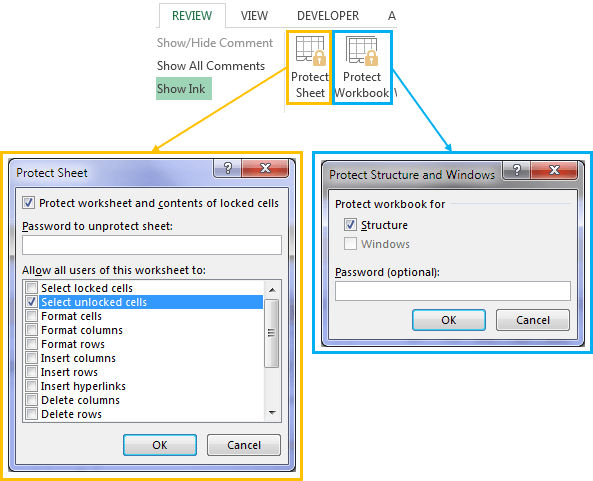
Clicking on Protect Sheet brings up a dialog box which asks you what you want to protect and you can set a password if you want to use one. The Protect Workbook dialog box asks you if you want to protect the structure and/or the windows.
The Windows option under Protect Workbook restricts changing the size and position of the windows for the workbook when the workbook is opened and moving, resizing, or closing the windows.
Tip: Before setting protection you must unprotect any cells or objects you want people to edit. So let's look at that next.
Cell Protection – open the Format Cells dialog box (CTRL+1) > on the Protection tab uncheck ‘Locked’:
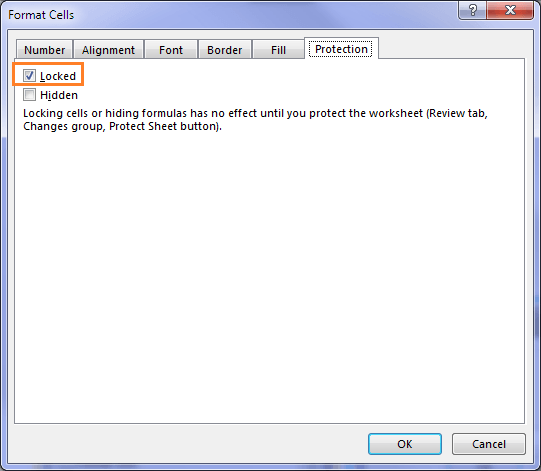
Tip: Checking the Hidden box will prevent a cell’s contents being visible in the formula bar. You can still see the result in the cell.
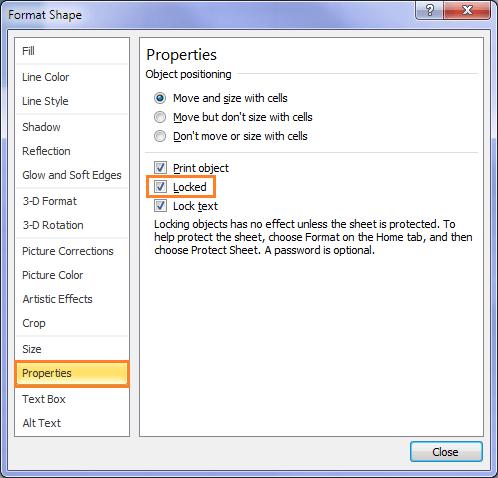
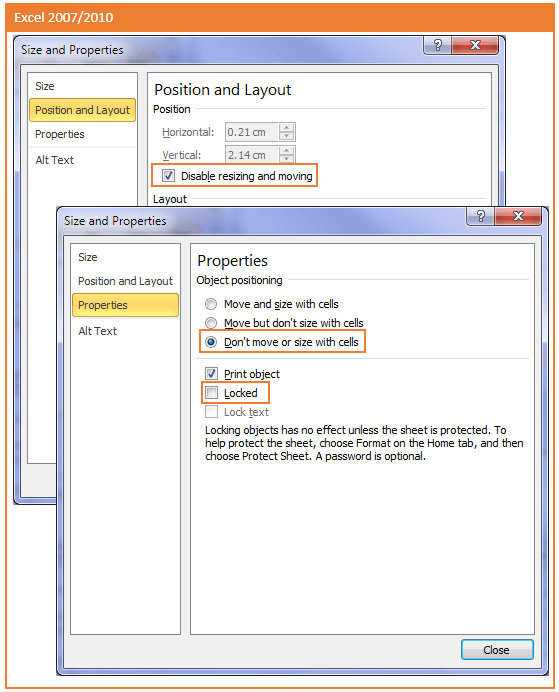
Object Protection – this varies from object to object but you’ll typically find it by right-clicking the object > Size and Properties > locate the ‘Locked’ check box and set it accordingly. E.g. here is the Properties dialog box for a Shape:
Protection – Humans vs Excel
Protection in Excel is preventing humans from editing your worksheets/workbooks, Excel can still edit objects, values, charts, PivotTables and the like. So if a human makes a change to a cell that is not protected, which in turn affects a formula in a cell that is protected, Excel will still update the formula.
VBA/Macros are considered human in this context unless the UserInterfaceOnly parameter is used:
ActiveSheet.Protect UserInterfaceOnly:=True
Ok, so now you know where to find the protection tools let’s look at how to use them.
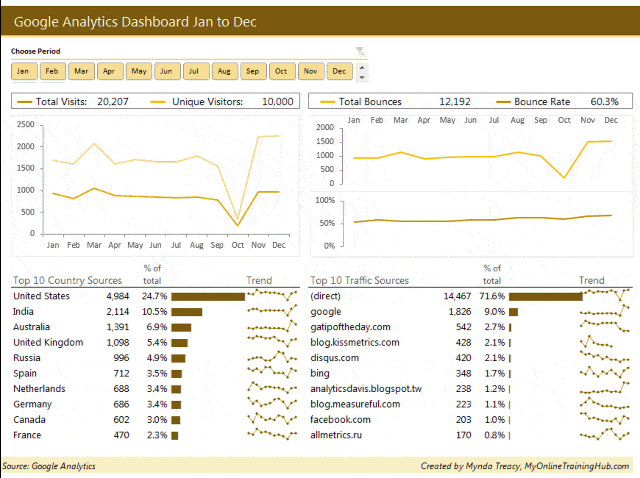
Protecting Dashboard Reports
One of the FAQ’s from my Excel Dashboard webinar series where I built the interactive dashboard shown below was:
“How can I protect my dashboard but allow people to select the months in the Slicer, and still have the dashboard, PivotTables and formulas all update?”
Well, like I mentioned above, Excel can still edit protected cells so all you need to do is edit the Slicer protection; right-click on the Slicer and choose Size and Properties. The dialog box will open:
- Under Position and Layout - check ‘Disable resizing and moving'
- Under Properties - select ‘Don’t move or size with cells’ and uncheck ‘Locked’
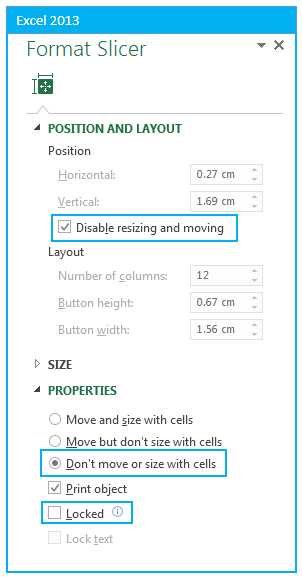
Once you’ve set the properties for the Slicer you can go ahead and protect the worksheet.
And if you don’t want people to see your formulas you can also uncheck ‘Select locked cells’ which will prevent any protected cells being selected:
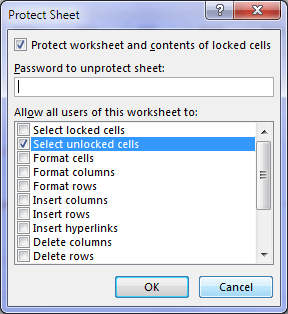
These settings will allow the user to interact with the Slicer but they can’t mess it up. When selections are made in the Slicer it will automatically update the dashboard, but the user can’t select any protected cells in the dashboard itself.
You can also hide the workings sheets in your file and then protect the workbook so they underlying data isn’t accessible either.
Protection Helps Navigation
Another benefit of protecting cells is for data entry; when cells are protected the Tab key will move through the unprotected cells, skipping any protected cells. This makes data entry quick and easy.

Hi Dear,
By applying all procedures to the slicer, the issue is that even after protecting the worksheet, yes the entire worksheet is protected, but the right-click menu on slicers is active, and unwanted changes can happen.
How to protect the slicer from activating the right-click menu options
Unfortunately, you can’t protect the Slicer from the right-click menu AND allow users to click the buttons in the Slicer.
Hello Mynda. Thanks so much for the tutorial. I was wondering if there was link to download the worksheet for this video. If not, I have just one question (hopefully, other folks on this platform can help too :)):
What formula did you use to create the “Jan to Dec” headline in the Google Analytics Dashboard to connect with slicer selections?
Thank you and hope to hear from you soon
Hi Eddie, the headline is created using a dynamic text label. Hope that points you in the right direction. If you get stuck please post your question in our forum where you can also upload a sample Excel file and or screenshots. Mynda
Thank you for the swift response Mynda.
I actually used an “IF” statement and the “TEXT” function for the dynamic title and it worked perfectly.
Have a great day.
Great to hear, Eddie!
Hi Mynda, tnx for your pointers, i encountered a problem….
my excel 2016 only shows 3d map, please how do i select a map chart from it?
3D maps are only available to Office 365 users. If you don’t see it, then it suggests you don’t have Office 365.
is it possible to incorporate office 365 into my excel 2016, if so, how do i go about it??
if not, can you send me a direct link to download it??
i really need to get this office 365
tnx in anticipation to hearing from you.
Office 365 and Office 2016 are separate installs. You’re best to uninstall Office 2016 and then purchase Office 365. There are lots of different options for Office 365 licences, so you should refer to their site for the one that suits you best: https://products.office.com/en-us/buy/office.
Mynda
thanks a lot
this is really the best, i learnt a lt from this
I followed these steps and the protected dashboards seem to be functioning as expected, however when opening the file now I get an error message that says
“That command cannot be performed while a protected sheet contains another PivotTable report based on the same source data. To Remove protection from the sheet that has the other report, click the sheet tab, and then click Unprotect Sheet (Review Tab, Changes group). Then try command again.”
The error goes away when I remove the sheet protection – which defeats the entire purpose of protecting the sheet.
Can you help?
Hi Claudio,
Do you have PivotTables on your Dashboard sheet? If so, did you check the box to allow users to ‘Use PivotTable & PivotChart’ in the Protect Sheet dialog box?
If you don’t have PivotTables on your Dashboard sheet, then did you protect the sheets containing your PivotTables or hide them as shown in the video tutorial?
Mynda
Hi Mynda,
Thank you for your tip, I did all the steps according to your tip, so now the user can not press the Delete bottom, but he can right click and delete the slice.
How can I prevent that?
Hi Suhair,
Perhaps you did not set the protection correctly. The Slicer’s protection settings should be set to ‘Protect’ by default (right-click the Slicer > Properties). Then all you need to do is Protect the sheet and ensure the ‘Edit Objects’ option is not checked (it’s not checked by default).
If you want to send me your workbook containing said Slicer I can check it for you.
Mynda
Hi Mynda,
I have a spreadsheet with a huge data entry table which also has many columns dispersed throughout which are loaded with different formulas. I need to make sure that the people entering the data cannot edit the formulas, but at the same time, I want the table to automatically add rows as data is entered. Once I protect the sheet, no matter which choices I check off, the table growing ability seems not to work anymore. Is there any way to protect the formulas but still allow the table to grow?
(If necessary, I’m not afraid of a little VBA)
Thank you very much
Hi David,
Here is the code I’m using to autoexpand tables on protected sheets:
Option ExplicitPrivate Declare Function OpenClipboard Lib "User32" (ByVal hwnd As Long) As Long
Private Declare Function CloseClipboard Lib "User32" () As Long
Private Sub Worksheet_SelectionChange(ByVal Target As Range)
If Target.Cells.Count > 1 Then Exit Sub ' unprotect only when a single cell is selected
If Sheets("Switch").Range("AutoExpand") Like "Disabled" Then Exit Sub
Dim Tbl As ListObject, Off As Integer, ExitCode As Label
Dim TblFirstRow As Long, TblFirstColumn As Integer
Dim FirstRowAllowed As Long
On Error GoTo ExitCode
Off = 0: If Target.Row > 1 Then Off = -1
Set Tbl = ActiveSheet.ListObjects(1)
TblFirstRow = Tbl.HeaderRowRange.Row
TblFirstColumn = Tbl.HeaderRowRange.Cells(1, 1).Column
OpenClipboard 0 ' when a macro runs, usually the clipboard is emptied; opening the clipboard will preserve whatever you have in there;
FirstRowAllowed = TblFirstRow ' the table will be unprotected if the user selects a cell from this row down
If Target.Row >= FirstRowAllowed And Target.Row <= Tbl.ListRows.Count + TblFirstRow + 1 And _ Target.Column <= Tbl.ListColumns.Count + TblFirstColumn And _ Target.Cells.Offset(Off, 0).Locked = False Then Unprotect CloseClipboard Else GoTo ExitCode End If Exit Sub ExitCode: Protect DrawingObjects:=False, Contents:=True, Scenarios:= _ False, UserInterfaceOnly:=True, AllowFormattingCells:=True, AllowFormattingColumns:=True, _ AllowFormattingRows:=True, AllowInsertingRows:=True, AllowSorting:=True, _ AllowFiltering:=True, AllowUsingPivotTables:=True CloseClipboard End Sub Private Sub Worksheet_Change(ByVal Target As Range) Dim Tbl As ListObject Set Tbl = ActiveSheet.ListObjects(1) If Not Intersect(Target, Tbl.Range) Is Nothing Then With Application .EnableEvents = False If Target.Columns.Count > 1 Then .Undo
.EnableEvents = True
End With
End If
End Sub
The code should be pasted into a sheet module, where the table is located.
You have to protect the cells (columns) with formulas, and set the other cells unlocked (where users can edit)
The code is flexible, you don’t have to make any changes, it will work with the first table found in that sheet (Set Tbl = ActiveSheet.ListObjects(1))
Let me know if you managed to make it work.
Note that there is no password set, you have to add a password in code, otherwise users will be able to unprotect from ribbon. But even if the users can manually unprotect the sheet, when they select a protected cell, the code will protect the sheet back, so a password may not be necessary, you have to test and see.
Catalin
Thanks Catalin!
That’s some serious coding!
Just two questions before I try it. 1) If I’m using 64 bit, do I need to modify anything in the code (say… “User32” or similar). 2) I notice you said that when users select a protected cell, the code will protect the sheet back. This sheet is still a work in progress, so even though I don’t want anybody else changing anything, I still need the ability to do so myself. Will I still be able to do that?
Thanks again! I’m anxiously awaiting your reply so I can try this out!
— David
The function declarations that needs to be adjusted… (OpenClipboard and CloseClipboard declarations)
You can take a look at this sample workbook: Autoexpand Tables on protected sheet.xlsm
These are the function declarations that will work on 64-bit systems:
#If VBA7 ThenPrivate Declare PtrSafe Function OpenClipboard Lib "user32" (ByVal hwnd As LongPtr) As Long
Private Declare PtrSafe Function CloseClipboard Lib "user32" () As Long
#Else
Private Declare Function OpenClipboard Lib "user32" (ByVal hwnd As Long) As Long
Private Declare Function CloseClipboard Lib "user32" () As Long
#End If
I also use a so called Switch, to turn on and off this functionality, see the sheet named “Switch”
Catalin
Very informative post, as usual, Mynda 🙂
Just my two-bits of gyaan on one of the points above:
“And if you don’t want people to see your formulas you can also uncheck ‘Select locked cells’ which will prevent any protected cells being selected.”
Here are a few more ways to prevent people from seeing your formulas.
1. Select all the formula cells (using Goto Special), then in the Format Cells dialog box, Protection tab, check the ‘Hidden’ setting.
Now protect the sheet as above.
Voila! The user can see the cell values, but the formula bar shows nothing.
2. If you want neither the formulas, nor the results in those cells to be visible after applying sheet protection, apply the custom format “;;;” (without the double-quotes) to such cells.
I use this when I don’t want the user to see / know how some of the calculations work, or even realise that there is something in those cells.
3. Simply hide the Formula Bar itself 🙂
To do this, uncheck the Formula Bar option on the View tab.
Thanks for sharing, Khushnood. 🙂
“Excel workbook protection is designed to keep honest people honest.”
Can’t agree more! 🙂
Cheers,
MF
🙂 I should credit Catalin with that line!
hiii manda
i want to protect my whole excel files on my computer so can u please please help me out
i have near about 60 excel files and i want to protect them in such a way that i can setup a password once and i want that without entering the password nobody will be able to see that excel files.. so is it possible ?? eagerly waiting for your reply hope u will help me out
thankyou
Hi Akash,
You can’t do that kind of protection from within Excel. You’ll need to set folder permissions to restrict access to the folder where the files are. How you do this depend son whether you are sharing files off a Windows server, or if you are trying to restrict access from your local hard drive.
This article will give you a good overview of what you need
Shared Folder Permissions
Regards
Phil