The following Excel Factor entry was sent in by Daniel Ferry, founder of Excel enthusiast blog, Excel Hero.
Often an Excel model needs a dynamic print area, as data that we wish to print may change over time.
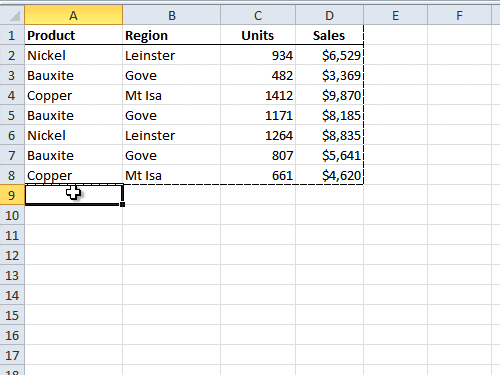
Watch how the print area for the table below (depicted by the dashed line around the data), dynamically updates as new rows are added to the bottom.
You can do this using a formula that produces a dynamic range and the result is the dynamic print area you see above.
How to Create a Dynamic Print Area
First create a dynamic named range using the OFFSET function and COUNTA (or any other combination of functions that creates a dynamic range).
For this example we’ll assume our table will not grow bigger than row 200 and column Z, therefore our formula will be:
=OFFSET($A$1,0,0,COUNTA($A$1:$A$200),COUNTA($A$1:$Z$1))
For more on how the OFFSET formula works.
To create a named range open the Name Manager on the Formulas tab of the ribbon > click New.
The following dialog box will open and you can give your range a name (e.g. Print_Area_Formula), then enter your dynamic range formula into the ‘Refers to:’ field (in this example we’re using the OFFSET formula above).
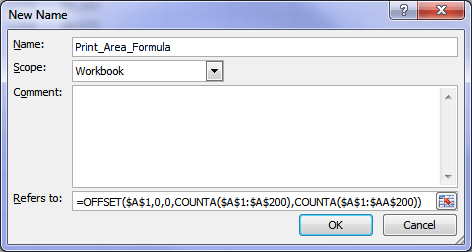
Note: the OFFSET formula example above will only work if there are no blank columns or rows in the data range.
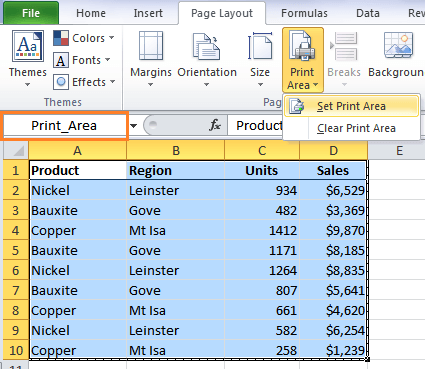
Next create a normal print area by selecting a range on your worksheet > go to the Page Layout tab of the Ribbon > click on Print Area > Set Print Area.
This will automatically create a named range in the Name Manager called Print_Area.
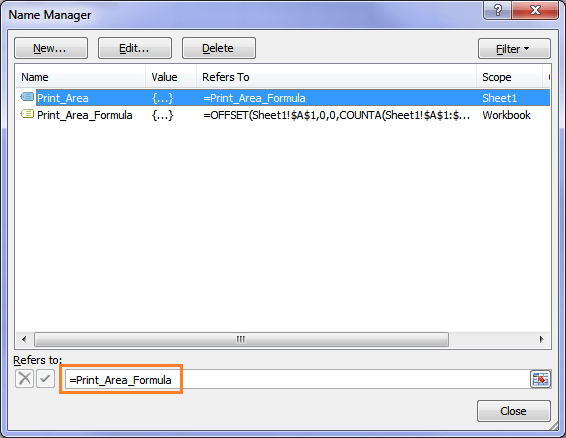
Now simply go into the Name Manager and edit the Print_Area name so that its ‘Refers To’ field houses the dynamic range formula that we created earlier.
To do this open the Name Manager > click on the name ‘Print_Area’ > type the name of your print area dynamic formula in the Refers to: field at the bottom:
Now sit back and relax as your print area dynamically updates when new data is added to your table!
Easier Alternative
While the Named Range solution works, Microsoft MVP, Beth Melton shared this alternative with Daniel:
Simply format your data in an Excel Table > select the entire table and set your print area the normal way (from the Page Layout tab). And that’s it.
As the table changes shape (grows or shrinks, both vertically and horizontally) the print area will adjust dynamically!
Enter your email address below to download the sample workbook.
Thanks for sharing this cool tip, Daniel.
Besides being a Microsoft MVP for Excel, Daniel Ferry runs the Excel enthusiast blog, Excel Hero and the Excel Hero LinkedIn Group. Daniel is currently authoring a book for Microsoft Press on Excel 2013 due to ship next year.
Daniel truly is a veteran of all versions of Excel, since the beginning of the product 26 years ago. If you would like to learn from him you can. He shares his expertise at the widely praised and truly remarkable Excel Hero Academy* .
*Disclosure - if you join Daniel's Excel Hero Academy through the link above we receive a small commission.
Vote for Daniel
If you’d like to vote for Daniel’s tip (in X-factor voting style) use the buttons below to Like this on Facebook, Tweet about it on Twitter, +1 it on Google, Share it on LinkedIn, or leave a comment….or all of the above 🙂


Quite simply, I can’t get this to work. When I change the reference to =Print_Area_Formula, it will not accept it. It just goes back to the regular print area.
Hi John,
It’s working for me. I suspect you haven’t used absolute references in your OFFSET formula, or the formula is returning the wrong range. Please post your question on our Excel forum where you can also upload a sample file and we can help you further.
Mynda
Hi Mynda,
I tried creating a dynamic print area by editing Print_Area name in Name Manager
It works (I can see the outlined area changing) but this resets to a fixed range as soon as I Print Preview, use Page Setup or even revisit Name Manager
also, it seems, if I save and reopen the spreadsheet
not very functional, Microsoft
jim
Hi Jim,
I can’t reproduce this bug. If you download the example file for this tutorial can you reproduce the problem in that file too? I suspect there is something wrong with your file specifically or the formula in your file.
Mynda
No worries Mynda, fixed with some (very simple) VB – although that always feels like cheating, code was needed anyway to facilitate creating a pdf output (which is what the print area was needed for anyway)
I’ve seen this problem alluded to elsewhere with similar replies of non-reproducibility (a new test file also does this, not just my working file – maybe it’s something in my set up)
jim
Ah, glad you found a workaround, Jim.
I have two sheets in a workbook, both with dynamic print areas. However, I need to be able to switch to the ‘active’ dynamic print area either based on a macro (ie, Print_Area now=’sheet 1 dynamic print area’, or ‘Print_Area=’sheet 2 dynamic print area’). I’ve tried setting the print area to a ‘choose’ formula and an ‘indirect’ formula, but neither works.
Any tips would be welcome.
Hi David,
Both worksheets need a separate Print Area, you should not use a single area for multiple sheets.
Does this work in 2013?
If I set the PrintArea namespace to =Print_Area_Formula, it will just then turns that formula into a static value based off of whatever is currently in the worksheet as soon as I leave the name manager(i.e. “=Sheet1!$A$1:$I$142”).
Instead of dynamically changing based on my data, the PrintArea just calculates what the dynamic formula equals at the moment of entry, not dynamic with new data being inserted.
Hi Ian,
What if you set the print range and then edit the Print_Area name in the name manager and put the dynamic named range formula in the ‘Refers to’ field. i.e. skip creating the Print_Area_Formula and just put the formula in the Print_Area name.
Mynda
I really like using this system, but there is a problem. The “refers to” for the Print_Area named range shifts from the named range I defined to a static range every time I print, or even print preview. How do I stop that from happening? Is there some sort of “keep this dynamic” code? Any advice you can offer would be greatly appreciated.
Hi Paul,
That’s strange. I tested it on my PC and didn’t have any problems. Are you able to send me your file via the help desk so I can see what the problem might be?
Mynda
Actually, I think I solved the problem right after I posted my question. I made the Print_Area range be dynamic instead of setting it to refer to a separate named range. So far, I haven’t had the problem with it converting to being static. Thanks for getting back to me, though.
Thanks, Paul. It seems you may not have followed the tutorial above correctly since that link explains how to do the same thing.
Not to worry, the main thing is you have it working.
Kind regards,
Mynda
Upon rereading the instructions, I see that you are right. I was thrown off by the image that has Print Area set equal to Print_Area_Formula. Thanks.
Ah, thanks for clarifying. I wonder how I can make that clearer.
Mynda
Hi Treacy,
I have a worksheet with a 5 year, monthly income statement projection covering column A-AM (Sept 2013 – Aug 2016). Column A-B contains the income statement headings, eg Turnover, cost of sales, etc upto profit. I have 3 more columns for totals; AN,AO & AP (ie Yr 1 total, Yr2 total and Y3 total). I want each year’s monthly income statement to be printed with its total on one page. I also want the headings to be repeated on each page on the print out.
Please help.
Regards
Simba
Hi Simbarashe,
You can print non-contiguous areas i.e. your yearly totals, and set columns and rows to be repeated on each page.
To set multiple print areas select the first range > Page Layout tab > Print Area > Set print area.
To set the next print area select the next range > Page Layout tab > Print Area > Add to print area.
To set rows/columns to repeat:
Page Layout tab > Print Titles – enter the rows/columns in the relevant fields on the sheet tab of the page setup dialog box.
I hope that helps.
Kind regards,
Mynda.
Bryon emailed me with this cool tip in response to the ‘Easier Alternative’ method above:
“There is no need to even set the print area on any table. Simply place your cursor anywhere in the table and then go to File –> Print. From there, click the dropdown directly under Settings and choose ‘Print Selected Table’.
This is nice because if you have multiple data tables, you don’t have to clear and reset the print area for different tables; just click on the table in question and print it. The feature understands when a table grows and shinks.”
Thanks for sharing, Bryon 🙂