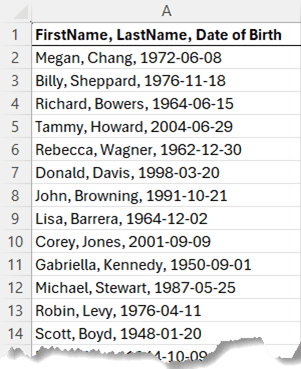
If you've ever received a dataset where first names, last names, or even birthdays are bundled into a single cell, you know the struggle.
Or maybe you're dealing with data that should be divided into rows rather than columns. Whatever the case, clean, organized data is essential, and Excel has a few powerful techniques to Split Data into separate cells effectively.
This guide covers four methods: Text to Columns, Flash Fill, TEXTSPLIT, and Power Query. Let's dive in!
Table of Contents
Watch the Splitting Data Video

Get the Practice File
Enter your email address below to download the sample workbook.

Text to Columns
Text to Columns is excellent for one-time text-splitting tasks and uses a wizard to guide you.
Step-by-Step:
1. Select the Data: Highlight the cells containing data to be split.
2. Navigate to Data > Text to Columns: This opens the wizard where you choose how to split the data.

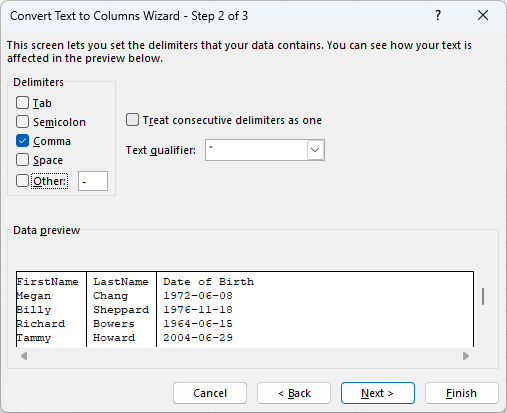
3. Choose a Delimiter: Select how Excel should divide the data (e.g., by comma or fixed width).
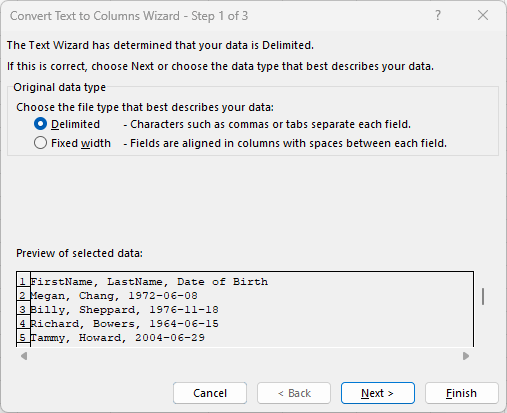
4. Customize the Split: You can add multiple delimiters or even a custom delimiter if your data needs it.
5. Set Data Types: Assign data types to each column (e.g., date format for birthdays).
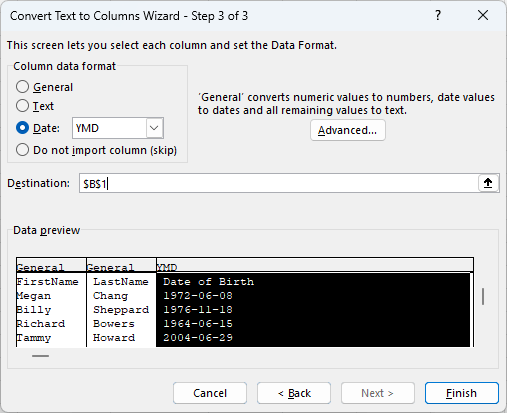
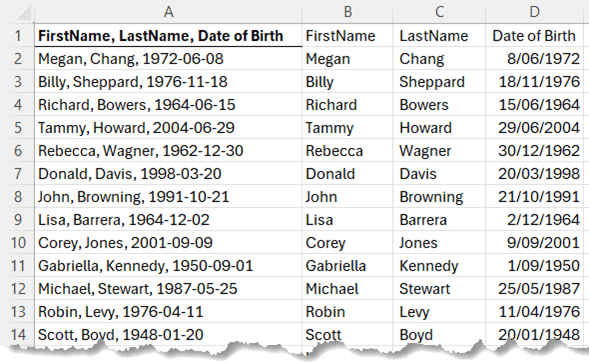
6. Choose Destination: By default, Excel will overwrite your data, so specify a destination cell to keep the original intact. In the screenshot above, you can see I've chosen cell B1 and below we see how Text to Columns has split data into separate cells:
Limitations:
- Text to Columns doesn't update automatically if the original data changes, but it's quick for one-time use.
- The LastName is prefixed by a space, so that would also need cleaning. For this, you could run this column through Text to columns again or use the TRIM function.
Flash Fill
Excel's Flash Fill tool uses pattern recognition to help split data into separate cells based on the examples you provide. This is a fast method for simple tasks.
Step-by-Step:
1. Provide Examples: Enter the first couple of names in the desired split format. Excel will try to detect the pattern.
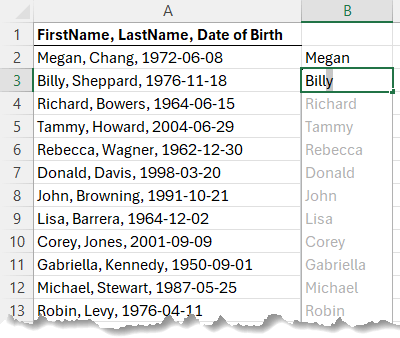
2. Press Enter for Flash Fill: You should see Excel populate the remaining data based on your example.
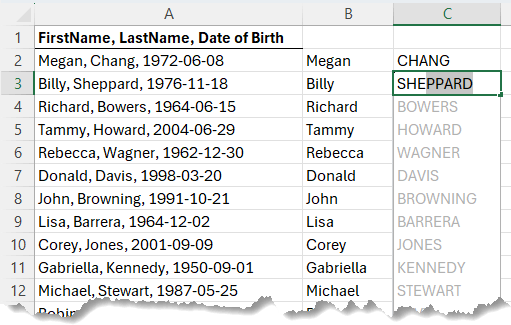
3. Format Specifics: For custom formatting, such as all-caps last names, enter the first example in the preferred format.
Pro Tip: Keyboard Shortcut: Trigger Flash Fill with `CTRL+E` to fill the rest of the column.
Limitation: Flash Fill can copy the formatting from your examples, but it doesn't automatically update with new data. If you add data later, simply re-trigger Flash Fill.
TEXTSPLIT Function
Available in Excel 365 or 2024 and later, the TEXTSPLIT function dynamically splits data into separate cells based on delimiters and updates whenever the original cell changes.
Step-by-Step:
1. Enter the Formula:
=TEXTSPLIT(A2, ",")Where A2 is the cell with data to split and ", " is the delimiter:
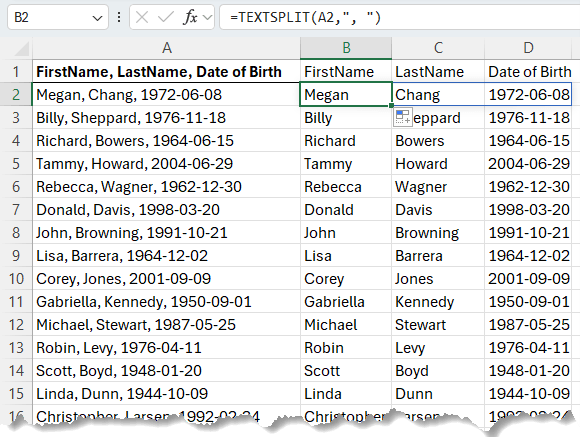
2. Copy the formula down the remaining rows. Note: as this is a spilled array formula, you cannot double click the bottom right of the cell to copy it down.
Pro Tips:
- For complex data, you can combine multiple delimiters e.g.,
=TEXTSPLIT(A2, {",", "-"})
- Optional Arguments: TEXTSPLIT offers customization, such as ignoring empty cells, setting case sensitivity, and padding empty results.
=TEXTSPLIT(text, col_delimiter, [row_delimiter], [ignore_empty], [match_mode], [pad_with])
Benefits: Automatic Updates - If the original data changes, the split results will update automatically.
Power Query
If you work with large datasets or data that requires frequent updates, Power Query is the ideal solution for data transformation.
Step-by-Step:
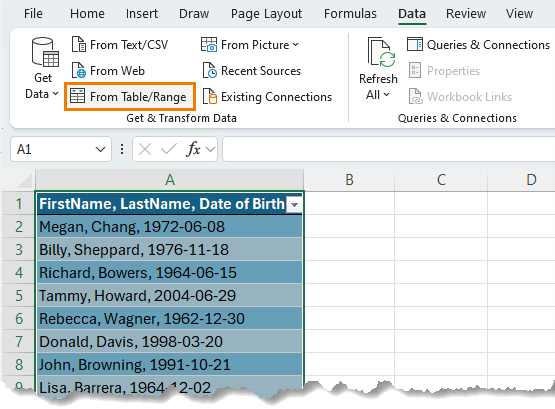
1. Convert to Table: Format your data as a table using CTRL+T.
2. Load to Power Query: Go to Data tab > From Table/Range. This loads the data and opens the Power Query editor.
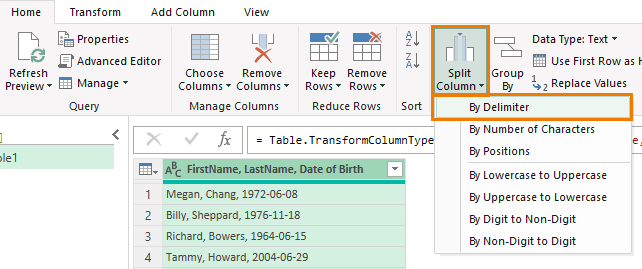
3. Split Column: Select Home > Split Column > By Delimiter:
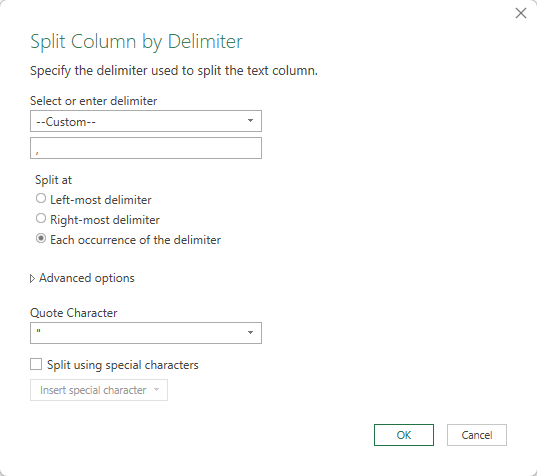
4. Specify Delimiter: Select from the defaults, or specify a custom delimiter e.g., comma followed by a space:
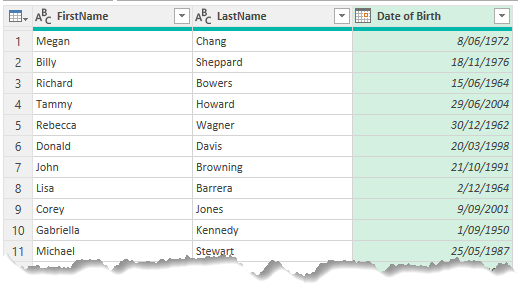
5. Rename Columns: Double click column headers to rename them as needed:
6. Load Data: Home tab > Close & Load the data back into Excel.
Pro Tip: Power Query refreshes data with just a right-click, making it ideal for dynamic datasets that change over time.
Splitting Data into Rows
Sometimes, you need to split data into rows rather than columns. For example, the roster data below requires a separate row for each employee listed in column C:

Power Query's flexibility allows for row-based splitting, perfect for datasets like rosters where each entry needs to be a separate row.
Step-by-Step:
1. Load to Power Query: Go to Data tab > From Table/Range. This loads the data and opens the Power Query editor.
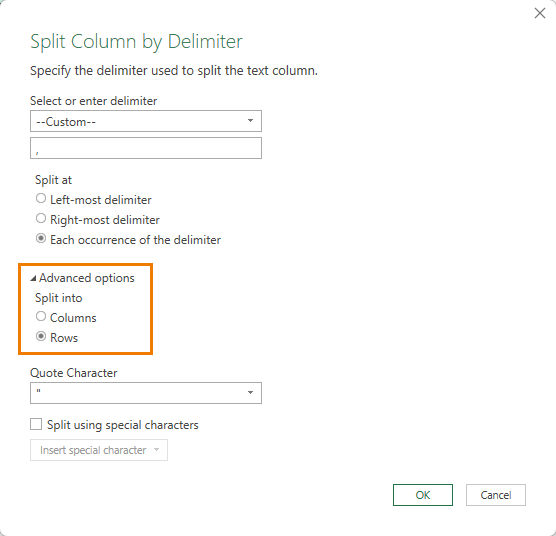
2. Split Roster Column: Select Home > Split Column > By Delimiter
3. Select Row Delimiter: When splitting data, choose "split into rows" in the advanced options.
Power Query will keep additional attributes (e.g., date or hours) in each new row, maintaining data integrity.

10x Productivity
Power Query isn't just for splitting cells; it's an essential tool for all things data cleanup and can save you hours of work. I'm not exaggerating. Here's an extract from an email from one of our course members, Craig:
Mynda, just before I started your Power Query course, Phil told me, "Power Query will change your life". Never a truer word has been spoken; I've since introduced other colleagues to the joys of Power Query in Excel (some of them had been exposed to it via Power BI, but didn't know it was available in Excel), and it's changed their lives, too; they are totally gobsmacked at the power of this remarkable tool.
If you're ready to skyrocket your productivity, check out my Power Query course.
