Written by Alan Murray of Computergaga.
Form controls such as option buttons, combo boxes and check boxes allow you to add interactivity to your spreadsheets. They are familiar to users whether they are Excel savvy or not, making your forms user friendly, quick and easy to complete.
Form controls can be incorporated into your Excel dashboards too, making it easier for users to interact with the charts and the formulae that you have created.
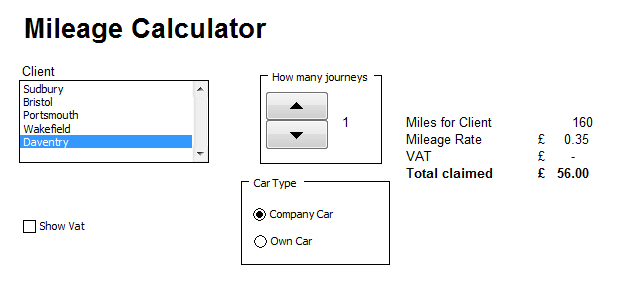
In this article we will be using some form controls to put together a mileage claim form (shown below).
Enter your email address below to download the sample workbook.
Download the Mileage Claim Form sheet to follow along.
Show the Developer Tab
To insert form controls we will need the Developer tab. This tab is not shown on the Ribbon by default, so will need to be displayed.
- Click the File tab on the Ribbon and click Options.
- Select the Customize Ribbon option from the left hand side.
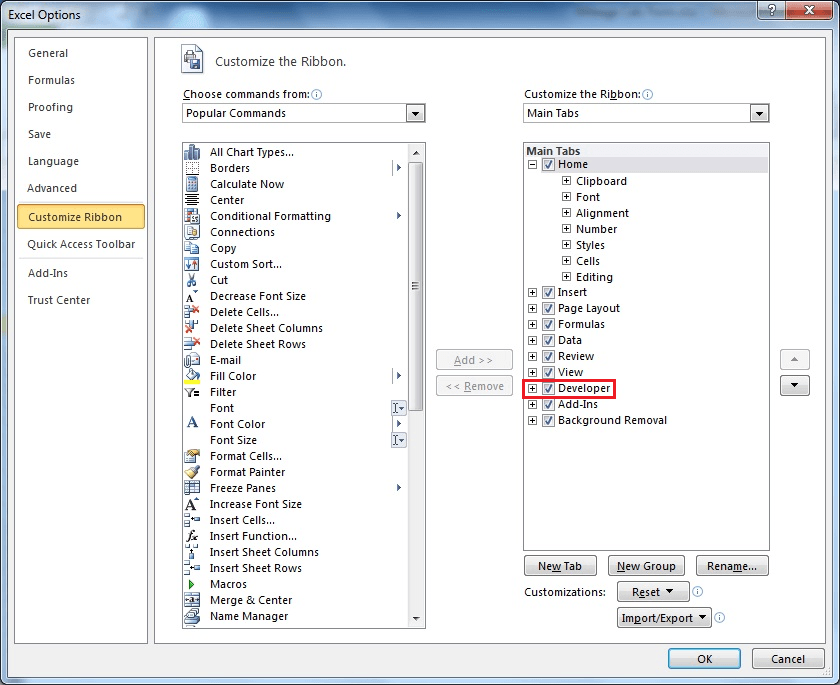
- Click the Developer check box on the right and click OK.
Inserting the Form Controls
To set up the form controls on a spreadsheet you go through three stages. Firstly you need to insert the control, then you choose a cell to store the user selection, and finally you will need a formula to work with the option the user selected.
To insert a form control;
- Click the Insert button on the Developer tab and select the control you want.
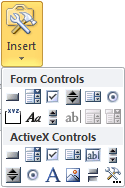
- Click and drag to draw the object onto the sheet. This object can be moved and resized as necessary.
- Once inserted, right mouse click on the control and select Format Control from the menu. Click the Control tab if it’s not already selected.
It’s now time to set the vital properties for the control to function. These settings are a little different between the controls so we will look at each one needed for our mileage claim form in turn.
List Box
The list box control is used to allow the user to select an option from a list. It is great for small lists and displays all the options on screen. They can be used for single or multiple selections.
The user selection is returned as a value. It is the index value of the option they chose in the list.
Let’s use one to enable the user to select the office that they traveled to.
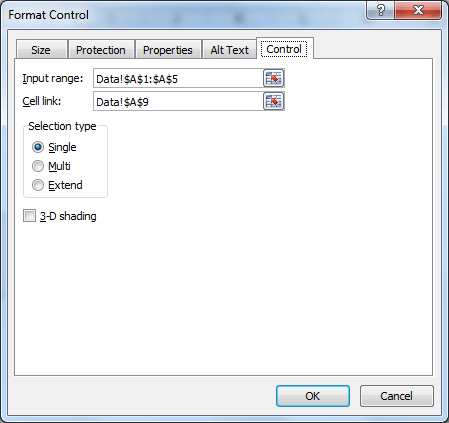
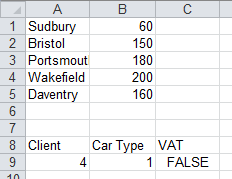
Input range: These are the options we want to provide in the list. In this example we want to select range A1:A5 on the Data sheet.
Cell link: This is the cell you want to use to store the user selection. In this example click on cell A9 of the Data sheet.
Selection type: Would you like a single or multi selection list box. Select Single from the options. They can only select one office.
Spin Button
The spin button control allows the user to increase or decrease a value easily, and by a predetermined amount.
Let’s use the spin button so users can select how many journeys they made.
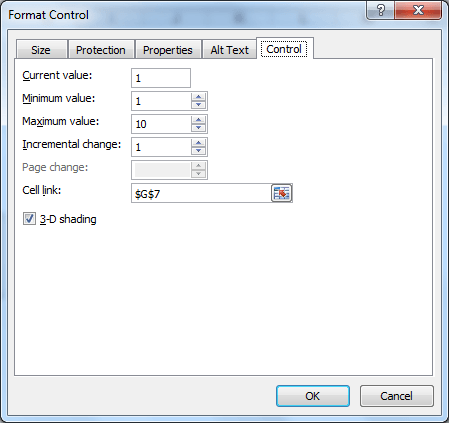
Minimum value and Maximum value: The lower and upper limits of the spin button. In this example the minimum value is set as 1 and the maximum as 10.
Incremental change: The amount that the value increments when increased or decreased. Enter 1 in this field.
Cell link: The cell you want to use to store the user selection. In this example cell G7 on the Mileage Form sheet has been used.
Check Box
The check box control is used for simple on/off selections. The linked cell will display True is the box is checked, and False if it is not. Check boxes allow non-exclusive selections (more than one can be selected in a list of check boxes).
A check box has been used to show or hide VAT from the amount claimed.
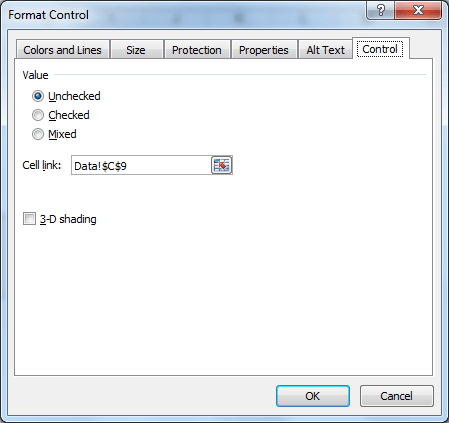
Value: Decide whether the box should be checked or unchecked by default.
Cell link: The cell that will store the True or False selection. Cell C9 on the Data sheet has been used to store this.
Option Button
Option buttons allow user selection from multiple options. They only allow exclusive selections (only one button can be selected). A group box should be used to group option button lists.
User selection is stored as an index number. So the first option button is 1, the second is 2 and so on.
Option buttons have been used in this form to select whether the user used their own car or a company car.
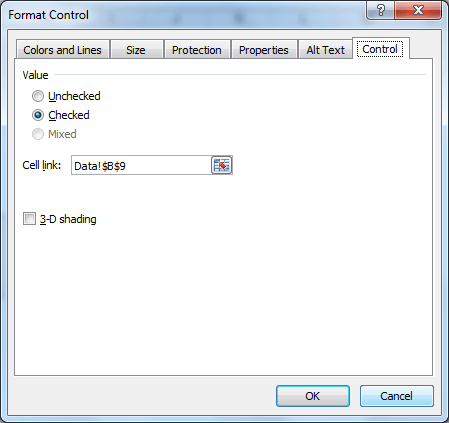
Value: Decide whether the button should be checked or unchecked by default.
Cell link: The cell that will store the user selection. Cell B9 on the Data sheet has been used to store this.
Group Box
The group box control is used to logically group the controls in the form improving its readability. If using multiple sets of option buttons in a form, this control should be used to group them.
In this form a group has been used around the spin button and the option buttons. Simply draw the group box into position and then enter a label for it.
The Formulas
Once the form controls are inserted and functioning correctly, you will need some formulas to put their selections to use.
On our mileage claim form we first want to find out how many miles the user has travelled. This depends on the office they travelled to and how many journeys they made.
Working with the List Box Control
There are a few formulas that work wonderfully well with form controls, and one of those is the Index function. This function will return a value from a specified column and/or row.
This makes it a perfect match for our list box control, as the user will be making a row selection when they choose the office.
The number of miles travelled is returned by the Index function can then be multiplied by the journeys made.
The following formula is entered into cell J7 on the Mileage Form sheet.
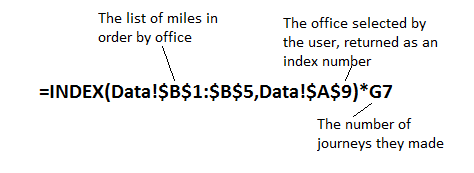
The image below shows the Data sheet.
Formulas for the Check Box and Option Button Controls
The IF function has been used for the check box and option button controls. The IF function works great with check box controls as it returns a True or False value when it is checked, or not.
The formula below will calculate the VAT on the claim if the box is checked, and return 0 if not.
=IF(Data!C9=TRUE,J7*J8*20%,0)
An awesome function for use with option buttons is the Choose function and it’s worth checking out if you get into using form controls. We will use the If function again here though as we only have two options to work with (own car or company car).
The formula below is entered into cell J8 on the Mileage Form sheet. It returns the mileage of 15p a mile if they use a company car for the trip (index number 1), or 35p a mile if they used their own car.
=IF(Data!B9=1,0.15,0.35)
Form controls are a fantastic way of capturing user selection and decisions. They provide interactivity for your spreadsheets and can be used for many scenarios. One area not covered in this article is their use in creating interactive Excel dashboards.
Check out the Excel Dashboards course for more information on how you can use form controls on your Excel Dashboards.
 About the author: Alan Murray is an IT Trainer and the founder of Computergaga. Author of the popular Computergaga Blog. Over 500 useful Excel, Word, PowerPoint and Project tips.

Hi Mynda
Just wondering if the below form control issue have been resolved in the latest versions of Excel.
1) Insert a checkbox in a cell and set it’s properties to move and size with cells.
2) Hide the row containing the checkbox, save and close the file.
3) Reopen the file and unhide the row. The checkbox does not resize back and seems to have “disappeared”.
This bug have been around for a long time and it is very irritating.
Hi Sunny,
With the regular Form Controls the property to ‘move and size with cells’ is greyed out. With Active X Form Controls the form control reappears on un-hiding of the row and is unharmed :-).
On further testing, if the row height before hiding is larger than the default then upon unhiding the row height is only restored to the default, and if that’s too small for the form control then it is resized to fit in the smaller row.
Mynda
Very good
Your tutorials are great and I’ve learned a lot but most is way beyond what I’m looking for. I’ve searched but so far have not found what I’m looking for. All I want to do is create a form that I can email to members of an organization to gather their bio’s. And a way to make it easy for them to fill out. Things like what positions they’ve held, what years, what committees they were on, what years, how may events they were part of, how many shows they performed in etc. Do you have a tutorial that explains how to do this?
Thanks,
Joe
Hi Joe,
Thanks for your kind words. I recommend you try Excel Suvey to gather your data. Here is a tutorial on how it works:
https://www.myonlinetraininghub.com/excel-surveys-an-easy-way-to-collect-data
Kind regards,
Mynda
Thanks! Beginning to learn things which I never thought I could do it myself!
Cheers, Moiz 🙂
This is an excellent tutorial! Thanks much.
I do have a question: Will these techniques work with Excel for the Mac? We’re a mixed technology shop (i.e. Macs & PCs) and if I use these techniques on my PC, I want to be sure the spreadsheets are usable by the Mac users.
Thank you,
Greg
Cheers, Greg.
Regular form controls will work on a Mac, but the Active X versions won’t.
You can download the Excel workbook in the above tutorial and test it out to see for certain.
Kind regards,
Mynda.
Thank you, Alan and Mynda, for an excellent tutorial.
However, there is one thing that should be corrected in the formulae:
It is wrong to use “hard-coded” values within a formula. I refer to the VAT percentage (20%) and to the mileage rates (15p per company cars and 35p per privately owned cars.
Instead, a better solution would be to have these values as defined names and display them (whether to allow these values to be changed by the user or not – is a subject for another discussion).
The advantages are obvious:
1. In case a value changes, one doesn’t need to mess with the formula.
2. All the values are explicit and visible.
3. It’s easier to debug.
Best Regards,
Meni Porat
Hi Meni,
Thanks for sharing your tips. All great of course, and a topic for another blog post since this one was already quite long 🙂
Cheers,
Mynda.
Hi Alan,
Thanks, it is really very very useful.
Regards,
Dnyandeo
On behalf of Alan, thank you 🙂