In today's world, where remote work has become increasingly common, the need to securely share files with multiple people has never been greater.
Whether your file is in the cloud or a local network drive, Microsoft has tools to enable you to prevent unauthorised opening, editing and downloading of your data.
Table of Contents
Password Protect File Open and Edit
Files saved on OneDrive/SharePoint, a local network drive or even your hard drive can be password protected.
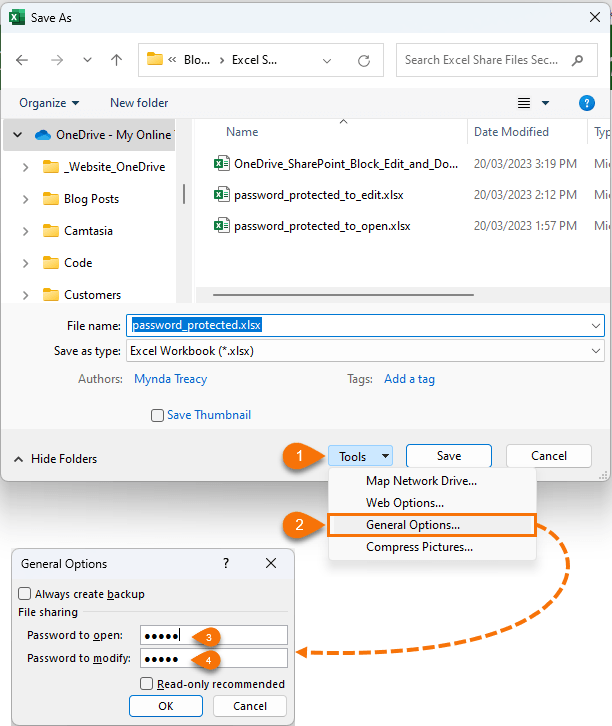
The password can be set at the Save As dialog box > Tools > General Options:
If you want to password protect both opening and editing the file, enter the password in both fields 3 and 4 shown in the image above.
If you only want to prevent editing, simply enter the password in the ‘Password to modify’ field.
Likewise, if you only want to prevent opening the file by unauthorised users, only enter the password at the ‘Password to open’ field.
You’ll be prompted to enter the passwords again to verify them.
Note: when a workbook has password protection to open the file, AutoSave is disabled.
IMPORTANT: if you forget the password to open the file it is very unlikely you will be able to recover it, so be sure to make a note of it in a secure password vault. However, if you forget the password to edit the file, you can use these techniques to remove the Excel password protection.
Retrospective Password Protection
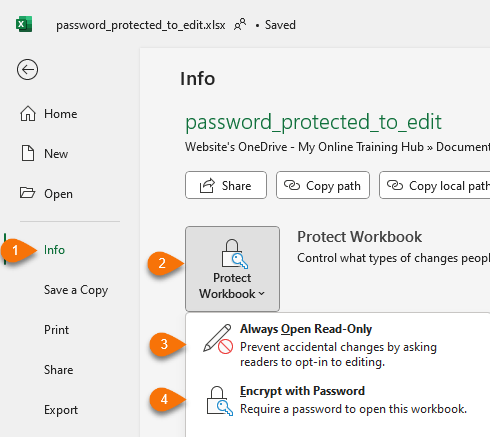
If you have already saved the file, you can add password protection via the File tab > Info > Protect Workbook.
Prevent editing by selecting ‘Always Open Read-Only’ (shown at 3 in the image below) and prevent opening by selecting ‘Encrypt with Password’ (shown at 4 in the image below):
Next time the file is opened you’ll be prompted to enter the password.
Just note that the read only option here doesn’t require the user to enter a password to edit the file, and they can simply enable editing by dismissing the notification.
If you want to restrict editing to specific users, then you’re best to set a password for editing via the Save As dialog box.
Securely Share Files Online
Microsoft OneDrive and SharePoint users can securely share files with restrictions on opening, editing, copying and sharing data.
These options are available in the file sharing settings accessible from within Excel (and Word, PowerPoint etc.), File Explorer, or online in OneDrive and SharePoint.
Excel Desktop App
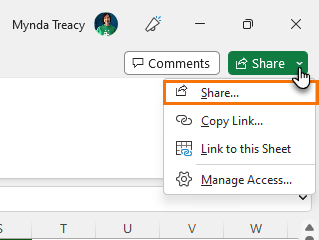
To securely share an Excel file from the desktop app, click on the Share icon in the top right:
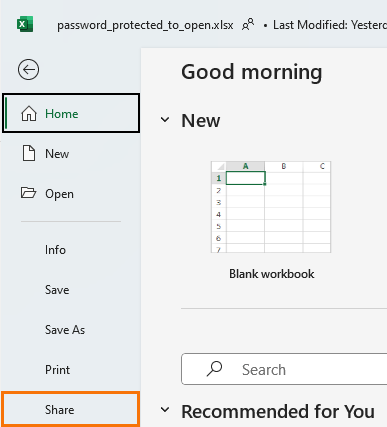
Or via the File tab > Share:
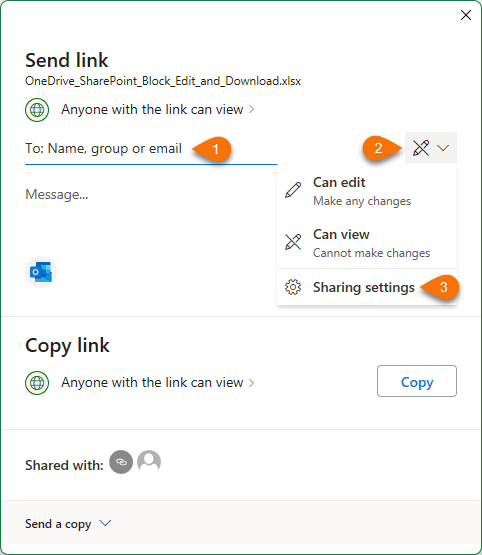
This opens the Send Link dialog box where you can enter a name of someone or group inside your organisation, or email address of someone inside or outside of your organisation (1), then specify the editing rights (2):
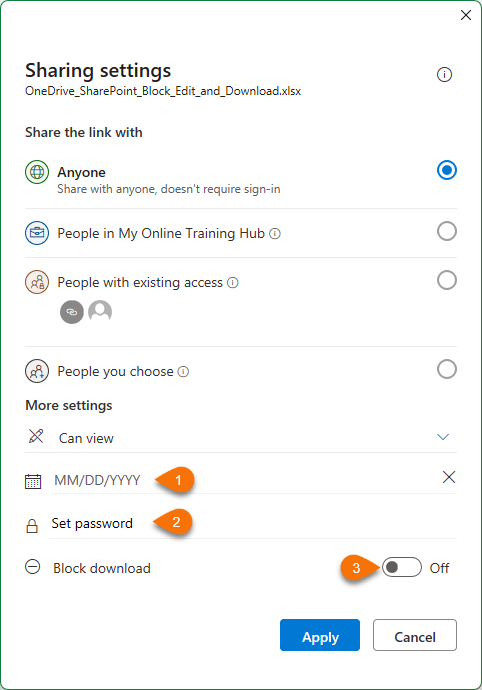
For more sharing restrictions open the Sharing Settings (3 in the image above), which opens this dialog box:
Here you can set an expiration date for the access (1), a password to open and edit the file (2) and prevent downloading of the file (3).
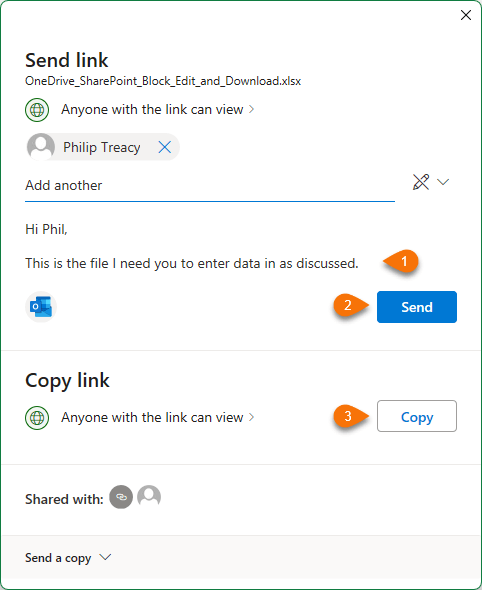
Once you’re happy with the settings, click Apply and you’ll be taken back to the Share dialog box where you can add a message (1), email the link via Outlook (2) or copy the link for sharing (3).
Sharing via OneDrive or SharePoint
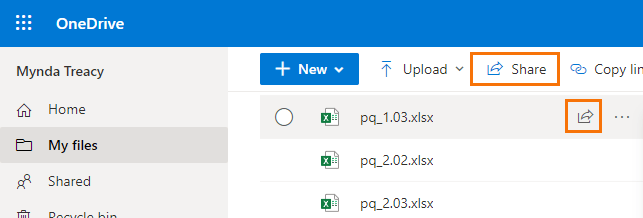
You can share a file or folder directly from OneDrive or SharePoint online via the Share button at the top of the screen, or the Share icon that appears when you hover over a file name:
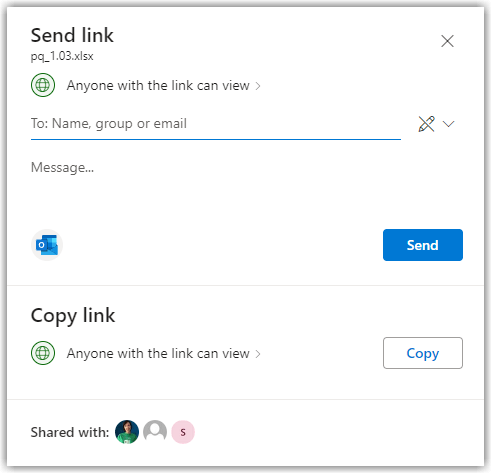
The same Send Link dialog box opens where you can specify who has access and modify settings:
These screenshots are from OneDrive, but the experience in SharePoint is the same.
Sharing Files and Folders from File Explorer
If you have the OneDrive sync app installed, you can access the same sharing tool from the File Explorer.
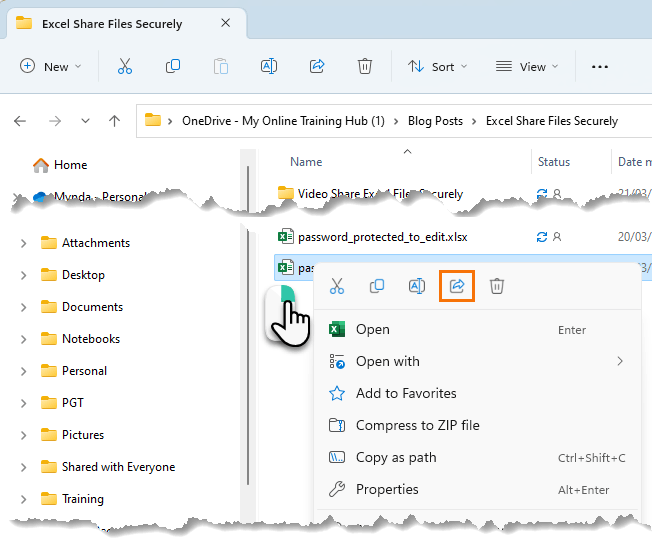
Right click on the file then click the ‘Share’ icon at the top in Windows 11 as shown in the image below.
Note: In Windows 10 the Share option will be listed in the right click menu items.
Allow Data Entry and Prevent Downloading
Unfortunately, allowing data entry but preventing downloading isn’t possible. Instead, you may find using Excel Forms is a better way to collect data from users.
Information Rights Management
If you need to take your data security up a notch further or want to restrict how employees use or distribute files in general, you might like to look into Information Rights Management (IRM).
IRM can be set at the SharePoint Library or List level and applies to Office documents like Excel, Word, PowerPoint and PDFs.
Click here for more on securing your data with Information Rights Management.
Securely Embedding Excel Files
Embedding Excel files in a web page is another great way to securely share reports.
All you need to do is save your file on OneDrive or SharePoint and get the embed code.
There are different approaches required depending on whether you have OneDrive Personal, or OneDrive for Business or SharePoint. The latter two offer more security and bigger file sizes.

