If you receive your data in separate daily, weekly or monthly files then before you can even begin analyzing the data, you need to consolidate it into one table.
In the past we may have written a Macro to automate this process, but if you didn’t have Macro/VBA skills then you were stuck doing it manually.
Nowadays we can automate this process with Power Query, and the best part is you don’t have to be a programmer to use it because there is a nice ribbon interface, so it’s point and click. And when you get the next period’s file, you simply refresh Power Query and it grabs the new data and adds it to the consolidated table for you.
Once we’ve consolidated our files with Power Query we can then load the data into an Excel worksheet, or the Power Pivot data model in Excel or Power BI.
Let’s look at an example.
Watch the Video

Download the Example Data CSV Files
Enter your email address below to download the sample files used in the video.

Power Query Get Files from a Folder - The Data
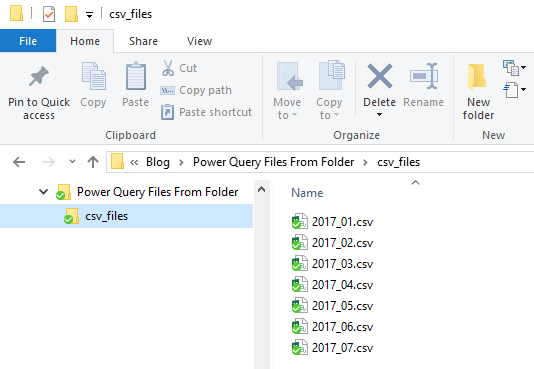
In the folder below, you can see I have 7 CSV files (tip: you can also get Excel files and Text files from a folder):
Important Point: The folder should only contain files that you want to consolidate. That said, you can pick and choose the files you want to import, it’s just safer and cleaner to keep the folder dedicated to your source data files. Trust me.
In this example each CSV file contains 3 columns of data, as you can see below in the January 2017 file:
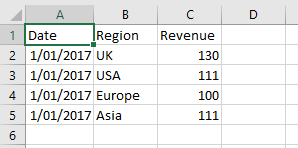
Important Point: My files have 3 columns of data, but you can import more. However, each file must contain the same number of columns, with the same names, although they don't need to be in the same order. If your data is an export from another system, then this should be the case anyway.
Power Query Get Files from a Folder – Excel Steps
The Power Query location is slightly different in earlier versions of Excel. I’ll point out menu differences where relevant but be prepared for them to change in the future because Microsoft are renowned for redesigning menus!
Step 1: Create a New Query.
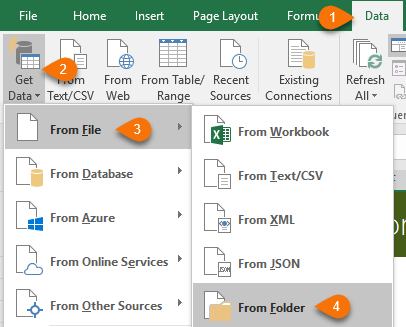
Excel 2016 onward: Data tab of the ribbon > Get Data > From File > From Folder:
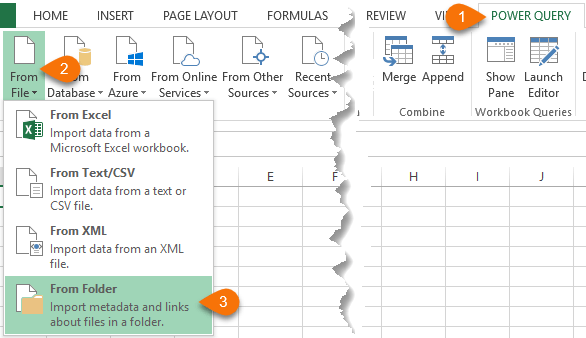
Excel 2010/2013: Power Query tab of the ribbon > From File > From Folder:
Power BI Desktop: Home tab of the ribbon > Get Data > More > File > Folder:
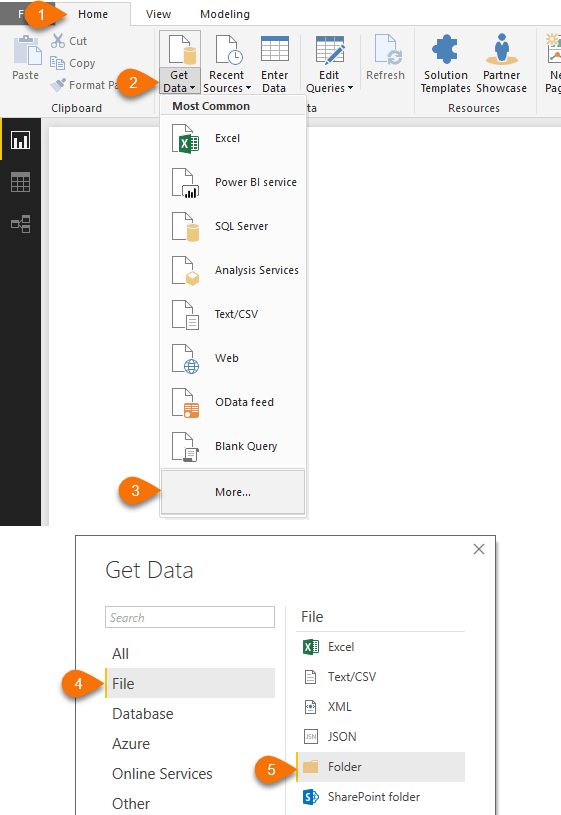
Note: From here on the process is the same in all versions of Excel & Power BI.
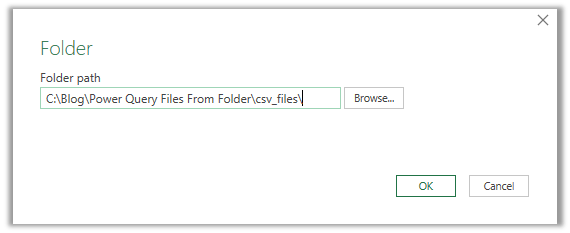
Step 2: Specify the Folder
In the ‘Folder’ dialog box browse to your folder location, or paste it in and click OK (in later versions of Excel you will be taken directly to the Browse Files dialog):
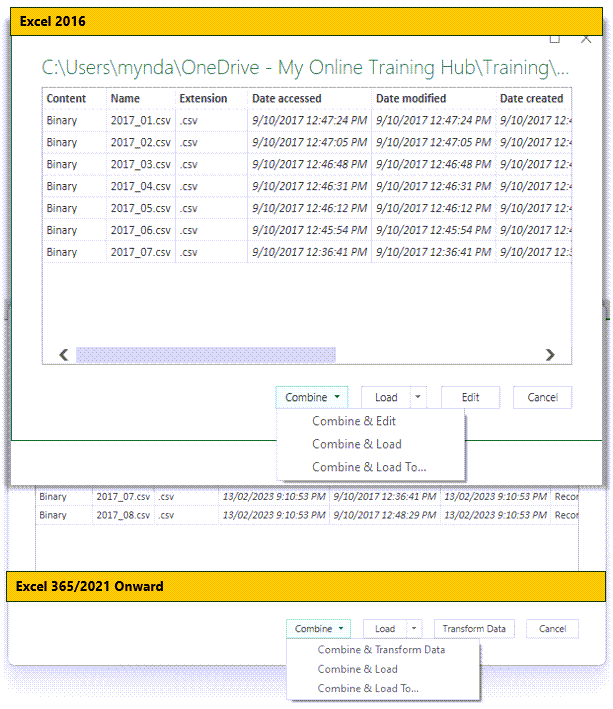
Step 3: Select Files
At the next dialog box you’ll see a list of the files in the folder. At this stage you can choose to Load right away, or Combine & Edit/Transform, Combine & Load, or Combine & Load to... (which allows you to specify where you want the data loaded).
I always choose 'Transform Data' aka ‘Edit’ in Excel 2016 and earlier. This way I can filter out any files I don't want to include before combining.
I also like to edit my query to make sure the data types have been set correctly, plus it gives me an opportunity to clean the data or add additional columns, and give the query a sensible name before loading it:
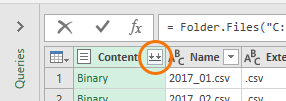
Step 4: Expand Content
Clicking Transform Data/Edit in step 3 launches the Power Query Editor window and displays a list of the items in the folder:
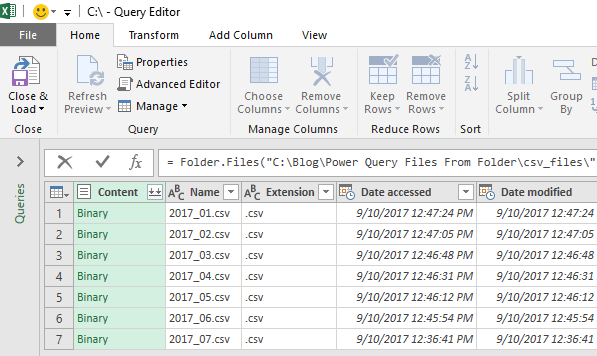
Tip: Notice there are some columns included in this view that you might want to make use of. More on that another time.
In this window you can filter out any files you don’t need. I want them all so I’ll click the double down arrow on the Content column to extract the data from each of the CSV files:
Step 5: Select Settings
Clicking the double down arrow on the Content column will launch the Combine Files dialog box where you can see a preview of the data and:
- Specify which file you want Power Query to use as the example file.
- Choose the File Origin; this helps Power Query understand what format the dates and currency values will be in etc.
- Choose the Delimiter
- And whether the first 200 rows will be an adequate sample size
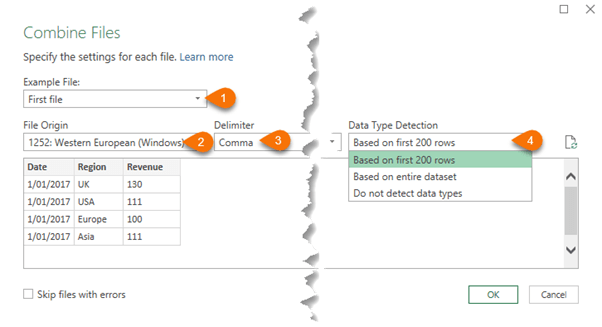
Once you’re happy with the settings, go ahead and click OK
Step 6: Combine Files
Power Query gets the data from the files you selected in step 4 and consolidates them into one table:
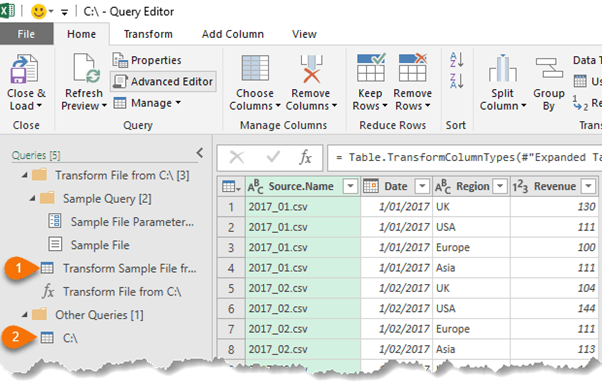
On the left (image above) is a list of queries that were automatically generated by Power Query when you clicked the Ok button in step 5. There are two items in this list that are important to you:
- This is the sample file query. It’s this query that Power Query uses as a template for consolidating all of the files into the final query. This is the query to modify with any changes you want applied to all of the files in the folder. For example, unpivoting tables should be done in the Sample File query because you need to do this before combining them.
- This is the final query that consolidates the files into one table. This is the query currently displayed in the preview. Modify this query with any final changes or additional columns you want to add etc. prior to loading the data into a worksheet or the Power Pivot data model. E.g. you might want to delete the Source.Name column if you don’t need it, plus it’s always a good idea to make sure the data types for the columns are correct.
On the right-hand side of the Query Editor window (image below) you’ll see the Query settings for the selected query:
- I recommend you replace the default query name to something more useful. Just type it in the Name field and press ENTER. I’ll call mine ‘consolidated_data’.
- This is a list of the steps that have been applied to the data to reach the point you see in the preview.

Step 7: Load Data
When you’re happy with the data in the final query you can load the data.
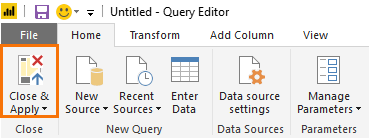
Power BI Desktop: Home tab > Close & Apply:
This will add the data to the Power BI Data Model (Power Pivot).
In Excel: Home tab > Close & Load:
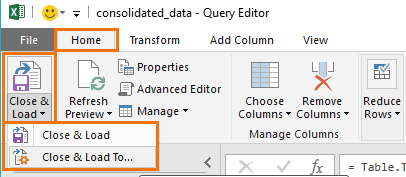
Close & Load will load the data to the default location, which is usually an Excel Table in a new worksheet in the Excel file containing the query.
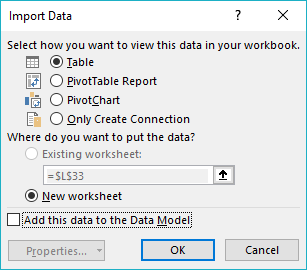
If you want to choose a different location or load it to the Power Pivot data model then choose ‘Close & Load To…’. This opens the Import Data dialog box (image below) with the defaults selected, which you can edit:
I’ll click OK and you can see the data has been inserted into a new sheet; ‘Sheet1’ and formatted in an Excel table ready for me to use:
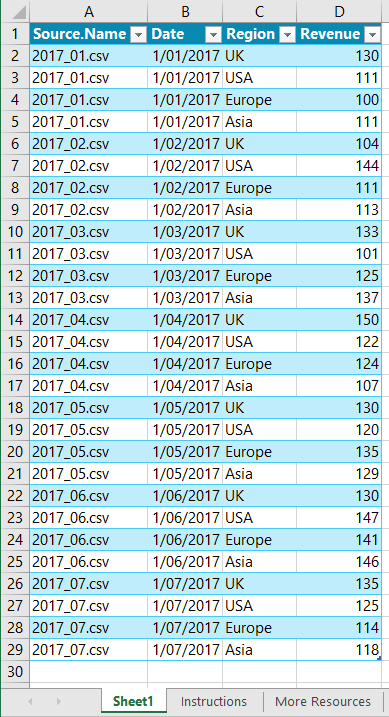
Notice that the data goes up to July 2017.
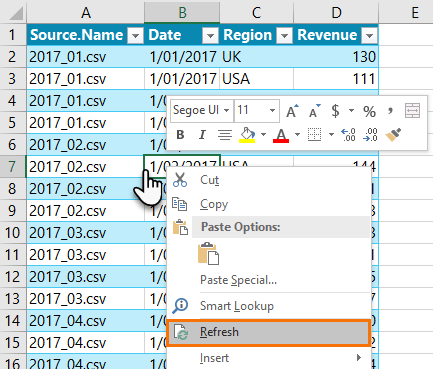
Updating the Query with New Data
As you can see in the image above, the data we currently have is for the period January to July 2017. When August’s CSV file gets added to the folder:

Simply right-click any cell in the Table > Refresh:
Power Query goes to the folder, gets the new file (actually it gets all files again), runs them through the steps you set up to clean and transform the data and then loads the updated Table:
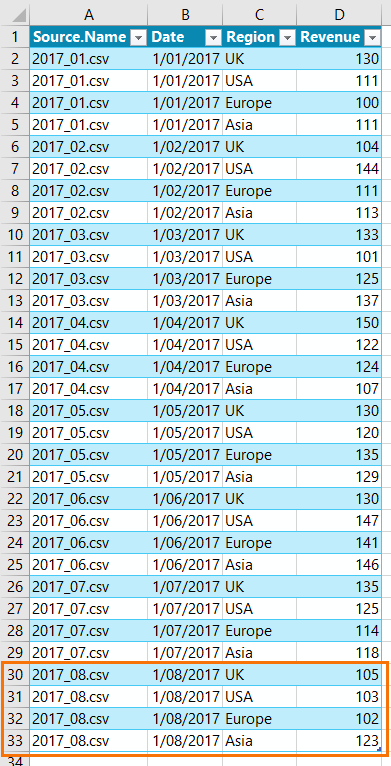
I know, it sounds too easy, but honestly that’s all you need to do.
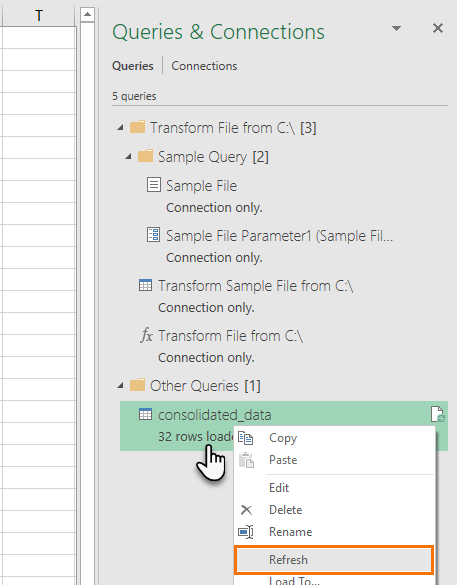
Note: If your data has been loaded to the Power Pivot data model then you can also right-click the query in the Queries & Connections pane in the right-hand side of your Excel window > Refresh (if the Queries & Connections pane isn’t visible you can enable it on the Data tab of the Ribbon):
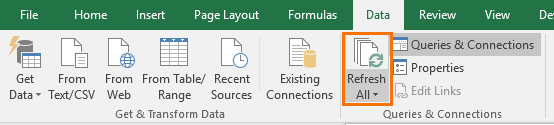
Or click the Refresh All button on the Data tab of the ribbon (note; this will refresh everything!):
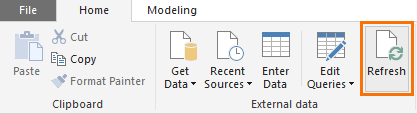
In Power BI Desktop the Refresh button is on the Home tab:
More Power Query
More Power Query tutorials on our Blog.
And if you want to get up to speed quickly, please check out my Power Query course and Power BI Course.
Get help with Power Query questions on our Excel Forum.


Hi Mynda,
Thanks for so awesome tutorial.
Would that work also for files that have different number of columns although with the same names? This happens sometimes when the bank adds a column, and if the file got 20 columns, usually, I don’t check if there is something new.
Thanks,
Juan-Antonio
63263 Neu-Isenburg
Germany
You’re welcome!
If the number of columns is variable, then you would need to check for that and adjust the file being used in the Sample to the file with the most number of columns. There are ways to automate this, but I don’t have any tutorials I can point you to, sorry.
Mynda
Hi Mynda, thanks for tutorial! It was very clearly and didactic.
One question: It’s possible to import all files from a folder and load each file as a new query instead of combining all files?
Best wishes!
Thank you for your feedback!
Unfortunately no, Import From Folder is meant for combining files, not for splitting.
HI
IF THE SAMPLE FILE YOU USE FOR AUTOMATING PQ IS NOT CONSISTENTLY THE SAME FOR EACH FILE (MONTHLY BANK STATEMENTS) IN THE FOLDER (IT OCCASIONALLY HAS TABLES ON DIFFERENT SHEETS IN EACH OF THE OTHER FILES) WHAT COULD I DO TO CORRECT THIS?
You could try this technique for getting multiple sheets from multiple files with Power Query.
Combining the data files into one is extremely useful to my business reports at work. You provided the best explanation I have been searching for days. Thanks for helping people with good solutions which we never know. Please keep on your work.
That’s awesome to hear, Ray! Glad I could help.
Hi Mynda
At Step 4, when you’re about to click on the double-down arrow at the top of the Content column to combine the files and create your Sample File query and final query, is there any way you can get it to bring across the metadata in the other columns there, e.g. file name, date accessed, etc? With my query I need to bring across the file name as it contains vital information on the period the data belongs to. Unfortunately this isn’t contained in the actual source data files, but only in the filenames! I think that you allude to this in your Tip (Tip: Notice there are some useful columns included in this view that you might want to make use of. More on that another time.)
Please can you point me to where you cover this? Basically, I need to have a column in my final query that contains the source file name for each row of data.
Many thanks
Ian
Hi Ian,
You can use the technique covered here to keep the file name column when getting files from a folder.
Mynda
Thank you so much, Mynda – that worked a treat!
Great to hear!
I get a message when I try to close and load -“Data could not be retrieved from the database. check the database server or contact your database administrator. Make sure the external database is available, and then try the operation again.”
There is no protection on these files or shares and if I look at the worksheet that it can produce I can see exactly what I want as the data. I can even copy it and paste it to the same file im trying to load to. Have you any ideas what I am doing wrong? Thanks Dave
Hi David,
Hard to see a reason without seeing a file. Are those files old xls or they are xlsx files? If they are xls, I suggest converting them to xlsx and try again.
How to make the power query combine I7 to Y7 ( Header) with varying number of rows of all identical excel files ignoring empty rows?
Please post your question on our Excel forum where you can also upload a sample file and we can help you further.
Thanks for solution This works perfectly for me
Great to hear, Archana!
Hi there I have this issue when I go to
“Get data” then “from file” —> “from folder” that no DOCUMENTS APPEAR. No excel files, no csv files, nothing at all?! Infact my “From folder” icon is white not brown like shown above.
What is the cause of this, I’ve tried with excel files, csv files, everything but everything folder appears empty for both when I search for them?!
Hi Ron,
The icon colour will indicate that you have a different version of Excel to the one in the screenshots, but that won’t be the issue.
Please post your question on our Excel forum where you can also upload screenshots of the folder that contains the Excel/CSV files and the Power Query menu that shows that same folder empty, and we can help you further.
My after my step 3 I don’t get the result you get.
Please post your question and screenshots on our forum where we can help you further and our answers can also help others: https://www.myonlinetraininghub.com/excel-forum
Hi, I have the same problem! I am not getting the options to select Combine/ Load/ Edit etc down in the window after selecting the folder… i searched for the answer in the forum but cant find. appreciated if you could provide the link for the solution.
Hi Sajil,
If you don’t see the same buttons as me it’s because you have a different version of Excel. Depending on how old your version is, you may not be able to use this technique, but you can use this technique to get multiple files from a folder instead.
Mynda
Hi Mynda,
it appears that the resutl of the “Folder.Files” function not only yields the files in the folder (given as first paramater of the function), but also files within any subfolder of that folder. In my case, this was an undesired effect and I looked for a way to suppress this. I didn’t find any (other than deleting the subfolders or their files … ), but I noticed the Folder.Files function has a second paramter (options), of which I can find no documentation.
I suspect the solution to the “subfolder” issue may be found there, however, without docs it’s hard. Hoping you will be able to shed some light. And, BTW, best wishes for 2021 to the team, which I admire for their competence
Hi Kurt,
Indeed, Options are not documented. A record is expected in that parameter, something like [Directory=false], but we do not know what options are accepted, nothing works at this moment.
You can try a simple thing to avoid subfolders: normally you have:
= Folder.Files(“C:\Your Folder Path”)
Use path as a parameter, then you will be able to filter the Folder Path column:
Path= “C:\Your Folder Path”
Source = Folder.Files(Path)
Files = Table.SelectRows(Source, each [Folder Path] = Path)
Thanks a lot Catalin, that works !
One minor remark : the value in the [Folder Path] field always seems to end with “\”.
So, with resptect to your example, I had to use a statement like
Files = Table.SelectRows(Source, each [Folder Path] = Path & “\”)
Apart from that, great workaround !
You’re welcome, glad to hear you managed to make it work!
HI,
Hope you can help. I’m working in Office 2016 and using the Get Data to combine multiple csv files (117 files in total). The end result is a file with 490412 rows. This works fine when I run it on my laptop, however, a colleague needs to run the report and is logged on via a Terminal server desktop and every time they run the report it only pulls through 115 of the files. has anyone any idea why it might do this?
Hi Carol,
That sounds odd. I wonder if there’s something specific with the two files it doesn’t import. Are you able to isolate those files and test the query on those two files plus a few others. That way you can figure out if it’s the files that are the problem, or whether there is some limit that’s being hit so only 115 files are imported.
Mynda
Stack overflow errors…
Is there a way to figure out what the errors are?
Everything worked perfectly until I tried to refresh the query from folder path and then the stack overflow error occurs.
My query has stripped/red bars just below the column headers and on the left side pane of power query it has the ⚠️ icons.
Only thing I can think of is start over. But, all my hard data cleanup & transformation would have to be repeated again, correct? Or is there a way to use the applied steps to a new query?
Thanks
Hi Tahj,
Without seeing your query and having access to the source data it is hard to say what the problem is.
That said, there are a few things you can check.
Firstly the yellow warning triangles beside each query name indicate that there’s a problem with that query – the error you are receiving.
The striped red bars under the column header indicate that column has errors in it.
If you see the word Error in a row of a column, you can click beside the word and at the bottom of the screen it will show you the error message.
Your query is not destroyed/unusable, you can right click on the query name (left hand side of screen) and then click on duplicate to copy it.
For any query that is generating errors, you can work your way back through the transformation steps starting at the bottom until you get to a step that does not cause an error. You know up to that point everything is working. Then with the next step that cause the error, you should get a message on screen telling you what happened.
As I said without seeing your query and some screenshots of the messages on your screen it’s hard to troubleshoot.
Please start a topic on our forum and attach your query (either the Excel workbook or PBIX file) with screenshots and some source data if possible.
Regards
Phil
I am building reports based on a data folder in Box that I need a larger group of people to be able to see. Using Power Query, I was able to get the data for the pivot tables I am building, but it is a set path to the data, meaning anyone else in my company cannot read it if it is not a web address.
The Box share URL is not an absolute path so I cannot get the data using “From Web” either.
Maybe I haven’t had enough coffee, but is there a solution to this?
Hi Norma, presumably you mean Dropbox. If so, please see this same Q&A on our forum for getting data from Dropbox with Power Query. Mynda
Very Informative
Thanks 🙂
I am working on a project at work that requires me to gather dat from 01.01.18 to present. There is no difficulty in downloading the data into Excel in .xlsx or .csv format. I am comfortable with either format. When I download the data, I get everything from 01.01.18-present. This will be a perpetual project, and need to know if setting up files to import using Power Query, should I break up the original download into month by month files (01-18,02-18 etc.). I would seem logical to take the time and do because I will be updating on a monthly bases going forward, but is it necessary at the start? Is there an advantage to using .xlsx format or .csv format? Thank you in advance for your insight.
Hi Timothy, As long as your source files have the same column layout and headers it doesn’t matter if the earlier files contain a whole year’s worth of data or just monthly. The only benefit might be that it could be quicker for Power Query to refresh if it has less files to get, but I haven’t tested this theory. Mynda
Thank you! Is there any advantage to use .xlsx format or .csv format?
Not that I’ve tested. My gut feel is CSV files might be slightly quicker to refresh, but you’d have to test.
Thank you very much; very cool!
Question please: After all I am getting error on some columns because the columns have text & numbers. e.g. A350141, ec3566331, P05920196 … etc.
How and what do to extract CSV without getting errors?
Thanks a lot!
Hi Nawaf, you should set the data type for this column as text since it contains some text along with numbers, which means it can only be a text column.
Mynda
Hi,
I have followed all those steps until Step 6. I went on 1. and made the changes I would like applied each time to the Example file meaning : change the type on date columns, delete some columns I have no use for (I cannot select the columns that are in this extract when i extract it, need to do it in Excel)…
I have a problem with 2. , which shows an error sign saying that one column doesn’t exist (it was the first column of the file, that I had to delete for data privacy).
How can I correct this error ?
Do I need to switch columns in Query as a first step (put a date column first and switch place with Customer name column) before deleting Customer name column ?
Any help is deeply appreciated ! Thanks
Hi Iris,
Please upload some sample files and your query file on our forum, will be much easier to provide a solution that will work for you.
See you there.
Catalin
Hi Catalin,
Sadly I cannot upload a document as these are business documents private to my company. I am not at liberty to share.
However I can describe what happened and the “solution” I found.
The changes I made in Step 6. 1. in “Transform Sample File…” , notably deleting a column or changing its name, weren’t reciprocated into the 2. “Other queries- C:/” part.
The solution I found was to delete the columns also in the code of “C:/” function . I suppose I can also change manually the names of the initial columns, so that they are written in the exact same way as in “Transform Sample File” after the steps I made to change the names.
But isn’t it supposed to update on its own ?
Hi Iris,
I never recommend uploading sensitive data. But a sample file with a few rows of anonymized data can be provided.
Anyway, if you think that you cannot prepare sample fake data, I’ll only be able to recommend a few generic solutions you can try.
“Transform Sample File” you mentioned is a name used by power query automatic combiner, so I guess you used that tool to combine data. If the data structure is always the same, will not be a problem.
But if the structure is even slightly changed, it will fail to update because all column names are hard typed into automatic queries.
Use Table.ColumnNames function to expand data, instead of those hard typed lists, this will make your query more flexible.
Basically, avoid the automatic combiner, it’s not flexible, build your own query.
In this blog you used .csv files and in your blog “Import Multiple Files Containing Multiple Sheets with Power Query” I noticed you used xlsx files. Are there reasons for using one type verses the other? Is it an application bases decision? Our ERP system downloads data in “Unicode text” and after I tidy the data up I can save either cvs or .xlsx.
Hi Timothy,
Import data from folder works for text files as well, no need to convert them, they can be text/csv, excel files, xml files, json files. More, in Power BI the Import from folder can take data even from pdf files.
Thank you Catalin
I understand how to use get & transform. I love it. My question is: Is there a way to apply the same data transformation rules to multiple files with out combining those files into one.
I have two csv files created daily and I combine those into one excel file with get and transform and it works great, but I then do the exact same thing the next day. I need each day’s data as it’s own file.
Is there a way to apply the transformation rules as some sort of template?
Hi Karl,
Not sure way you need to separate them, usually new data needs to be appended to existing data, in order to include the newest data sets in reports. If you need each day data as a separate file with transformed data, store the daily files in subfolders, make a copy of the query file and just change the subfolder path to get data from another data set. You can set some naming standards for subfolder names that can be automated, for example subfolder name like “yyyy-dd-mm” can be automated if in your query file you define a new table with a cell using =NOW() formula, then take this cell into power query as part of the source files path.
Mynda,
I created a summary document from three separate workbooks and created a pivot table from that summary document. If I update the individual files and refresh the summary table, everything updates correctly. However, how do I send all of these to my client so that he can update the files and have the summary document properly update?
Hi Mike,
I would use a table to store the source folder path, and a small code in workbook_open event:
Thisworkbook.worksheets(“Path”).Range(“a2”).Value=Thisworkbook.Path & “\Source Files” .
Use this table to set dynamic folder path in your queries.
Of course, the files folder should be in the same folder with the summary file.
Catalin, I certainly need to improve my VBA skills. However, is it not possible to do the following: send the data files and the summary file to the client. Then that person can open the summary file, go to the Queries & Connections and choose to edit the combined files. Then choose the Source settings and change the location? I tried that but it didn’t work. Is something like this possible?
Hi Mike,
The solution I described will work for client too, if you send him the source files, client stores the data files into a folder named “Source Files”, the folder should be located in the same location with the summary file.
In your queries, you can make the address dynamic if you replace the address for folder or file location with a dynamic parameter from a table in a sheet, like:
FolderPath = Excel.CurrentWorkbook(){[Name=”Path”]}[Content]{0}[Folder Path], (this means that you need to have a table named Path, with 1 column “Folder Path”, with the path typed in cell 1 of that column.)
Then, in query, instead of Folder.Files(“C:\Users\Mike\Source Files”), you will use : Folder.Files(FolderPath) (same with file addresses)
Now, the query will take the address from the worksheet table, instead of being hard typed in query text.
let

    Path = Excel.CurrentWorkbook(){[Name="Path"]}[Content]{0}[Folder Path],

    Source = Folder.Files(Path)

in

    Source
This is great, it’s been a real game-changer for me in making it so simple (and flexible) to change the location of the source folders…
Glad to hear that.
You can always use our forum for better support, you can create your own topics there and upload sample files.
Regards,
Catalin
Mynda,
How do you handle users sharing an Excel file where some of the queries use the Files from Folder option. The issue I currently see is the initial PowerQuery workbook was created on Bob’s computer and the files reside on OneDrive. Therefore, the file path to the folder is something like: C:\OneDrive\Users\Bob\Data. Everything works great for Bob, he can refresh the workbook with no problem. The problem is when he shares that file with someone on his team (Steve). Steve gets the file which has a number of PivotTables that are using data from queries that originate from Bob. Now, Steve has access to those same files, however, the same path on his computer is different: C:\OneDrive\Users\Steve\Data.
How do you set up this scenario so that users can share the workbook and the queries that use the Folder Files option? I found a solution using Parameters for connecting to a single file, just not yet for this scenario. Many thanks for all your brilliant work and advice.
Hi Sterling,
No easy way to do this because OneDrive file paths when generated with the CELL function (which is how you’d normally automate it) will be https://…. However, if the users’ file path will always be C:\OneDrive\Users\username\Data then you could use a drop down list for the user to choose their name and have it populate the ‘username’ in the file path using CONCATENATE.
Mynda
Thanks Mynda! I just need to figure out how to pass into the source string the updated file path based on a dropdown. I know how to setup the concatenate/dropdown piece on the Exce side, just how to pass that properly into the Source string for the powerquery.
I cover that in my Power Query course.
Hello, thanks for your efforts.
What if the file is outlook data file (extension : .pst) and I want to import list of all emails as if I want to get data from outlook exchange.
Best regards
Hi Abdul,
If your Outlook is Microsoft Exchange then you can connect to it as explained here, but I don’t think it can read the .pst files.
Mynda
Hi Mynda-
I was wondering do you have to save the underlying files as CSV? or can you use .xls files?
Hi Christine,
Yes, you can use .xls files with this technique too.
Mynda
Hi, Thanks a lot.
That’s interesting.
Hi Mynda,
I thought as much. Best to ask. I will exclude the list by doing a Text.length and filter to allow the query to run and then do another query to bring back that which is too long… what to do with these is another question I’ll have to ponder…
Hello,
I have tried this and thank you for the completeness of visuals and text provided. A quick question – as I am getting an error after close & load. I am guessing that if the files in the folder sourced is more than the maximum character limit for file/folder names in XL that it will not load…? Would you have any suggestions as a workaround on this (apart from reducing the file name length – which could be tedious if there are many!)
Thanks!
Hi Sylvain,
I don’t know of a fix or workaround for file names that are too long, sorry.
Mynda
Does this refresh button also add new workbooks that are added to the selected folder?
Or does it only update the current workbooks that are selected before?
It will take all the existing files from that folder.
All you have to do is to make sure they have the same headers structure, otherwise it might break the query.
Cheers,
Catalin
Hi Mynda,
Hypothetical scenario ahead.
In this case, the August file is added to the folder and the table is updated. This only works as long the files have the same structure.
What if the september file has a different column order, column name, new columns, etc?
Thanks,
Frederico
Hi Frederico,
Depending on the steps in your query, it’ll either return an error, or it will add the different columns rather than appending the data.
Mynda
Hi,
First of all I would like to thank you for the quality of your site and training. Much appreciated.
I’ve a question.
I would like to do the same thing in order to populate my dashboard. The only thing different is I do not want to combine files, I would like to delete existing and replace by the new data. In fact, each week, I receive a new file with the existing data, adding the new data from the last week and all weeks like this. Do you have a solution to use a folder and when a new file – with exactly the same structure – arrives in the folder, it’s delete and replace for my dashboard ?
Thank you for your help.
Hi Hughes,
Power Query can’t delete data as such, but if you replace the file it is getting from the folder with the new file (using the same file name and column structure), then when you refresh the query it will pick up the new file and the old data will no longer be included in the query.
Mynda
I will try !
Thank you for your swift answer. Again, you are doing an excellent job !
🙂 you’re welcome!
Step 5: Select Settings
The option to adjust settings did not appear for me? I was only able to select “ok”.
Also, for some when I “Close & Load” my query gives an error:
[Expression.Error] The key didn’t match any rows in the table. Only one of the files actually loads with data.
Hi Tahj,
If you don’t see the options in step 5 then you have an old version of Power Query. You need to update Excel or download the Power Query add-in if you’re running Excel 2010.
Mynda
Also, when pulling files from a folder. Does the saved file names have to be in the same format (i.e. purchases march, purchases february, etc) OR
does the tables/data within the excel files have to be formatted with same column headers, in same order, and same headers, and tables with same naming prefix?
That could have been my issue…
I’m using excel 2010 and have the Power Query and Power Pivot add ins.
Thank you
Hi Tahj,
Great to see you’re giving Power Query a go. Yes, the file format need to be the same in each file (each file must contain the same number of columns, with the same names in the same order). That’s how Power Query knows which columns of data get appended to one another.
Mynda
Hello Mynda, I have a folder with several excel files extracted from SSRS. I am including the period within the file names so I can use the source column to split it and get period. Example FILENAME_20180430.xlsx I duplicate the column and leave only the date reference to create relationship to calendar table. Works great. The problem I am having is that when I try to add prior period data i.e. FILENAME_20180331.xlsx into folder when I refresh I receive the “We couldn’t refresh the connection because the column FILENAME_20180430.xlsx of the table was not found. I think the problem is that when I promote to header the first row it is pulling the source file name into the header so when a prior period is added it is using it as first sample file but the name is …0331…instead of …0430…so it kicks out an error. I have tried to tell it to use a specific file as sample file but when I add prior period file it gives me error. Any help is appreciated.
Hi Joe,
Are you promoting the first row as header in the ‘Transform Sample file…’ query or the final query under the ‘Other Queries’ folder? It should be done in the ‘Transform Sample file…’ query.
Mynda
Hi Mynda,
I transformed it on the final query. So can I go to sample query and edit it so it uses a specific sample file and not the first one. I have the power pivot model constructed even using CUBEMEMBER to fetch data so I would hate to rebuild and lose a lot of work.
Thanks
Hi Joe,
You should be able to remove the step from the final query and modify the sample. As long as you don’t change the column headings of the final query loaded into Power Pivot it should be fine. Just make a copy of your file to be on the safe side.
Mynda
Hello Mynda, I have a .csv column that contains commas. How do I keep from separating the data in that one column by commas? I use the load csv and delimit by commas.
Thanks
Hi Vanessa,
I’m not sure you can stop it separating one comma delimited and not the others, but you can join those columns back together once you import it and add a comma separator with the Merge Columns tool.
Mynda
Hi Mynda,
Very useful as always.
I’m using this to combine system generated csv downloads that are dropped into a folder by our ERP system.
The problem is that the first three rows are populated with a report header and not the column headings. I’f I go through the folder and delete the first three rows bingo all is right with the World – but I’d prefer to eliminate this step if possible.
Is there a way to skip the first three rows of each file?
Thanks
Vaughan
Hi Vaughan,
In the tutorial above see step 6.1; you can edit the ‘Transform Sample File…’ query. Then in the Applied Steps pane remove the ‘Promoted Headers’ step so you can fix those first 3 rows. The changes you make to this query get applied to all files you import.
If you get stuck, please post your question on our Excel Forum, where you can also upload your sample files.
Mynda
Hi Mynda
Great post.
I am trying to pull text files from a folder and would like to preserve the ‘Date created’ column as this will drive an accounting journal.
However, when I click the double down arrow on the Content column it jumps past the ‘Combined Binaries’ step (which displays an icon) into an Imported Text step.
Do I need to add some code to preserve the ‘Date created’ column?
I don’t have the ‘Combine’ option on the initial screen so maybe my version of PQ (or excel) is the issue!
Best wishes,
Casey
Hi Casey,
It sounds like you have an old version of Power Query. You just need to download the update and you should see the same interface as me.
Mynda
HI Mynda,
I have a problem… my problem is not about combining data from csv. files. My problem is about using the combined data in Pivot Table. The problem arises when I create a Pivot Table that connects to the combined Data (>1M rows of data). I’d got an error message saying something like “Problem in obtaining data”. I am using Excel 2010 (32 bit) with Power Query installed. Not sure if you have encountered this kind of problem? Appreciate your advice.
Hi MF,
Have you tried loading the data to Power Pivot and creating a PivotTable from there? That said, you need 64-bit Excel to handle 1M+ rows of data.
Mynda
Hi Mynda,
Thanks for your prompt reply.
I haven’t tried using Power Pivot to create the PivotTable as I guess I am the only person with Power Pivot installed in my company… believe it or not? haha.
I also thought about the 32-bit issue… but again that’s something out of my control in office. 🙁
That’s a shame 🙁
I have to go through combine and edit if I want to retain my file name – I then use power query to pull the first part of my file name as part of my data. If I go straight to edit, I lose the file (source) name. It’s not a big deal, but do you have any idea why that happens? I have excel 2016
Hi Amelia,
No idea why that would be other than maybe you have an old version of Excel 2016. Are you able to update it?
Mynda