• Skip to main content
  • Skip to header right navigation
  • Skip to site footer

My Online Training Hub

Learn Dashboards, Excel, Power BI, Power Query, Power Pivot

  • Courses
  • Pricing
    • Free Courses
    • Power BI Course
    • Excel Power Query Course
    • Power Pivot and DAX Course
    • Excel Dashboard Course
    • Excel PivotTable Course – Quick Start
    • Advanced Excel Formulas Course
    • Excel Expert Advanced Excel Training
    • Excel Tables Course
    • Excel, Word, Outlook
    • Financial Modelling Course
    • Excel PivotTable Course
    • Excel for Customer Service Professionals
    • Excel for Operations Management Course
    • Excel for Decision Making Under Uncertainty Course
    • Excel for Finance Course
    • Excel Analysis ToolPak Course
    • Multi-User Pricing
  • Resources
    • Free Downloads
    • Excel Functions Explained
    • Excel Formulas
    • Excel Add-ins
    • IF Function
      • Excel IF Statement Explained
      • Excel IF AND OR Functions
      • IF Formula Builder
    • Time & Dates in Excel
      • Excel Date & Time
      • Calculating Time in Excel
      • Excel Time Calculation Tricks
      • Excel Date and Time Formatting
    • Excel Keyboard Shortcuts
    • Excel Custom Number Format Guide
    • Pivot Tables Guide
    • VLOOKUP Guide
    • ALT Codes
    • Excel VBA & Macros
    • Excel User Forms
    • VBA String Functions
  • Members
    • Login
  • Blog
  • Excel Webinars
  • Excel Forum
    • Register as Forum Member
  • Login

Excel Protect Ranges with Different Passwords

You are here: Home / Excel / Excel Protect Ranges with Different Passwords
July 8, 2014 by Mynda Treacy

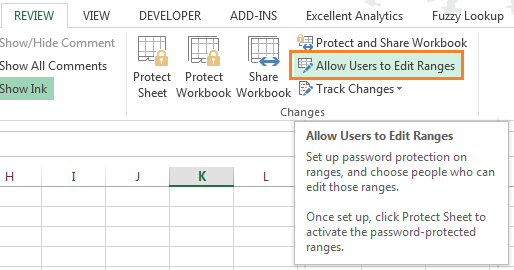
Did you know you can set different passwords to protect specific ranges of your Excel worksheets?

It’s called Allow Users to Edit Ranges and you’ll find it on the Review tab in the Changes group:

Allow users to edit ranges

Let’s say you have several different users of a workbook and you want to restrict each user’s editing rights to a specific range (knowing this would have been handy when I used to collate budget and forecast data from department managers), you can give them their own password which only unprotects the section they’re allowed to work on.

Or, if you work on a network drive you can simply grant users permission to a specific range so they don’t have to enter the password.

Applying Different Passwords

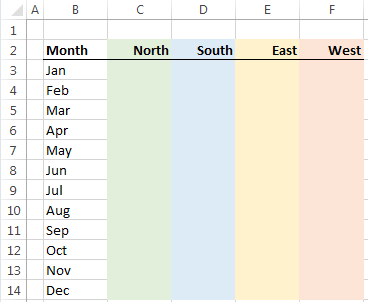
It’s easy to set up. I’ll demonstrate using these 4 regions where each region will have a different user enter the data:

choose ranges

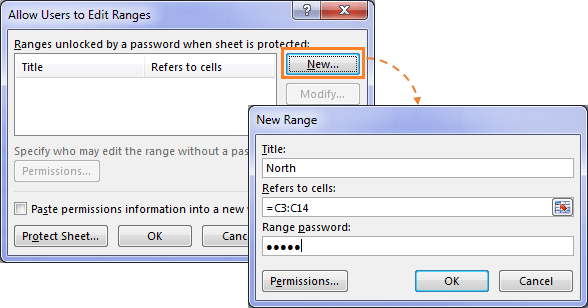
  1. Go to the Review tab in the Changes group > Click on Allow Users to Edit Ranges button.
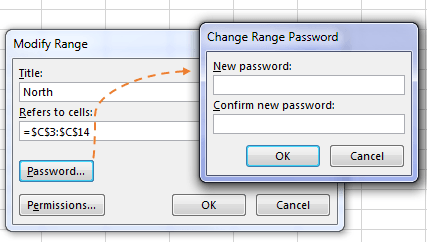
  2. Click on β€˜New’ to set up your first range for North, which will be cells C3:C14 and enter your password:
  3. add new ranges

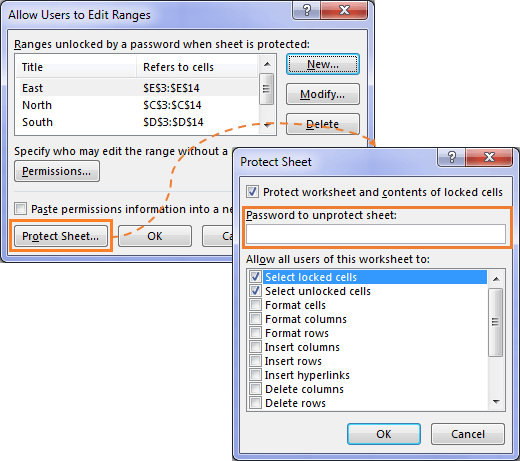
  4. Rinse & Repeat for regions South, East and West using different passwords for each (assuming a different user will input each region).
  5. Tip: You can set non-contiguous ranges, just select the first range > hold down CTRL and select the next range and so on. This will insert a comma between each range.

  6. Now you should have all 4 ranges listed in the Allow Users to Edit Ranges dialog box and you’re ready to protect the sheet. Click on the Protect Sheet button and enter a unique password (this is your master password so it should be different from the passwords for the users):
  7. protect sheet

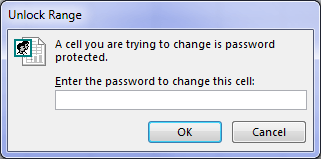
  8. Now when anyone attempts to enter data into the protected cells they’ll be prompted for their password:

unlock a range

Things to note:

  • Upon the user entering their password, that range becomes unlocked while the other ranges remain locked.
  • You can unlock multiple ranges and doing so will not lock any previously unlocked ranges.
  • Once a range has been unlocked by a user, it will remain unlocked until the workbook is closed.
  • Saving a workbook doesn't lock any ranges.
  • No protection is actually applied until you password protect the workbook. Don’t forget this step πŸ™‚

Changing Passwords

If you need to change a password simply:

  1. Go to the Review tab > Click Unprotect Sheet > enter your password
  2. On the Review tab > Allow Users to Edit Ranges
  3. Click on the range you want to edit > Modify > Password > enter your new password:
  4. change passwords

  5. Don’t forget to protect the sheet again.

Protection for Groups and Users

If your workbook is on a shared network drive then you can assign individual users or groups of users. Any permitted users can then edit the protected ranges without having to enter the password.

Note: Other users can still edit the ranges by typing in the password.

To set up access for users and groups of users:

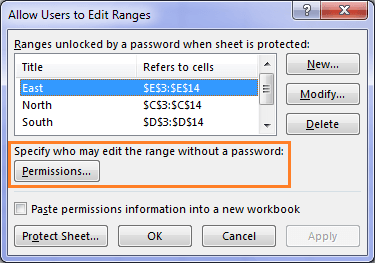
  1. After setting up your ranges open the Allow Users to Edit Ranges dialog box.
  2. Click on the range you want to set permissions for and click the Permissions button:
  3. set permissions

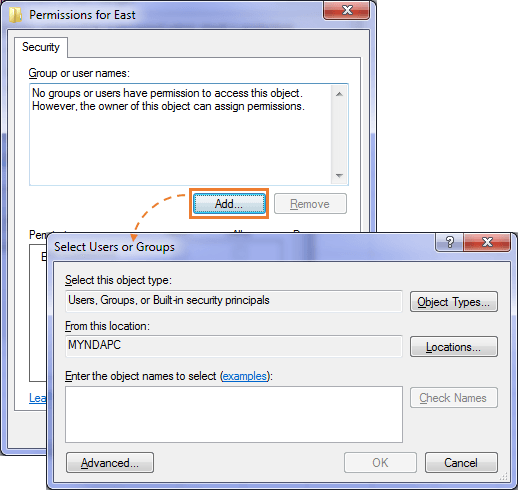
  4. In the next dialog box click Add. This will open the dialog box where you can select the users or groups (note: I don’t have a network drive so my dialog box in the image below doesn’t show a list of users or groups, but yours should if your file is saved to a network drive):
  5. allow users

  6. Now you’re all set. Don’t forget to password protect the workbook again πŸ™‚

Caveat

Please be aware that Excel doesn’t encrypt data in a password protected workbook and anyone can figure out a way to crack the password in an Excel file by doing enough searches on Google.

Excel password protection is designed to prevent users from accidentally editing data they shouldn't, and to avoid confusion by allowing you to hide formulas and other information from view. It’s by no means Fort Knox.

Mynda Treacy

Microsoft MVP logo

AUTHOR Mynda Treacy Co-Founder / Owner at My Online Training Hub

CIMA qualified Accountant with over 25 years experience in roles such as Global IT Financial Controller for investment banking firms Barclays Capital and NatWest Markets.

Mynda has been awarded Microsoft MVP status every year since 2014 for her expertise and contributions to educating people about Microsoft Excel.

Mynda teaches several courses here at MOTH including Excel Expert, Excel Dashboards, Power BI, Power Query and Power Pivot.

More Excel Posts

8 Excel in-built AI Tools

Built-in Excel AI Tools

Clean, analyze and visualize data with these Official Excel AI tools by Microsoft. Including formula writing, PivotTables, Charts and more.
excel date and time

Excel Date and Time

Everything you need to know about Excel date and time. Includes comprehensive workbook with every date and time function, plus PDF version.
10 mistakes to avoid when using excel formatting

10 Mistakes to Avoid With Excel Formatting

These are the Excel formatting habits that drive me crazy and what you should do instead to ensure you use formatting effectively.
linear regression

Excel Linear Regression

Excel linear regression is easy with the built-in tools. Use charts to plot linear regression or use the Data Analysis Toolpak.
speed up slow excel files

How to Improve Excel Performance

How to improve Excel performance and the various causes of slow Excel files so you can speed up Excel and avoid problems in future.
Securely Share Excel Files

Securely Share Excel Files

Securely share Excel files stored locally, on OneDrive or SharePoint. Prevent editing or downloading, specify who can open and edit the file.
excel check boxes

Interactive Excel Check Boxes

Excel check boxes are interactive elements you can link to formulas, charts, conditional formatting and more.
tips for working in multiple excel files

Hacks for Working in Multiple Excel Files

Awesome tips for navigating, arranging and working in multiple Excel files. Guaranteed to streamline your workflow and increase productivity.
chatgpt for excel

ChatGPT for Excel

Using ChatGPT for Excel can be hit and miss. Learn the best uses for ChatGPT to make your Excel life easier and what to avoid using it for.
excel templates

Where to Find Free Excel Templates

Where to find free Excel templates and how to create your own Excel templates. Using templates saves time and effort.


Category: Excel
Previous Post:Protect and Unprotect All Sheets in a WorkbookProtect and Unprotect All Sheets in a Workbook
Next Post:3 Steps to Easy Bullet Graphs in Excel

Reader Interactions

Comments

  1. sana

    September 13, 2020 at 5:38 pm

    Greeting
    thank you for the great information .i want to clarify if it is possible to lock each column by different user with different password (daily check list with different user )
    regards

    Reply
    • Mynda Treacy

      September 14, 2020 at 1:24 pm

      Yes, Sana. You can protect different columns for different users.

      Reply
  2. Mufz

    April 6, 2020 at 1:54 am

    Is there a way I can do this to FormControls or ActiveX controls? For examlpe, I have 4 check boxes (form control or activeX) and I need to individually password protect them so that Person 1 can only check/uncheck checkbox1 and Person 2 can only check/uncheck checkbox2 and so on.

    Reply
    • Mynda Treacy

      April 6, 2020 at 9:40 am

      Hi Mufz,

      In the Protect Sheet dialog you check the ‘Edit Ojects’ box to allow interaction with form controls and other objects.

      Mynda

      Reply
  3. john

    April 18, 2018 at 3:29 pm

    Hello and thank you!

    Is it possible to do this within a VBA-Code?

    Thanks

    john

    Reply
    • Mynda Treacy

      April 18, 2018 at 8:32 pm

      Hi John,

      Sure, if you know how to write the VBA code, almost anything is possible.

      Mynda

      Reply
  4. Jamie

    March 21, 2018 at 4:12 am

    Thank you! Is there any way to relock the ranges after a user has inputted their password and no longer needs to edit their ranges? Other then closing the document, as you noted in your “Things to note”?

    Things to note:
    β€’Upon the user entering their password, that range becomes unlocked while the other ranges remain locked.
    β€’You can unlock multiple ranges and doing so will not lock any previously unlocked ranges.
    β€’Once a range has been unlocked by a user, it will remain unlocked until the workbook is closed.
    β€’Saving a workbook doesn’t lock any ranges.

    Reply
    • Catalin Bombea

      March 21, 2018 at 3:23 pm

      Hi Jamie,
      That cannot be done without a macro. I suggest uploading a sample file to our forum, if you need help on writing the code for this.
      Regards,
      Catalin

      Reply
  5. David Heard

    July 25, 2017 at 5:25 pm

    Hello and thanks for the info. Is there a way to create permissions with passwords within the “allow users to edit ranges” feature using vba. Thank you!

    Reply
    • Catalin Bombea

      July 26, 2017 at 3:44 am

      Hi David,
      I used the macro recorder while doing the operation manually, and here is what the recorder produced:

      ActiveSheet.Protection.AllowEditRanges.Add Title:="Range1", Range:=Range( _
      "A1:C20"), Password:="1111"

      Is that what you wanted?
      Catalin

      Reply
  6. Gordon Robbins

    July 23, 2016 at 9:31 pm

    This blows me away. It’s great, but… I spaghetti coded my own administrator login layer for a workbook I made for my work, because I wanted people to have access to the data but not be able to change (screw up) all of my hard work. It even locks people out if they try X number of failed attempts, etc.
    And now, you go and show me THIS, and I realize that all of what I did was for naught….
    Aaaaaaaaaahg!
    But, thank you!

    Reply
    • Mynda Treacy

      July 24, 2016 at 7:56 pm

      πŸ™‚ glad you’ll find this useful, Gordon.

      Reply
  7. ELINOR

    June 4, 2015 at 4:34 pm

    Thank you very much ma’am for this another brilliant knowledge you had shared. Maam please teach me how to make a default header and footer so that everytime i open a new excel workbook and print my output there is automatically a header and footer in it without typing again and again header and footer. Thank you very much and GOD BLESS.

    Reply
    • Mynda Treacy

      June 4, 2015 at 7:18 pm

      Hi Elinor,

      Glad you liked it.

      To have a default header and footer already set up you need to modify your default workbook. To do this:

      1. Open a blank Excel workbook.
      2. Format the blank workbook with the header and footer that you want.
      3. Choose Save As.
      4. From the “Files of type” drop-down list, select “Excel Template (*.xltx)” and change the file name to “Book”
      5. Set the “Save in” location to the XLSTART folder*.
      6. Click Save.
      7. Close Excel and re-open. The blank workbook should contain the header and footer you previously set.

      *To find your XLSTART folder :
      Windows XP : C:\Documents and Settings\User_name\Application Data\Microsoft\Excel\XLSTART
      Windows Vista : C:\Users\User_Name\AppData\Local\Microsoft\Excel\XLSTART
      Windows 7 /8 : C:\Users\User_Name\AppData\Roaming\Microsoft\Excel\XLSTART
      Replace User_Name with your username on your computer.

      Mynda

      Reply
      • Khushnood Viccaji

        June 4, 2015 at 9:31 pm

        And of course, if you want any new *sheets* you insert to have the same formatting, you should save the file as “Sheet.xltx” in the XLSTART folder. πŸ™‚

        Reply
        • Mynda Treacy

          June 4, 2015 at 9:37 pm

          Indeed. Good tip, Khushnood.

          Reply
          • ELINOR

            June 6, 2015 at 5:58 pm

            Thank you very much ma’am.

  8. shapour moradi

    August 1, 2014 at 4:53 pm

    thanks a lot

    iran,isfahan

    Reply
    • Mynda Treacy

      August 2, 2014 at 7:33 am

      You’re welcome, Shapour πŸ™‚

      Reply
  9. Ivan

    July 18, 2014 at 11:38 am

    You are excellent

    Reply
    • Mynda Treacy

      July 18, 2014 at 12:30 pm

      Thanks, Ivan. Glad you found it helpful.

      Reply
  10. KALAISELVAN R

    July 17, 2014 at 8:08 pm

    Wonderful Article.Thanks for sharing to us.

    Reply
    • Mynda Treacy

      July 17, 2014 at 8:29 pm

      You’re welcome, Kalaiselvan πŸ™‚

      Reply
  11. RGS

    July 12, 2014 at 2:48 am

    Great article Mynda… Thanks

    Reply
    • Mynda Treacy

      July 12, 2014 at 7:54 pm

      Thanks, RGS πŸ™‚

      Reply
  12. naeem

    July 11, 2014 at 9:06 pm

    really it is most helpful tips, thanks

    And which 1 next???

    Reply
    • Mynda Treacy

      July 11, 2014 at 10:02 pm

      πŸ™‚ thanks, Naeem.

      Next is a surprise!

      Mynda

      Reply
  13. MF

    July 10, 2014 at 12:15 pm

    Just another great tips!!!
    Thanks for sharing.

    Reply
    • Mynda Treacy

      July 10, 2014 at 12:30 pm

      Thanks, MF πŸ™‚

      Reply
  14. JERALD

    July 9, 2014 at 5:18 pm

    very nice examples..

    thank u

    Reply
    • Mynda Treacy

      July 9, 2014 at 5:21 pm

      Thanks, Jerald.

      Glad you liked them πŸ™‚

      Mynda

      Reply
  15. Jef

    July 9, 2014 at 12:38 pm

    A useful tip and very handy. I would definitely recommend this method. Thanks for sharing.

    Reply
    • Mynda Treacy

      July 9, 2014 at 1:26 pm

      Cheers, Jef πŸ™‚

      Reply

Leave a Reply Cancel reply

Your email address will not be published. Required fields are marked *

Current ye@r *

Leave this field empty

Sidebar

More results...

Popular Content

  • 10 Common Excel Mistakes to Avoid
  • Top Excel Functions for Data Analysts
  • Secrets to Building Excel Dashboards in Less Than 15 Minutes
  • Pro Excel Formula Writing Tips
  • Hidden Excel Double-Click Shortcuts
  • Top 10 Intermediate Excel Functions
  • 5 Pro Excel Dashboard Design Tips
  • 5 Excel SUM Function Tricks
  • 239 Excel Keyboard Shortcuts

100 Excel Tips and Tricks eBook

Download Free Tips & Tricks

239 Excel Keyboard Shortcuts

Download Free PDF

mynda treacy microsoft mvpHi, I'm Mynda Treacy and I run MOTH with my husband, Phil. Through our blog, webinars, YouTube channel and courses we hope we can help you learn Excel, Power Pivot and DAX, Power Query, Power BI, and Excel Dashboards.

Blog Categories

  • Excel
  • Excel Charts
  • Excel Dashboard
  • Excel Formulas
  • Excel Office Scripts
  • Excel PivotTables
  • Excel Shortcuts
  • Excel VBA
  • General Tips
  • Online Training
  • Outlook
  • Power Apps
  • Power Automate
  • Power BI
  • Power Pivot
  • Power Query
microsoft mvp logo
trustpilot excellent rating
Secured by Sucuri Badge
MyOnlineTrainingHub on YouTube Mynda Treacy on Linked In Mynda Treacy on Instagram Mynda Treacy on Twitter Mynda Treacy on Pinterest MyOnlineTrainingHub on Facebook

Sign up to our newsletter and join over 400,000
others who learn Excel and Power BI with us.


Company

  • About My Online Training Hub
  • Disclosure Statement
  • Frequently Asked Questions
  • Guarantee
  • Privacy Policy
  • Terms & Conditions
  • Testimonials
  • Become an Affiliate
  • Sponsor Our Newsletter

Support

  • Contact
  • Forum
  • Helpdesk – For Technical Issues

Copyright © 2023 Β· My Online Training Hub Β· All Rights Reserved. Microsoft and the Microsoft Office logo are trademarks or registered trademarks of Microsoft Corporation in the United States and/or other countries. Product names, logos, brands, and other trademarks featured or referred to within this website are the property of their respective trademark holders.