
You send an Excel file.
Five minutes later, someone overwrites your formula, breaks the report, deletes a sheet, unhides something they should not see, or accidentally shares confidential information with the wrong person.
Now you are fixing something that already worked.
If you regularly send Excel files to clients, colleagues, managers, students, suppliers, or external partners, you need more than good formulas. You need to protect the workbook so people can use it without breaking it.
In this post, I’ll show you six Excel tricks that help protect your file before you share it.
Table of Contents
- Watch the Video
- Why Excel File Protection Matters
- Trick 1: Only Unlock the Input Cells
- What Does Locked Mean in Excel?
- How to Unlock Input Cells in Excel
- What Users Can Still Do on a Protected Sheet
- Trick 2: Hide Formulas from the Formula Bar
- Important: Hidden Formulas Are Not Encrypted
- Trick 3: Protect Sheet vs Protect Workbook
- Trick 4: Make Sheets Disappear Without Deleting Them
- Trick 5: Remove Personal Information Before Sharing
- Trick 6: Encrypt the Whole File with a Password
- Excel Protection Methods Compared
- Final Thoughts
- Next Steps
Watch 6 Excel Tricks to Protect Your File Before Sharing

Why Excel File Protection Matters
Most Excel files are built for someone else to use.
That might be a sales tracker, commission calculator, budget template, dashboard, invoice file, forecast model, or reporting workbook.
The problem is that most users do not know which cells are safe to edit. If every cell is available, they can easily:
- Overwrite formulas
- Change lookup tables
- Delete worksheets
- Rename tabs
- Unhide back-end sheets
- Expose hidden calculations
- Share metadata you did not mean to include
- Forward confidential information
Excel protection is not just about security. It is also about usability.
A well-protected workbook guides users to the right cells and prevents common mistakes before they happen.
Trick 1: Only Unlock the Input Cells
The first step is to separate the cells users should edit from the cells they should not touch.
For example, imagine a simple sales commission tracker.
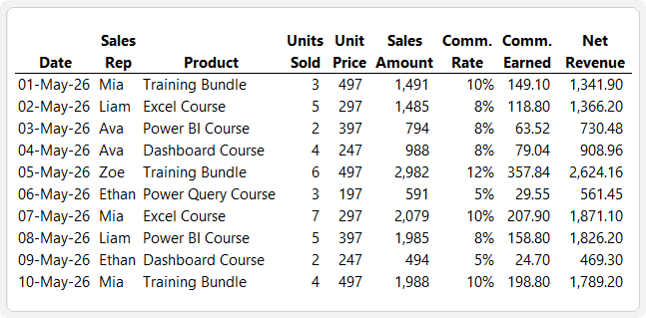
The user needs to enter:
- Date
- Sales rep
- Product
- Units sold
- Unit price
The remaining columns contain formulas that calculate:
- Sales amount
- Commission rate
- Commission earned
- Net revenue
Those formula cells are exactly the cells you do not want people editing. It is very easy for someone to overwrite a formula, change a commission rate, or break the logic behind the report without realising it.
The solution is to unlock only the input cells, then protect the worksheet.
What Does Locked Mean in Excel?
In Excel, every cell is locked by default.
However, the locked setting does nothing until you protect the worksheet.
That means there are two steps:
1. Unlock the cells users should be allowed to edit.
2. Protect the sheet so the locked cells are actually protected.
This catches many users out because they open Format Cells, see that cells are already locked, and assume the workbook is protected. It is not protected until sheet protection is switched on.
How to Unlock Input Cells in Excel
Select the cells where users are allowed to type.
For example, in a commission tracker, this might be the input area for date, sales rep, product, units sold, and unit price.
Then follow these steps:
1. Select the input cells.
2. Press Ctrl+1 to open the Format Cells dialog box.
3. Go to the Protection tab.
4. Uncheck Locked.
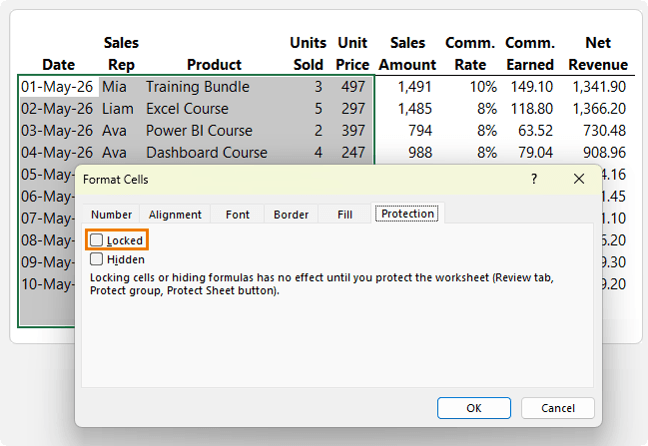
5. Click OK.
6. Go to the Review tab.
7. Click Protect Sheet.
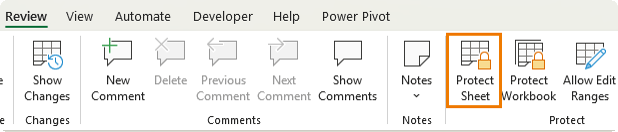
8. Add a password if required.
9. Choose what users are allowed to do.
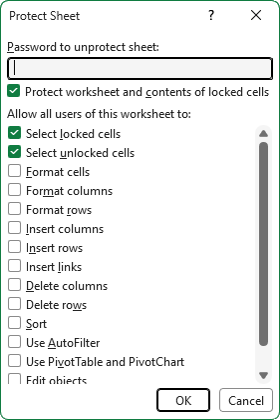
10. Click OK.
Once the sheet is protected, users can type into the unlocked input cells normally.
But if they try to edit a formula or locked cell, Excel displays a warning telling them the cell is protected.
This is one of the most practical ways to stop users accidentally breaking your workbook.
What Users Can Still Do on a Protected Sheet
When you protect a sheet, Excel lets you choose what users can still do.
Depending on your workbook, you might allow users to:
- Select locked cells
- Select unlocked cells
- Format cells
- Format columns
- Format rows
- Insert rows
- Delete rows
- Sort
- Use AutoFilter
- Use PivotTable reports
- Edit objects
- Edit scenarios
For most shared files, you want to keep the workbook usable while preventing accidental damage.
Trick 2: Hide Formulas from the Formula Bar
Protecting cells stops users editing your formulas, but it does not necessarily stop them seeing your formulas.
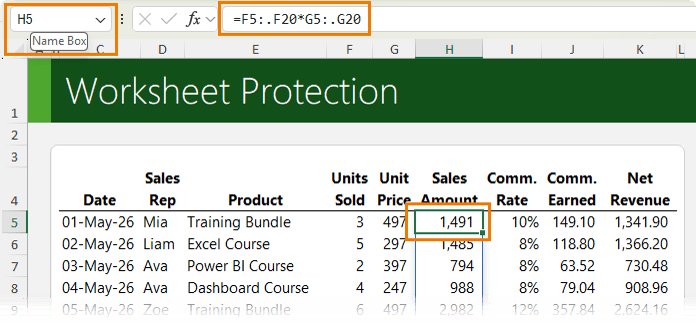
Even if you prevent users from selecting locked cells with the mouse or arrow keys, they may still be able to navigate to those cells using the Name Box.
Once there, the formula may appear in the formula bar:
That can be a problem if your formulas are:
- Proprietary
- Commercially sensitive
- Based on confidential business logic
- Something you do not want copied or shared
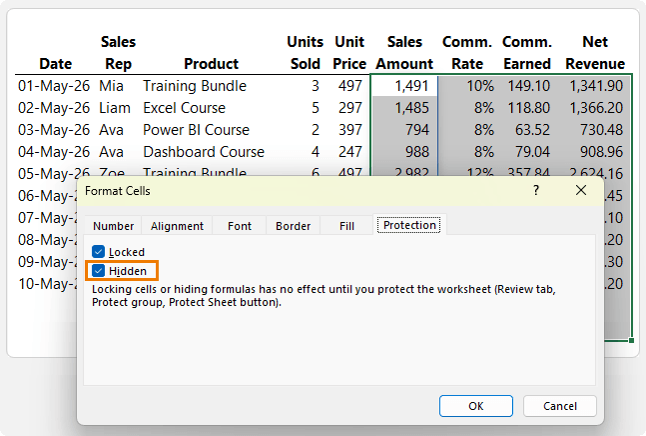
To prevent formulas appearing in the formula bar, you need to use the Hidden setting.
How to Hide Formulas in Excel
To hide formulas from the formula bar:
1. Select the cells that contain the formulas.
2. Press Ctrl+1 to open Format Cells.
3. Go to the Protection tab.
4. Check Hidden.
5. Make sure Locked remains checked.
6. Click OK.
7. Go to the Review tab.
8. Click Protect Sheet.
9. Add a password if required.
10. Click OK.
Now, when users select those formula cells, the formula bar does not reveal the formula.
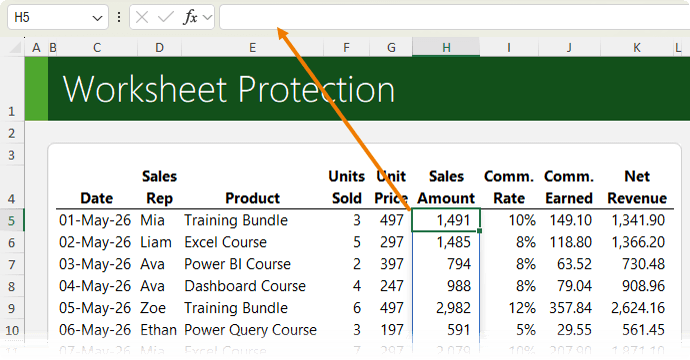
This is useful when you want users to see the result, but not the calculation behind it.
Important: Hidden Formulas Are Not Encrypted
This is an important distinction.
Hiding formulas from the formula bar helps prevent casual users from seeing them, but it is not true encryption.
A determined user may still be able to unprotect the sheet and access the formulas, especially if they know how Excel protection works.
So, use hidden formulas to reduce accidental exposure and casual snooping, but do not rely on them for highly sensitive intellectual property or confidential business data.
For true file-level security, use encryption, which is covered later in this post.
Trick 3: Protect Sheet vs Protect Workbook
Protect Sheet and Protect Workbook sound similar, but they do different jobs.
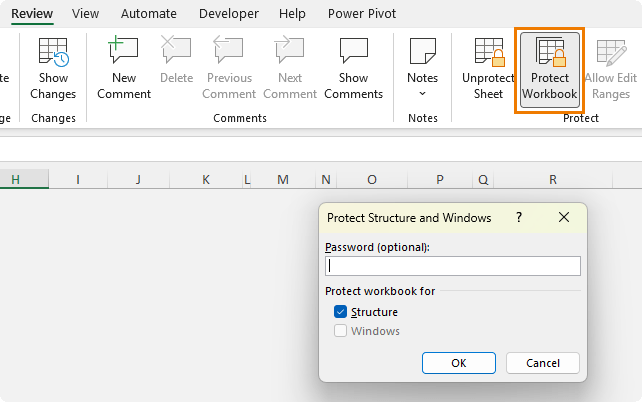
Understanding the difference is essential if you want to share Excel files safely.
What Protect Sheet Does
Protect Sheet controls what users can do inside a worksheet.
It can stop users from:
- Editing locked cells
- Changing formulas
- Modifying protected ranges
- Formatting cells
- Inserting rows or columns
- Deleting rows or columns
- Changing certain objects
Use Protect Sheet when you want users to enter data without breaking formulas or changing protected areas.
What Protect Workbook Does
Protect Workbook protects the workbook structure.
It can stop users from:
- Adding sheets
- Deleting sheets
- Renaming sheets
- Moving sheets
- Copying sheets
- Hiding sheets
- Unhiding sheets
- Reordering sheets
Protect Workbook does not stop users editing cells.
That means someone may still be able to type into unlocked cells or unprotected sheets, but they cannot change the structure of the workbook.
Use Protect Sheet when you want to protect the contents of a worksheet.
Use Protect Workbook when you want to protect the workbook structure.
If you need both, use both.
Trick 4: Make Sheets Disappear Without Deleting Them
Most Excel files have a back-end.
This might include:
- Lookup tables/Parameter sheets
- Source data
- Helper calculations
- Validation lists
These sheets are often essential to the workbook, but they are not meant for users to touch.
The standard approach is to right-click the sheet tab and choose Hide.
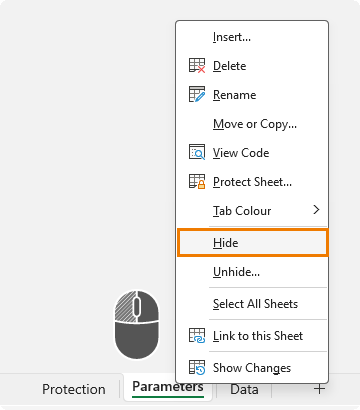
Then you apply workbook protection so users cannot unhide the sheet.
That works to a point.
The problem is that anyone who right-clicks a sheet tab can see that hidden sheets exist.
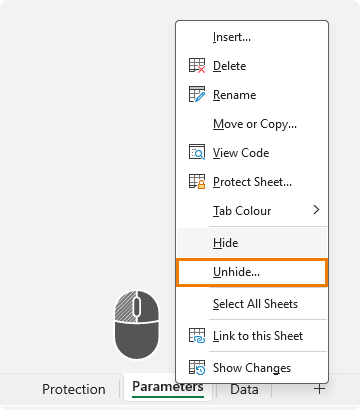
Once they know something is hidden, curiosity often takes over.
A better option is to make the sheet Very Hidden.
What Is a Very Hidden Sheet in Excel?
A Very Hidden sheet is an Excel worksheet that does not appear in the normal Unhide menu.
As far as a casual user is concerned, the sheet does not exist.
The sheet still works in the background. Formulas can still reference it, calculations still run, and the workbook still behaves normally.
But users cannot unhide it using the regular right-click sheet tab menu.
How to Make a Sheet Very Hidden
You do not need to write any VBA code to make a sheet Very Hidden.
Follow these steps:
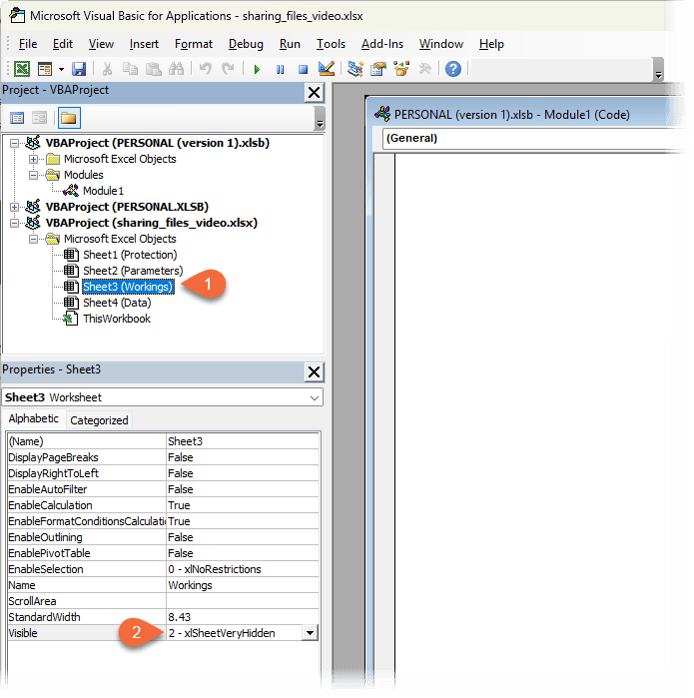
1. Press Alt+F11 to open the VBA Editor.
2. In the Project window, find your workbook.
3. Expand Microsoft Excel Objects.
4. Select the sheet you want to hide.
5. In the Properties window, find the Visible property.
6. Change it from -1 - xlSheetVisible to 2 - xlSheetVeryHidden.
7. Close the VBA Editor.
The sheet is now very hidden.
Unhide will not appear as an option when someone right-clicks a sheet tab:
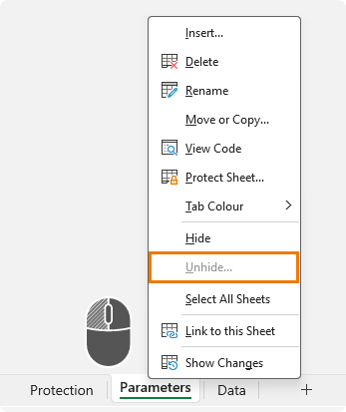
To make the sheet visible again:
1. Press Alt+F11 to open the VBA Editor.
2. Select the hidden sheet in Microsoft Excel Objects.
3. In the Properties window, find Visible.
4. Change it back to -1 - xlSheetVisible.
5. Return to Excel.
The sheet will appear again in the workbook.
Are Very Hidden Sheets Secure?
Very Hidden sheets are useful, but they are not true security.
Anyone with intermediate Excel knowledge can open the VBA Editor and find them.
Very Hidden is best used to reduce clutter and prevent casual users from accessing back-end sheets. It is not suitable for genuinely confidential data.
If a sheet contains salary data, client financial records, commercial secrets, or regulated information, you should not rely on Very Hidden sheets alone.
For actual security, encrypt the entire workbook – we’ll come on to that shortly.
Trick 5: Remove Personal Information Before Sharing
By this point, you might have protected formulas, locked input areas, hidden sheets, and protected the workbook structure.
But there is still one thing many people forget.
Excel files often contain personal information and metadata visible via the File tab > Info:
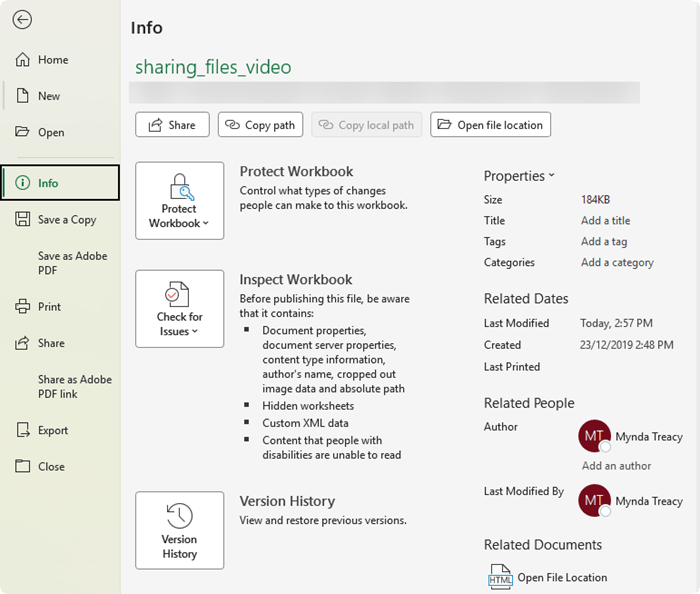
This can include:
- Author name
- Last modified by
- Company information
- Names attached to comments
- Hidden worksheets
- Custom XML data
- Document properties
- Other hidden file information
If you are sending a workbook to a client, recruiter, supplier, external partner, or anyone outside your organisation, this information may reveal more than you intended.
That is where Excel’s Document Inspector helps.
How to Inspect an Excel File Before Sharing
Before using Document Inspector, make a backup copy of the file.
This matters because some changes cannot be undone.
Then follow these steps:
1. Go to the File tab.
2. Click Info.
3. Click Check for Issues.
4. Choose Inspect Document.
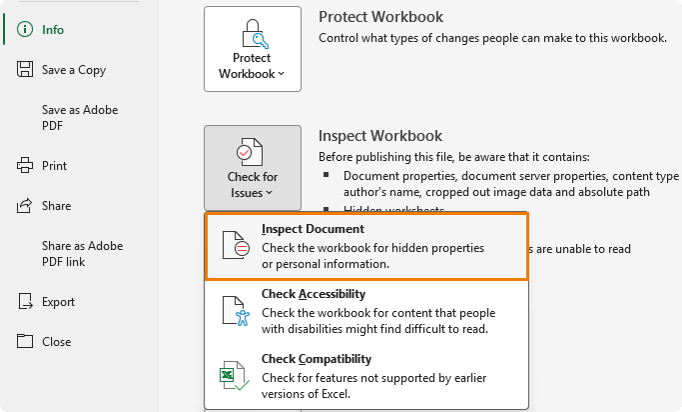
5. Make sure Document Properties and Personal Information is checked.
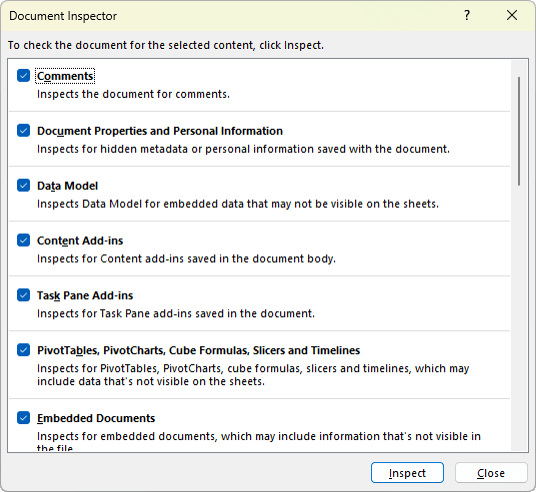
6. Leave the other relevant options checked if required.
7. Click Inspect.
8. Review the results.
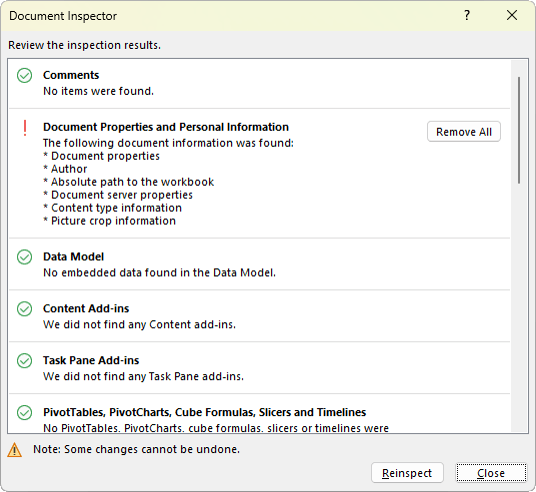
9. Click Remove All beside anything you want to remove.
Excel scans the workbook and identifies hidden or personal information that may be stored in the file.
You can then remove identifying details like author, last modified by, comments metadata, and other document properties.
Treat Document Inspector Like Spell Check for Privacy
Before sending an important Excel file, run Document Inspector as a final check.
Think of it like spell check, but for privacy.
It only takes a moment, but it can prevent accidental disclosure of information you did not realise was stored in the workbook.
Trick 6: Encrypt the Whole File with a Password
Everything covered so far helps protect against accidents and casual snooping.
But it does not stop a determined person who really wants access.
Sheet protection, even with a password, is relatively weak – I show you how to crack Excel passwords here. Workbook structure protection is also not designed to be strong security.
If your file contains truly sensitive information, you need encryption.
Examples include:
- Salary data
- M&A spreadsheets
- Client financial records
- Legal documents
- HR files
- Regulated information
- Confidential business models
- Sensitive forecasts
- Private company data
Encryption protects the entire file.
Until someone enters the correct password, the workbook cannot be opened.
How to Encrypt an Excel File with a Password
To encrypt an Excel workbook:
1. Go to the File tab.
2. Click Info.
3. Click Protect Workbook.
4. Choose Encrypt with Password.
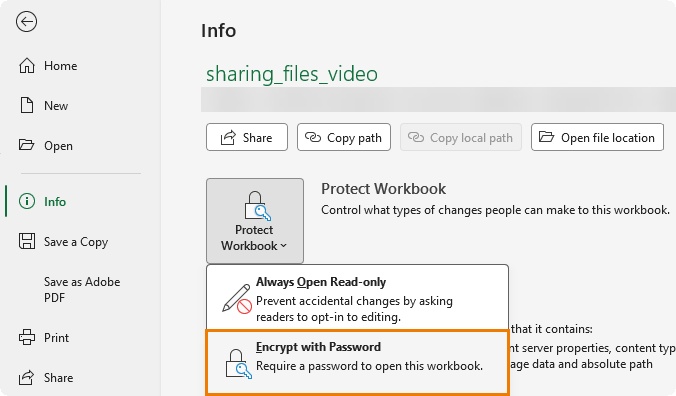
5. Enter a strong password.
6. Re-enter the password to confirm.
7. Save the file.
From that point on, anyone who tries to open the workbook will see a password prompt before they can view a single cell.
Use a Strong Password
When encrypting an Excel file, use a strong password and store it in a password manager.
This is important because if you forget the password, you may not be able to recover the file.
Unlike basic sheet protection, file encryption is designed to prevent unauthorised access.
That is exactly why losing the password can be a serious problem.
How to Remove Encryption from an Excel File
To remove encryption later:
1. Open the workbook using the password (note: if you’ve forgotten the password, you’ll have to recreate the file as there is no reliable way to recover it unless the password was something easy like 123 or ‘password’).
2. Go to File.
3. Click Info.
4. Click Protect Workbook.
5. Choose Encrypt with Password.
6. Delete the password from the password box.
7. Click OK.
8. Save the file.
The workbook will then open normally without requiring a password.
Excel Protection Methods Compared
Here is a quick comparison of the protection methods covered in this post.
| Protection Method | What It Protects | Best Used For | True Security? |
|---|---|---|---|
| Unlock input cells and Protect Sheet | Formula cells and worksheet content | Preventing accidental edits | No |
| Hide formulas | Formula visibility in the formula bar | Preventing casual formula viewing | No |
| Protect Workbook | Workbook structure | Preventing sheet deletion, renaming, hiding, and unhiding | No |
| Very Hidden sheets | Sheet visibility | Hiding back-end sheets from casual users | No |
| Document Inspector | Metadata and hidden information | Removing personal information before sharing | Privacy cleanup, not security |
| Encrypt with Password | Entire workbook access | Sensitive or confidential files | Yes, if a strong password is used |
Final Thoughts
Excel gives you several ways to protect a workbook, but they are not all designed for the same purpose.
Some options prevent mistakes. Some reduce visibility. Some protect structure. Some clean up privacy information. Only encryption provides real file-level security.
So, before you share an Excel file, ask yourself:
- What should users be allowed to edit?
- Which formulas should be protected?
- Are there sheets they should not access?
- Does the workbook contain personal or hidden metadata?
- Is the information sensitive enough to require encryption?
A few minutes of protection before you send the file can save hours of repair work later.
It can also prevent embarrassing mistakes, broken reports, exposed formulas, and accidental disclosure of confidential information.
Next Steps
If you want to build Excel files that are easier to update, harder to break, and clearer for other people to use, this is where solid Excel foundations make a huge difference.
In my Excel Expert course, I teach the tools and techniques that help you build more reliable, professional files, including:
- Structuring data so it can grow over time
- Building formulas that are easier to maintain
- Using Tables, PivotTables, data validation, and conditional formatting
- Applying best practices that reduce errors and make your files easier for others to use
These are the kinds of Excel skills that save time, prevent mistakes, and make your workbooks more valuable in the real world.


Put scripts and key data into a separate – fully protected workbook
and have scripts in the user accessible data workbook reference the scripts.
With the first action on loading the user manipulated data workbook being to open the protected “OS set read-only secured” workbook.
Or use compiled addins
It may be worth running a check script from a private script in that protected workbook to check the count and a hashing of the control data – is valid – as in matches a hash value on the user accessible workbook.
Also consider using %environment% variable variables including a date-timestamp to ensure the scripts and control set matches the user data.
Basic approach –
assume that the excel security environment is not well setup,
and start with OS level access security.
so an OS (and server?) secured file has key values that are relevant to a particular App, and user and can only be accessed by that user –
maybe a canned SQL script to get control data from a SQL capable database management system.
Maybe “communicate” with the user through a named value in a multi-line text message, possibly indicating the problem, or failed data for your information when you get the call about it failing, with a glaring CF formatted cell, and a message box, with a check for that not indicating problems before actually doing a Save , and offer a SaveAs, or Savecopy as …
That way the good data version doesn’t get replaced, and you may get to see the problem !
But do accept that some organisations consider the data to be company confidential.
Thanks for sharing this tip for using Office Scripts.
Thank you for producing these tips each week.
I have a question specifically about trick 1: unlocking input cells. In your example, the input cells were all contiguous. In my set up, this is not the case. My input cells are in columns A and B. Then columns C and D auto-populate when the user tabs across. Finally there are further input cells in columns E, F and G.
Do I have to select the input cells in 2 stages or can I do it all in one go holding Ctrl or something similar?
Yes, exactly. Hold Ctrl while selecting non-contiguous cells, then Ctrl+1 to open the format cells dialog box.