If you've ever wanted to create an invoice system in Excel that automatically updates, records, and clears itself—you're in the right place.
In this post, I’ll walk you through building an automated invoice template from scratch using Excel formulas, tables, and a touch of VBA magic. Whether you’re a freelancer, small business owner, or just want to level up your Excel game, this tutorial has you covered.
Table of Contents
- Watch the Step-by-step Video
- Get the Free Automated Invoice Template
- Step 1: Design the Header Layout
- Step 2: Build the Invoice Table
- Step 3: Calculate Totals
- Step 4: Add Notes and Bank Details
- Step 5: Set the Print Area
- Step 6: Create the Invoice Tracker
- Step 7: Write the Record Invoice Macro
- Step 8: Write the Reset Invoice Macro
- Step 9: Add Conditional Formatting
- Auto Create PDF and Email It
- Next Steps
Watch the Video

Get the Template
Enter your email address below to download the sample workbook.

Step 1: Design the Header Layout
Open a new Excel file and save it as a .xlsm Macro Enabled Workbook. Then set up the invoice header area. Mine looks like this, but you can modify it to suit your needs:
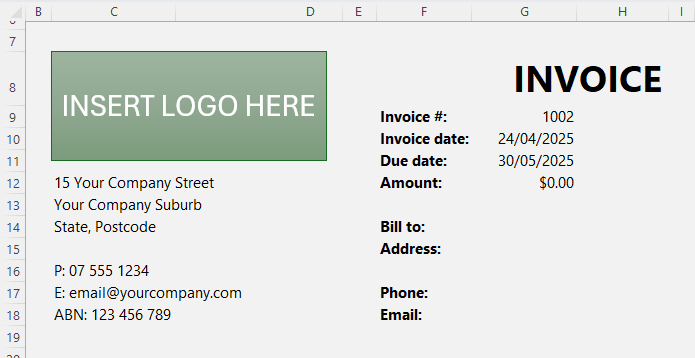
For a clean design:
- Shade the invoice cells B3:I77 a pale grey (don’t do this if you print your invoices).
- In cell H8, enter “INVOICE” with a bold 28pt font.
- Add a logo in the top left.
- Insert company info in C12:C17 (e.g., address, email, tax identifiers).
- Add invoice details in F9:F18 including:
- Invoice #: Cell G9 → Start at 1000 or 10000 (or your next number)
- Invoice Date: =TODAY()
- Due Date: Use a formula to calculate. E.g. net 30 days: =G10+30 or net 30 EOM:
- =EOMONTH(G10,0)+30
Step 2: Build the Invoice Table
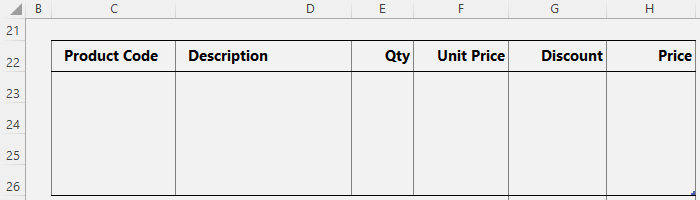
Create a table for itemised entries:
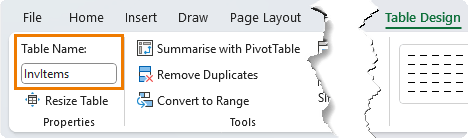
- Start in cell C22 with headers: Product Code, Description, Qty, Unit Price, Discount, Price (modify to suit your needs as required).
- Select the headers and press Ctrl + T to format as a table
- Name the table (Table Design tab): InvItems
- Set formatting:
- Currency format for Unit Price and Price
- Percentage for Discount
- Custom number format on Price column to hide zeros: $#,##0.00;-$#,##0.00;
Price Formula
In the Price column, use:
=ROUND([@Qty]*[@[Unit Price]]*(1-[@Discount]), 2)
Step 3: Calculate Totals
Below the table (e.g., cells G27:G30), insert:
- Subtotal: =SUM(InvItems[Price])
- Tax Rate: Enter 10%
- Tax Amount: =ROUND(H27*H28,2)
- Total: Subtotal + Tax Amount (=H27+H29)
- Format totals with borders and centred text.

Then, define a name for the Total cell (e.g., Total) and link G12 (Amount) to it: =Total
Step 4: Add Notes and Bank Details
- Add a Notes section in cell C33
- Add Bank Details starting at cell C37
This includes bank name, account number, etc. required for your customer to pay you.
Step 5: Set the Print Area
Select B3:I45 (or the relevant cells for your invoice area) and go to:
Page Layout tab > Print Area > Set Print Area
Adjust page setup:
- On the Margins tab > Center horizontally & vertically
- On the Page tab > Fit to 1 page wide x 1 page tall
Step 6: Create the Invoice Tracker
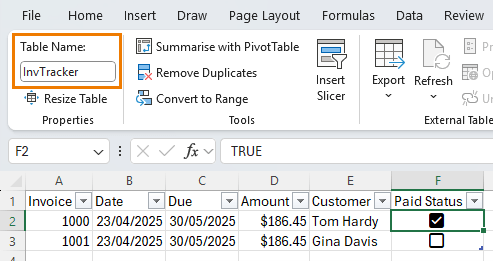
Add a new sheet and rename it Tracker. Insert headers - these are the fields from the Invoice that you want to record. Modify as required:
- Invoice, Date, Due, Amount, Customer from the invoice and an additional column to track the Paid Status
Format as a table (Ctrl + T) and name it InvTracker.
Insert a check box in the Paid Status column.
Step 7: Write the Record Invoice Macro
Enable the Developer tab (right-click Ribbon > Customize > check the box for the Developer tab), open the Visual Basic Editor:

In the Visual Basic Editor, select the Automated Invoice Excel file and via the Insert menu > insert a new module:
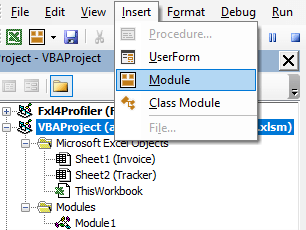
In the module, enter this macro to copy the data from the Invoice template to the Invoice Tracker:
Option Explicit

Sub RecordInvoice()

    Dim inv As Long
    Dim invDate As Date
    Dim dueDate As Date
    Dim amount As Currency
    Dim customer As String
    Dim invoiceSheet As Worksheet
    Dim trackerSheet As Worksheet
    Dim tbl As ListObject
    Dim targetRow As Range

    Set invoiceSheet = Sheet2
    Set trackerSheet = Sheet3
    Set tbl = trackerSheet.ListObjects("InvTracker")

    ' Read values from invoice
    inv = invoiceSheet.Range("G9").Value
    invDate = invoiceSheet.Range("G10").Value
    dueDate = invoiceSheet.Range("G11").Value
    amount = invoiceSheet.Range("G12").Value
    customer = invoiceSheet.Range("G14").Value

    ' Safely decide where to write the data
    If tbl.DataBodyRange Is Nothing Then
        ' Table has no rows — add one
        Set targetRow = tbl.ListRows.Add.Range
    ElseIf Application.CountA(tbl.DataBodyRange.Rows(1).Resize(1, 5)) = 0 Then
        ' First row is empty — reuse it
        Set targetRow = tbl.DataBodyRange.Rows(1)
    Else
        ' Add new row
        Set targetRow = tbl.ListRows.Add.Range
    End If

    ' Write values to the table
    targetRow.Cells(1).Value = inv
    targetRow.Cells(2).Value = invDate
    targetRow.Cells(3).Value = dueDate
    targetRow.Cells(4).Value = amount
    targetRow.Cells(5).Value = customer

    MsgBox "Invoice recorded!", vbInformation

End Sub
Assign this macro to a Shape button for easy use.
Step 8: Write the Reset Invoice Macro
This clears the old invoice and increments the invoice number.
Add the following code below ‘Option Explicit’ and above the ‘Sub RecordInvoice()’ macro:
Sub ResetInvoice()

Dim inv As Long

' Issue new invoice number
inv = Range("G9")
Range("G9") = inv + 1

' Clear cells ready for new invoice details
Range("G14:G18,InvItems[[Product Code]:[Discount]]").ClearContents
Range("G14").Select

' Confirm new invoice is ready and number
MsgBox "Template is reset. New invoice number is " & inv + 1, vbInformation

End Sub
Again, assign this macro to a shape or icon.
Step 9: Add Conditional Formatting
In the Tracker sheet, use Conditional Formatting to highlight overdue unpaid invoices.
Select the table rows (excluding the column headers). Then Home tab > Conditional Formatting > New Rule > ‘Use a formula to determine which cells to format’.
Formula:
=AND(NOT($F2), TODAY() > $C2)
Apply red fill if the invoice is overdue and not marked as paid.
Auto Create PDF and Email It
If you want to take your automated Excel invoice template to the next level, check out this post on how to create a PDF from an Excel worksheet and then email it.
Next Steps
Ready to take your skills deeper? Whether it’s core Excel skills, dashboards, or Power BI, I’ve got a full range of Excel and Power BI courses that walk you through everything step-by-step.
They come with a certificate of completion, and support from me if you ever get stuck.
Thousands of students have taken them, not just to level up their skills. I’ve heard from people who’ve built tools that save their team hours every week, landed promotions, or finally felt confident enough to freelance on the side.
So, if you’re ready to stop Googling Excel and actually master it, there’s no time like the present. Check out our Excel and Power BI courses here.

Hello Mynda.
Thank you very much for this excellent and very practical version to automate an invoice. I have been a follower of yours for several years. Excellent channel, your courses and tutorials are all very good.
So pleased you found it useful, Cesar! Thank you for the kind words.
Great job
Much appreciated.
Great video and excellent presentation. Thank you for providing this useful invoice. I have a small business and am looking forward to using this in the future. I do have a question that may or may not be easy to incorporate into this workbook. Is there3 a simple way to create a worksheet with the product codes such as yours that can be looked up by placing the product code on the invoice and have it lookup and insert the information on the invoice without haveing to type all that in every time? It would really spruce things up and make life much easier for us small businesses. Thank you.
Glad you found it useful. Yes, you can use XLOOKUP or VLOOKUP to bring the product description and unit price in from a lookup table.
Thanks for your amazing and interesting work
Glad you find it helpful, Khaled!
Apparently you have to comment to get the download…see if it works.
Hi Steven,
No comment required. Just enter your email address in the field under the ‘Get the Template’ heading and the download link will reveal itself. Reach out via email if you have any trouble: website @MyOnlineTrainingHub.com (delete the space after ‘website’).
Mynda
Thank you for the template and tutorial, I have run into a couple of issues. When tabbing into the new row, text in the product code tab is moved one space to the right and the border between product code and description does not continue with each new row. Also, the print preview does not expand with the rows, meaning that the notes and info at the bottom of the page are cut off when adding new product rows.
I can’t reproduce the tabbing issue, Scott. Sounds like the Table might be corrupt. I’d completely delete it and reinsert it.
As for the print range, use this dynamic print range trick.
If you’re still having issues with the Table, please post your question on our Excel forum where you can also upload your file and we can help you further.
Hello,
I created a customer database worksheet within the workbook. From this, my goal was to create a drop down list of those customers and by using xlookup function, autofill their details. However, when I clear the invoice, the formulas disappear. What is the simplest way to either format the macro or lock a formula to keep that from happening moving forward? Thank you.
Hi Mike,
Go to your customer database and add a new customer called ‘Choose Customer’. Update the macro to choose this ‘customer’ from the drop down instead of clearing the cells.
Mynda
Hi I’m having an issue with the reset macro where if I modify the names of Product Code or Discount, and then modify them accurately in the code here:
Range(“G14:G18,InvItems[[Product Code]:[Discount]]”).ClearContents
It just doesn’t work saying there’s an issue with _Global.
The debugger just highlights this line. If I change it to Item # and Percentage respectively for example, it doesn’t work. But if I change it back then it works. I removed some columns and it still works with the original two names but my changed names don’t work. I couldn’t find if Product Code and Discount were specifically declared anywhere else.
How do I fix this issue? The recording macro works fine no matter what I title things.
Thanks
Check the column names in the table match the column names in the code:
Range(“G14:G18,InvItems[[Product Code]:[Discount]]”).ClearContents
If you’re stillstuck, please post your question on our Excel forum where you can also upload a sample file and we can help you further.
Hi Mynda,
Thanks for the video all seems very clear. I know not a lot bout excel but do use it for invoicing so this will hopefully save me some time and effort
Peter
Awesome to hear, Peter!
Hi Mynda
Thanks a lot for this , will use this for my needs.
I do have a need to transfer the contents of the detail table to a sheet like the SKU, DESCRIPTION, QTY etc. etc. (and if there is 2 or 3 or more lines, everything should be transferred)
Can this be done with a little tweak ? how? or perhaps you made a video for this as well
Please guide me .
Thanks
David
Hi David,
Yes, you can do this. I recommend asking ChatGPT for help modifying the code.
Mynda
Thanks a lot. I have learnt so much from watching your videos etc.
Just to let you know that there’s a typo in the template.
In the ResetInvoice macro, “Range(“G14:G18,InvItems[[Product Code]:[Discount]]”).ClearContents”
instead reads
“Range(“G14:G18,InvItems[[SKU]:[Discount]]”).ClearContents”
Oops, I thought I’d fixed that. It’s done now. Thanks for letting me know, Chris.
The clear button macro errors out when used. The VBA is using SKU instead of Product Code. Quick fix.
I’d also suggest an item to consider fixing.
If you press the Record Invoice button twice, it duplicates entries. Could you add a test to see if it’s already recorded that entry, or better yet prompt to overwrite or accept the duplicate?
Otherwise, this is great. I could see this as part of a building block. I know it’s not a database, but for a small business just getting started, you could add a few features for future training. Save customer data, add or select from existing users.
Then add a tab for products sold. Inventory management is not far behind.
That begs the next question. At what point does it become necessary to quit using Excel and use a database. Maybe 10K products or customers?
Cheers, Ken. I’ve fixed the SKU/Product Code typo.
Another easy way you could handle duplicates is with some simple conditional formatting to highlight them.
Thanks for your suggestions. I agree, there are almost endless enhancements that can be added (print to PDF button, reprint past invoice, reset number of rows in the table etc., etc.), some more important than others.
A good indicator of when it becomes necessary to use a custom program is when your Excel file starts running slowly and or there are other manual processes connected to the invoice generation that could be more efficient with a custom app.
Mynda
Hi Mynda,
Thanks for your amazing and interesting work. I was after such automated invoice.
I have downloaded for my small business. But I have an issue using it, saying that macro is not avaiable in this work book. I have ticked all macros but still doesnt work. Could you please help.
Thanks Ali
Hi Ali,
The file is a .zip file. You need to extract the Excel file and save it in a folder on your PC/local drive. It should be a .xlsm file. When you open it, you’ll see a yellow banner above the formula bar asking you to enable macros.
It should then work. If you’re still having trouble, reach out via email and share screenshots so we can see what you’re dealing with: website @myonlinetraininghub.com (delete the space after ‘website’).
Mynda
Excellent, as ever, Mynda; thank you.
The tracker sheet is an excellent addition. Comments on the invoice form:
→ as a customer I prefer to see all of the salient information required to pay an invoice in one place, i.e. Invoices with the amount, due date, invoice number (and/or other reference required in the transfer), and the bank details all together; the cherry on the top would be a QR code. A pet hate of mine is invoices with bank details in tiny print hidden in the footer along with the directors’ names!
→ businesses in some countries may need a column for the tax rate integrated into the invoice, because the tax rate differs according to product (e.g. food/non-food) in their country.
Thanks again for an interesting and useful site and keep well.
Thanks for sharing these suggestions, Chris. I suppose you haven’t watched the video because in it I state that the layout is completely customisable to suit your business needs.
Download doesn’t work ….
Hi Bert,
It works, but you have to right-click > Save As the link.
Mynda