If you're looking to speed up your workflow in Excel, there's a powerful yet often overlooked tool that's been right in front of you: the Quick Access Toolbar (QAT).
Whether you're a fan of keyboard shortcuts or prefer the mouse, the QAT can become your new best friend.
In this post, I'll show you how to customize it for optimal productivity, plus highlight some must-have shortcuts recommended by the Excel community.
Table of Contents
Watch the Video

What is the Quick Access Toolbar?
The QAT is a small toolbar located at the top of the Excel window.
It provides one-click access to your most-used commands, helping you skip the hassle of navigating through multiple ribbon menus.
Whether you're a beginner or an Excel pro, customizing the QAT will feel like you've got a remote control for Excel at your fingertips.
Why Most People Don't Use the QAT Effectively
There are three main reasons Excel users don't fully utilize the QAT:
- They don't use it to its full potential - They miss out on time-saving shortcuts.
- They use the wrong shortcuts - Filling the QAT with unnecessary commands wastes valuable toolbar space.
- They ignore it altogether - Users who've been working with Excel for years often overlook this feature.
But don't worry—once you know how to customize it with your most frequently used tools, the QAT will save you loads of time!
How to Set Up and Customize the QAT
1. Add Common Commands
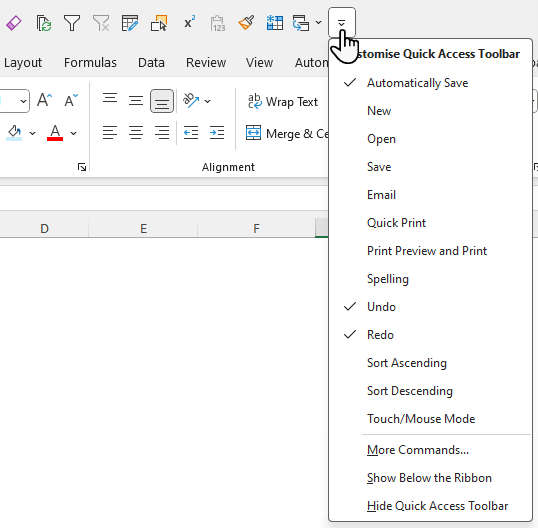
To the right of the QAT, there's a small downward arrow. Click it to access a drop-down menu with common commands. The commands with check marks are already included.
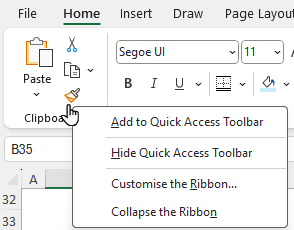
You can also add new ones by right-clicking any command on the ribbon and selecting "Add to Quick Access Toolbar."
2. Add Advanced Commands
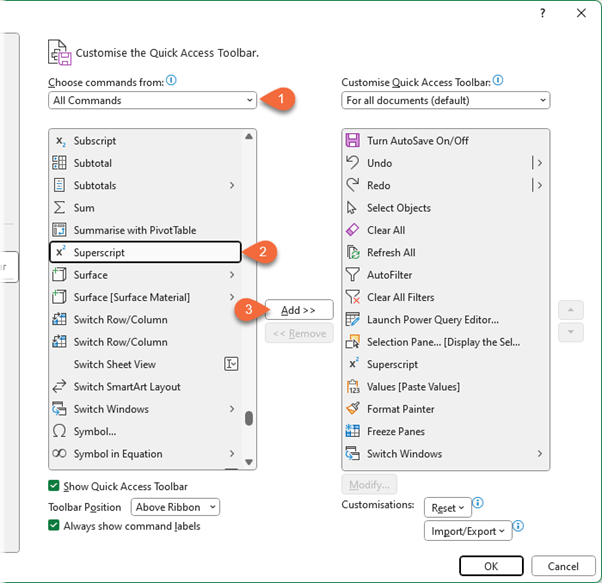
If you need a command that's not on the ribbon, click the down arrow on the QAT and select "More Commands." From here, you can browse through "All Commands" or filter by specific tabs to find what you need. For example, commands like "Superscript" can be found here.
3. Organize and Rearrange Your Commands
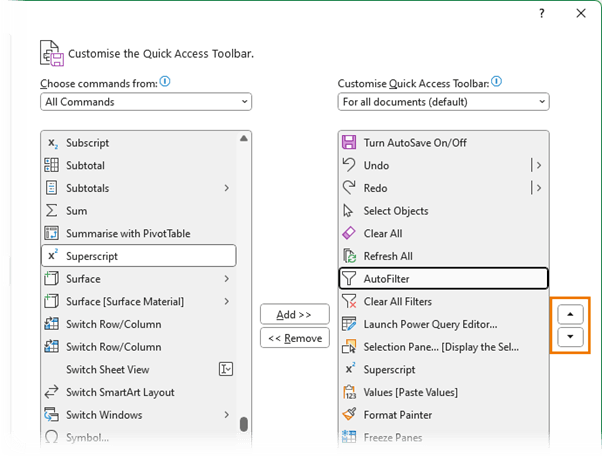
Once you've added your preferred commands to your Quick Access Toolbar, use the up and down arrows in the customization menu to arrange them.
Tip: Be sure to place your most-used commands in the first nine positions—more on that later!
4. Adjust the Toolbar Position
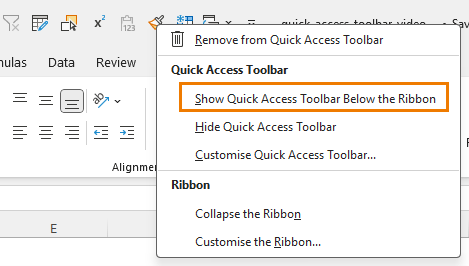
By default, the QAT sits above the ribbon, but you can move it below the ribbon by right-clicking and selecting "Show Below the Ribbon."
This makes the icons larger and more accessible, though it does take up extra screen space:
Top 9 QAT Icons Recommended by the Excel Community
Next, let's take a look at our Excel community's top 9 recommendations for icons to include in the QAT. I have to say, I don't agree with some of them, and I'll tell you why.
1. Paste Values
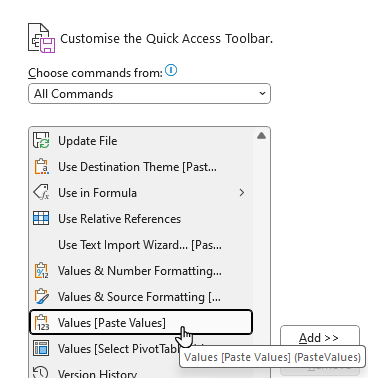
This is one of the most popular commands, although I prefer the shortcut `CTRL+SHIFT+V` over using toolbar space for it. But for those on earlier versions of Excel who don't have the new shortcut, you can add it by filtering for "Values" in the customization menu.
2. Select Objects
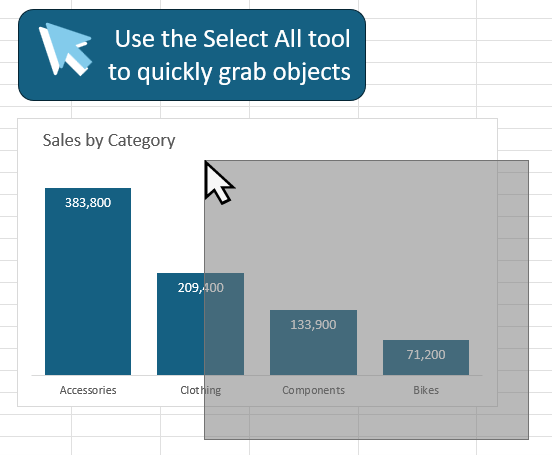
If you frequently work with shapes, images, or charts, the "Select Objects" command will save you from the frustration of clicking through layered items. It changes the mouse pointer into a lasso, enabling you to select all objects you drag the mouse over:
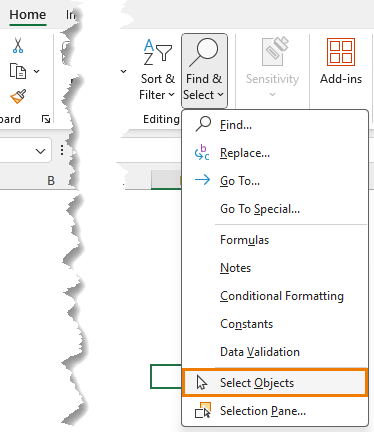
You'll find it on the Home tab > under the Find & Select drop down:
3. Format Painter
Want everything to look consistent? The Format Painter is a must-have for quickly applying uniform formatting across cells. Right-click it and add it to your QAT for easy access.
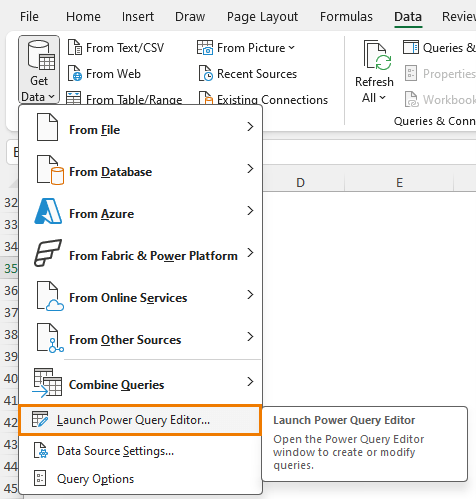
4. Power Query Editor
For Power Query users, this shortcut launches the editor without switching sheets—saving you from the back-and-forth hassle.
5. Filter/Remove Filter
Add both the Filter and Remove Filter commands to your QAT for quicker data management, especially when dealing with tables and large datasets.
Tip: it clears filters on PivotTables too.
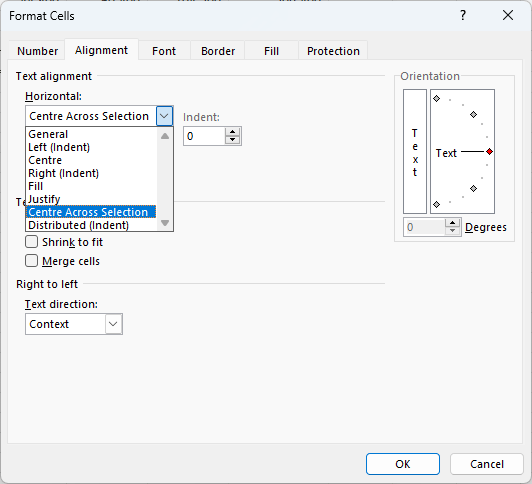
6. Merge & Center Center Across Selection
While commonly used, I advise against adding Merge & Center. It often causes issues in Excel. Instead, try the "Center Across Selection" option in the Format Cells dialog.
Unfortunately, this isn't available as an icon you can add to your QAT, but you could write a Macro for it and add the macro to a button on the QAT.
7. Freeze Panes
This command is great for freezing rows and columns, though its frequency of use may not justify a spot on the QAT for everyone.
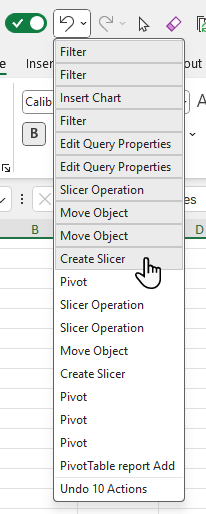
8. Undo/Redo
Essential and straightforward, these commands help you undo or redo multiple actions with just a click.
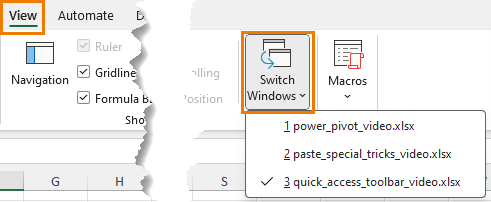
9. Switch Windows
If you frequently work with multiple Excel workbooks, the "Switch Windows" command makes jumping between files quick and easy.
Alternatively, use the keyboard shortcut CTRL+TAB.
Bonus: Use ALT Key Shortcuts with the QAT
Want to make the QAT even faster? Each icon on your QAT automatically gets an ALT key shortcut assigned to it. Simply press the `ALT` key, and Excel will display a number for each command. For example, press `ALT+1` to access the first tool, `ALT+2` for the second, and so on.
If you have more than nine commands, they'll start with zero followed by a number (e.g., `ALT+09` for the tenth icon).
Pro Tip: Save Your Custom Toolbar Setup
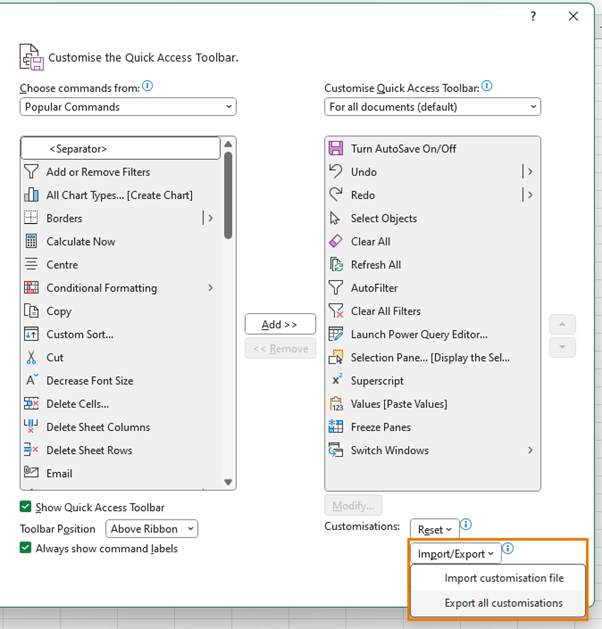
Once you've spent time perfecting your QAT, you won't want to lose your setup if you switch computers or need to reinstall Excel. Fortunately, you can export your custom toolbar configuration.
Here's how:
- Right-click on the QAT and select "Customize the Quick Access Toolbar."
- At the bottom of the dialog, choose "Import/Export" and select "Export All Customizations."
- Save the file somewhere safe, like on a USB drive or cloud storage.
When you need to restore your QAT setup, simply import the file and your toolbar will be ready to go!
Next Steps
Now that your Quick Access Toolbar is set up, you'll notice a huge boost in productivity, spending less time hunting for commands and more time getting work done!
There's one more Excel trick that I use every single day, and it's a total game changer. Be sure to check out this tutorial next, where I reveal the trick that makes working in Excel so much easier.







The downside to the “Clear” button for filters is that it also clears/forgets any sort parameters, making it impossible to “Reapply” those same sort conditions to a refreshed or recalculated dataset without recreating them from scratch. I loathe that so much that I wrote a macro (and assigned to my QAT…wink) that only performs the portion to clear all filters, which unfortunately means I have to accept the tradeoff of that action clearing my undo stack.
If anyone agrees that this is a pain, then please consider upvoting this idea from Sunita Pathak on Microsoft’s Feedback Portal.
https://feedbackportal.microsoft.com/feedback/idea/e7908e8e-af93-ee11-a81c-0022484f9f6d
Hi David, I use Sheet Views to quickly reapply filter settings. You can learn more about Sheet Views in this post.
I don’t have any coauthored workbooks, and my company’s policy currently has the Share option disabled, so I couldn’t use Sheet Views even if I wanted to. But even then, it would require creating a Sheet View just to avoid losing the current sort parameters of a dataset, which would then have to be updated/replaced every time I decided to use a different sort. It just seems the much simpler option would be to have a button/shortcut that could clear all the filters without losing the sort parameters (or to be able to run my macro without clearing the undo stack).
When you’re in the Sheet View, any changes you make are automatically saved to that view. So, you can simply switch in and out of the view, or create separate views for different sort and filter views. But if you don’t have 365, then the macro sounds like the way to go.
I have 365, but it’s a custom install (I work for a big company) where the Share and coauthoring and Sheet View features aren’t enabled yet.
Ah, that’s a shame.
I have enjoyed and hugely benefited from your YouTubes. I didn’t know of this site; I just stumbled onto here from using Google for a specific Excel issue. You do excellent work on the site as well as the videos. Thank you hugely for your unselfish contributions to all of us.
The “trick” for more than 9 with the ASCII number code is brilliant, as well as shrewd comprehension and explanation of the QAT 9 slot scarcity and value of economizing the 9 assignments. But here’s an approach to put, oh, even 30 operations if you want to, on one single QAT icon. It requires use of VBA.
First I should note that I write many VBA macros, always available in PERSONAL, and some I use SO commonly that I assign them to QAT slots. But inevitably I run out of slots. So the “trick” is to have one macro that serves as an interface to many macros, by dropdown or a Form or however you wish, given your VBA capabilities. And note that each “sub macro”, as you might describe them, might just do 1 simple Application.Run. Even if you don’t do VBA, or want faster execution as Application.Run might yield, the learning curve to get just that far is small.
As to a dropdown, here’s a technique. For brevity let’s consider only 3 “sub macros” instead of 30 or 300. Then make the VBA-accessed dropdown be assigned as a user macro on alt-4, and have in the dropdown
A Launch Power Query Editor
B Insert PivotTable
C Select Objects
The payoff is you get to go alt-4, C, enter. Not exactly hideous. Maybe even alt-4, C if there’s a dropdown option to “select and perform” an item (I can’t recall if Excel VBA accessed dropdowns have that property).
I’d love to hear if anyone tries or benefits from this. You do need to set it up in VBA and put in PERSONAL, but if you’re fluent in VBA this might pay off a thousand fold, who knows.
Your article is valuable and clear. I like it. Bookmarked it. Here I’ll offer some hopefully useful additions.
Microsoft is a cruel monster, blending being forced to accept insanely stupid design decisions (with no option to decline), but sometimes you can blunt the damage by “making compromises” such as finding ways to do things in 3 strokes that never required more than 1 before. You might choose to make the compromises below, since, as you astutely explain, the “prime” collection is limited to a scarce 9. (Funny, before the murderously productivity assassinating 2007 ribbon I used to have 36 alt- shortcuts with icons or text atop the window, but that’s another story. MS, making the world a better place.)
Manage conditional formats is not tragic; you can still go alt-O-D. More expensive than alt-9, but just by one stroke, and you gain a precious “prime slot”, a “small compromise” to gain a “slot”.
Clear all – I go alt-E-A zillions of times daily on cells. If that’s no good for pivot tables, get comfy with this shortcut anyway. Consider this compromise to regain the alt-2 slot?
Clear filters – again it MIGHT be insufficient in some categories (Tables?) but alt-D-F-S rules. That will unfilter all regular (or advanced) cell filters. Note that this is generally superior to alt-D-F-F which removes the filtering entirely when you toggle it off, meaning to reinstitute the filtering later, you must rebuild (if you can remember!) which columns were filtered, as well as the top and the bottom of the filter area! alt-D-F-S remove the “filtering”, not the “filter”.
Paste values – no doubt alt-1 is superior. But note alt-E-S-V is close, so evaluate “prime real estate” as before. But at any rate be sure you investigate Control-Shift-V, depending on your Excel version. Hard to type, but only one stroke!
I chose the above only because they are QAT choices made in the article. Much more could be said about optimal shortcuts usage. MS catastrophically made it painful to find shortcuts now but there are many out there and even if slightly more work than “alt-4”, sometimes the compromise is worth it. I use shortcuts more than any human in the solar system. Despite Microsoft’s clue-clue-clueless damage to their productive use with the ribbon (because before you could browse every menu item and SEE the shortcut strokes – unfathomable that the designers couldn’t grasp that they ruined that, and shattered productivity) – I still use them to an inhumanly great degree. I hope this little discussion of shortcuts makes someone faster and more accurate and productive 🙂
Mynda, I really appreciate your excellent tips with Excel! I also use the quick access toolbar and find it frustrating when I use different PCs that do not have my favorite tools saved. Often, if your IT department needs to update (or reformat) your work PC, many customizations are reset. Thanks for sharing the tools you use and I have made a copy of my own toolbar in case I need to create on a new PC.
I know you are so wired with the latest Excel updates – have you ever done a command toolbar options comparison between versions. Do new toolbar options get noticed between updates, or do Microsoft add new buttons and we just need to discover them haphazardly?
Thank you for helping the world with Excel You are a hero. -Krist (kristwalicky.com)
Hi Krist,
Great to hear you enjoyed my tutorial! Microsoft do announce changes, but they’re not easy to find. I haven’t done a toolbar options comparison. I typically find out about new features via my Microsoft MVP email list when other MVPs email about them L0(
Mynda
I’m still amazed at the number of experienced Office users who are unaware of this
here’s mine, which has been largely unchanged for a decade, so I often confuse myself on someone else’s set up when I try to use what I think is a standard shortcut
1. freeze pane toggle, because no-one seems to do this with spreadsheets they send me!
2. autofilter on current value
3. autofit column width on current cell, used more than any other QAT, except 5
4. back, often followed by paste values
5. paste values
6-9. commonly used border commands (eg alt-9,8,7 gets me a thick RH border)
and then many higher ones, often for the same reasons (eg Undo, so I can see the stack), some just for the visual (eg wrap text which shows if the current cell is wrapped or not)
Thanks for sharing, Jim!
Jim, since like everyone you’re plagued by the limit of 9, maybe consider memorizing these shortcuts to free up slots:
alt-W-F-F to toggle Freeze. The Microsoft Deproductivity department is very proud of this one, because they diabolically recognized that alt-W-F (which has been there forever) was too easy.
alt-O-C-A for the autofit. I too go alt-O-C-A often, easily 60 times per day; going alt-3 wouldbe nicer, but, it’s a tradeoff for the limit of 9 slots, you know?
Ctrl-shift-V for paste by value. This is I believe a relatively recent addition so may be Excel version dependent.
I like you scheme. Just offering some hopefully helpful tweaks.
My company has a Group policy setting that deletes my custom QAT every few minutes. It must cost the company a lot in staff time, but they keep saying I’m the only person who has complained!
I used to keep a copy to import on my Desktop, but if you import it you have to minimise and maximise to make it visible. By which time the policy may have reset it anyway. So it is back to finding things on the Ribbon… Adios QAT, you are much missed …
What a shame, Andy! I suppose it’s their loss, but still very frustrating for you.