If you've ever caught yourself doing the same clicks in Excel over and over - formatting columns, rearranging data, applying borders - it's time to stop. There's a faster way: Macros. And just behind those macros is something even more powerful: VBA (Visual Basic for Applications).
In this post, you’ll learn how to:
- Record your first macro without writing any code
- Understand what VBA is doing behind the scenes
- Write your first VBA procedure
- Use variables to store and manipulate values
- Create loops to automate repetitive tasks
- Interact with users using message boxes
Let’s get started.
Table of Contents
- Watch the Macros & VBA 101 Video
- Get the Practice Workbook
- Recording Your First Macro
- Peek Under the Hood with the VBA Editor
- Writing Your Own VBA Procedure
- Variables: Your Code’s Storage Boxes
- Loops: Automate Repetitive Tasks
- Message Boxes: Get User Input
- Saving Your Macros
- Before You Go Too Far With VBA…
Watch the Macros & VBA 101 Video

Get the Practice Workbook
Enter your email address below to download the sample workbook.

Recording Your First Macro
Macros let Excel remember your steps so you can automate them with one click.
Step 1: Enable the Developer Tab
If you haven’t used macros before, the Developer tab might be hidden. Right-click any ribbon tab > Customize Ribbon > Check the "Developer" box > OK.

Step 2: Record Your Macro
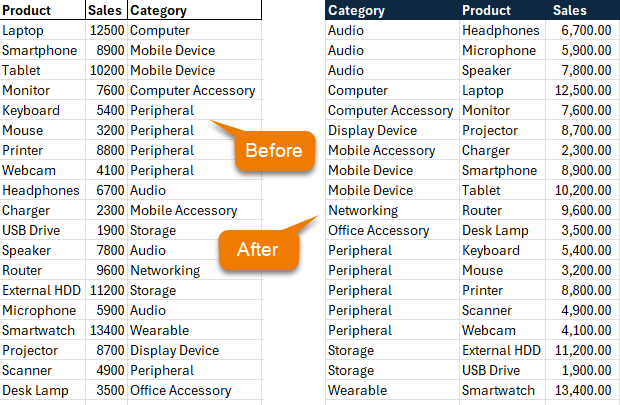
We’re going to record a macro that transforms the table on the left below, to the nicely formatted table with the column order rearranged and the data sorted by category and product.
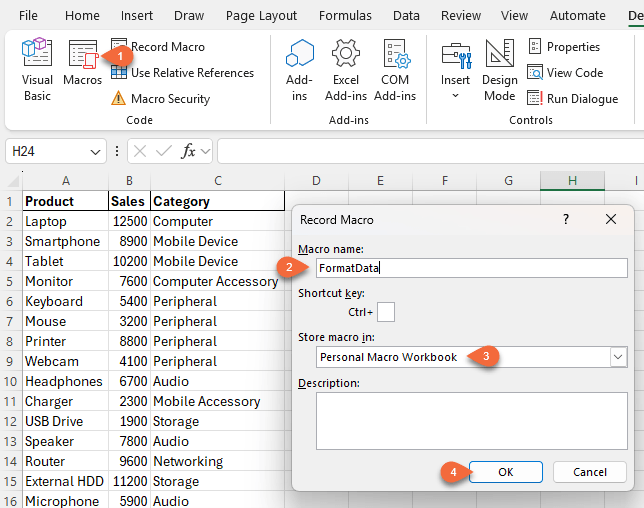
- On the Developer tab, click Record Macro.
- Name it FormatData (macro names can't have spaces and must start with a letter).
- Choose to store it in your Personal Macro Workbook so it’s available across all workbooks.
- Click OK - Excel is now recording.
Step 3: Perform Your Actions
To format this daily sales report:
- Remove bold and borders from headers (Home > Clear > Formats)
- Apply a blue fill and white bold font to headers
- Format the Sales column with comma separators
- Move the Category column to the front
- Sort by Category and then Product
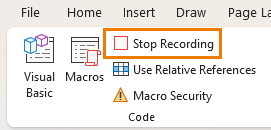
When done, click Stop Recording in on the Developer tab:
Step 4: Run Your Macro
Open another unformatted copy of the data. Go to the Developer tab > Macros (or Alt + F8), select FormatData, and click Run.
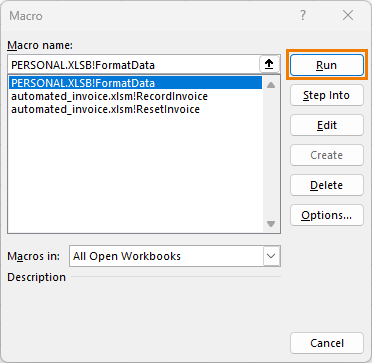
All formatting is applied instantly.
That’s the magic of macros - automating repetitive work.
Note: VBA changes can't be undone - they are permanent.
Peek Under the Hood with the VBA Editor
Macros don’t just automate clicks - they write VBA code behind the scenes.
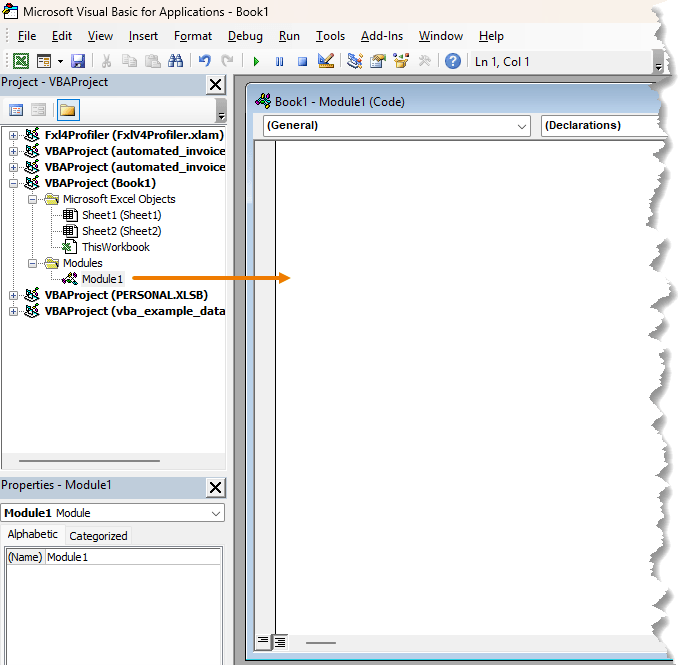
Go to Developer > Visual Basic (or press Alt + F11) to open the VBA Editor.
In the Project pane, locate PERSONAL.XLSB and double-click the module containing your macro. You’ll see code like this:

Even if you don’t understand it all yet, this is where you gain control and flexibility.
Writing Your Own VBA Procedure
A procedure is a named block of code that performs a task. There are 3 types:
- Sub Procedures - perform actions
- Function Procedures - return results
- Property Procedures - used in advanced scenarios
For simplicity, we'll stick with a Sub.
Step 1: Insert a Module
In the VBA Editor, right-click your workbook > Insert > Module.

This opens a new coding pane on the right for the module:
Step 2: Create a Procedure
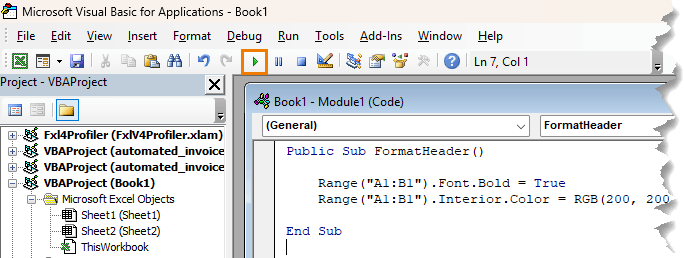
Here we can write the code for our procedure to formats header cells with bold text and a light purple background:
Public Sub FormatHeader()
    Range("A1:B1").Font.Bold = True
    Range("A1:B1").Interior.Color = RGB(200, 200, 255)
End Sub
Click Run (the play button), and Excel will apply the formatting to the current sheet.
Congratulations! This is your first custom macro.
Variables: Your Code’s Storage Boxes
You might ask: why write VBA at all when you can just record a macro or use ChatGPT? Well, recorded macros can’t make decisions, loop, or adapt to new inputs. And ChatGPT can’t read your actual workbook unless you explain it in detail.
To truly automate, you need variables.
A variable is like a labelled storage box in your code. It can hold a number, text, date, range, or input.
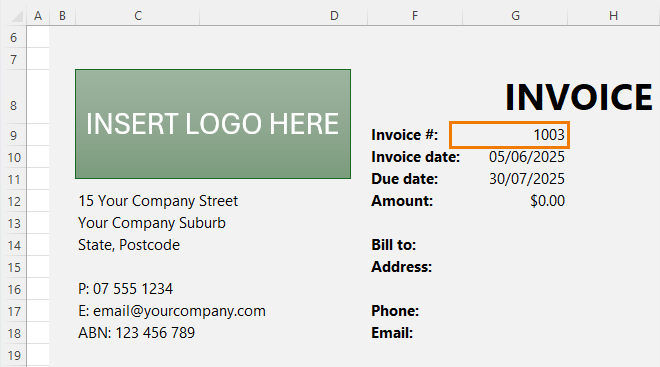
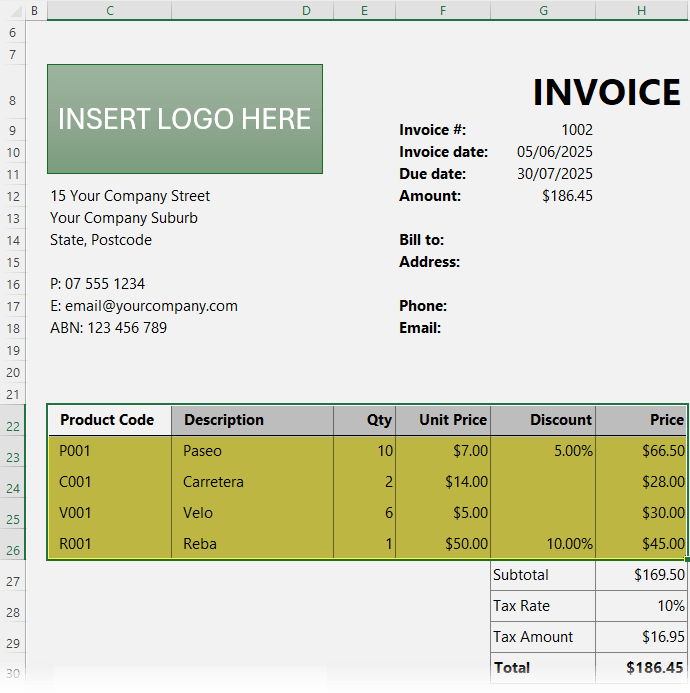
Example: Auto-Generate an Invoice Number
On the invoice template below, we can see cell G9 contains the invoice number. Let’s set up a macro to automatically increment it to avoid errors:
Here’s the macro to increment the invoice number:
Sub GenerateNextInvoiceNumber()
    Dim currentInvoice As Long
    Dim nextInvoice As Long
    currentInvoice = Range("G9").Value
    nextInvoice = currentInvoice + 1
    Range("G9").Value = nextInvoice
End Sub
How This Macro Works:
- Dim currentInvoice As Long
This declares a variable called currentInvoice that will hold the number currently in cell G9. We use the Long data type because invoice numbers are whole numbers and may grow large over time. - Dim nextInvoice As Long
This sets up another variable to store the new, incremented invoice number. - currentInvoice = Range("G9").Value
This line tells VBA to read the value from cell G9 and store it in the currentInvoice variable. - nextInvoice = currentInvoice + 1
Here, we simply add 1 to the current invoice number and store the result in nextInvoice. - Range("G9").Value = nextInvoice
Finally, we overwrite the value in G9 with the new number, updating it for the next invoice.
✅ The Result:
With just a click, this macro updates your invoice number without any manual entry, reducing errors and making your workflow more efficient.
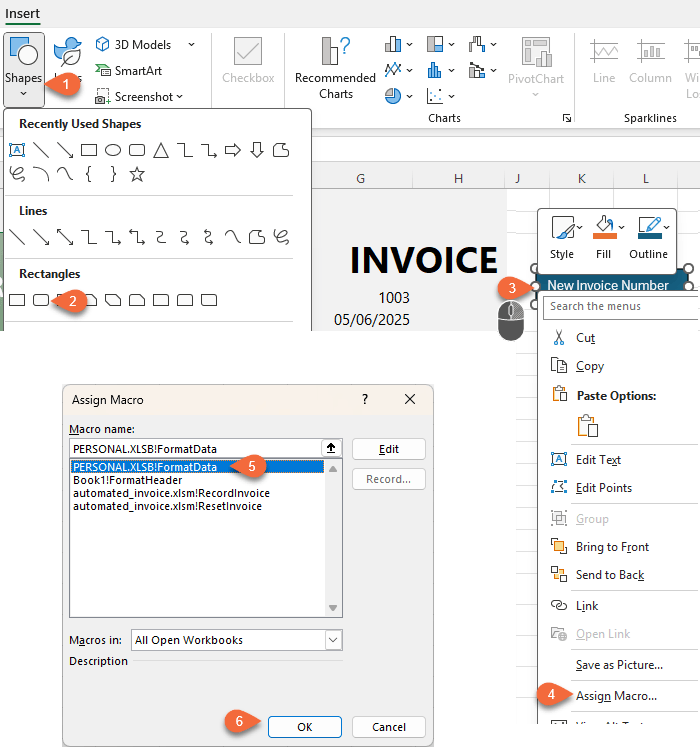
You can even assign this macro to a button on your worksheet, so users who aren’t familiar with VBA can just click “New Invoice Number” and it’s done - fast, reliable, and consistent.
I like to use Shapes for my macro buttons – see the image below or watch the video for how to set them up:
Loops: Automate Repetitive Tasks
Let’s say you’ve finished creating an invoice and want to clear the line items so the template is ready for the next one. Instead of manually deleting rows or starting over, this macro resets the invoice table automatically - keeping just the first row and clearing its contents.
Note: the table name is InvItems.
Here’s how to loop through the rows and delete all but the first:
Sub ResetInvoiceTable()
  Dim rowIndex As Long
  Dim tbl As ListObject
  Set tbl = Worksheets("Invoice").ListObjects("InvItems")
  For rowIndex = tbl.ListRows.Count To 2 Step -1
        tbl.ListRows(rowIndex).Delete
  Next rowIndex
  tbl.ListRows(1).Range.Resize(1, 5).ClearContents
End Sub
How This Macro Works:
- Dim rowIndex As Long
This declares a variable to keep track of the current row number during the loop. - Dim tbl As ListObject
This sets up a variable to reference the invoice table. - Set tbl = Worksheets("Invoice").ListObjects("InvItems")
This line tells VBA to look at the worksheet named "Invoice" and find a table named "InvItems". That table is stored in the tbl variable, so we can work with it easily.
The Loop:
- tbl.ListRows.Count gets the total number of rows currently in the table.
- The loop starts at the last row and works backward to row 2 (we leave row 1 intact).
- Step -1 means the loop counts downward.
- Deleting rows from bottom to top is important - if you go from top to bottom, the row numbers shift each time you delete, which causes rows to be skipped or errors to occur.
So, this loop deletes every row except the first one, preserving the table structure.
We loop backward to avoid row shifting issues. The last line clears the first 5 columns in row 1, keeping formats and formulas.
Clear the First Row’s Values:
- tbl.ListRows(1).Range targets the first row of the table.
- .Resize(1, 5) reduces the selection to just the first 5 columns (e.g. Product Code through to Discount).
- .ClearContents erases the cell values only, but keeps any formulas, dropdowns, and formatting intact.
The Result:
This macro gives you a clean, ready-to-use invoice table with all previous data removed but the layout and structure preserved. Perfect for forms or templates that need resetting without being rebuilt each time.
Message Boxes: Get User Input
So far, your macros have run automatically with no user input - which is great for automation. But what if you want to give the user a choice before taking action? For example, you may want to confirm a formatting change, prevent accidental deletions, or allow them to cancel a task.
That’s where the MsgBox function comes in.
Here's a simple macro that demonstrates this:
Sub ConfirmAction()
    Dim answer As VbMsgBoxResult
    answer = MsgBox("Do you want to format the cells?", vbYesNo)
    If answer = vbYes Then
        Range("A1:B1").Font.Bold = True
        Range("A1:B1").Interior.Color = RGB(200, 200, 255)
        MsgBox "Formatting complete!"
    Else
        MsgBox "Action cancelled."
    End If
End Sub
How This Macro Works:
- Dim answer As VbMsgBoxResult
This creates a variable named answer that will store the result of the message box. The VbMsgBoxResult data type allows you to capture whether the user clicked Yes or No. - answer = MsgBox("Do you want to format the cells?", vbYesNo)
This line displays a message box with a question and Yes/No buttons. The result (the button the user clicks) is stored in the answer variable. - If answer = vbYes Then ... Else ... End If
This conditional block checks the user's response:- If the user clicks Yes, the macro applies formatting to cells A1:B1 - bold font and a light purple fill.
- If the user clicks No, the macro shows a message confirming that the action was cancelled.
Why This Is Useful:
- It gives your macro interactivity - no more running blindly without user consent.
- You can prevent irreversible actions like deleting data unless the user confirms.
- It makes your VBA solutions more robust, especially if other people will be using them.
Example Use Cases:
- “Are you sure you want to delete this record?”
- “Would you like to clear the invoice details?”
- “Do you want to overwrite existing data?”
This simple use of MsgBox greatly enhances the usability and professionalism of your macros. And it’s just one example of how VBA lets you build more intelligent and user-friendly tools in Excel.
Saving Your Macros
If you write or record a macro and save the file as .xlsx, all your VBA code will be wiped.
To preserve your macros:
- Save as .xlsm (macro-enabled workbook)
- Or store in Personal Macro Workbook so it's always available
The "m" in .xlsm is for macros. Don’t forget it!
Before You Go Too Far With VBA...
VBA and macros are powerful tools, but don’t overuse them for things Excel already does well. If your work involves repetitive data cleanup, Power Query is almost always the better choice.
Check out this guide on automating data cleaning with Power Query.
Whether you're just getting started or building smarter spreadsheets, a little VBA goes a long way. Happy automating!
